Pioneer DJM-750 Owner's Manual - Page 21
Changing the settings, About the auto standby function, About the talk over function, Setting - software
 |
View all Pioneer DJM-750 manuals
Add to My Manuals
Save this manual to your list of manuals |
Page 21 highlights
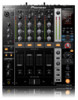
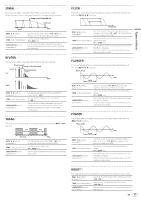
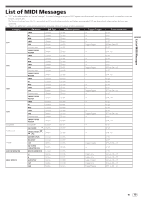
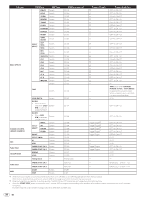
Changing the settings Changing the settings 1 Press the [SETUP (WAKE UP)] button for over 1 second. The [USER SETUP] screen is displayed. ! To display the [CLUB SETUP] screen, first turn this unit's power off, then press the [POWER] button while pressing the [SETUP (WAKE UP)] button. 2 Press the [BEAT c, d] button. Select the setting item. 3 Press the [TAP] button. The screen switches to the setting item's setting value change screen. 4 Press the [BEAT c, d] button. Change the setting value. 5 Press the [TAP] button. Enter the setting value. The previous screen reappears. ! To return to the previous screen without changing the settings, press the [AUTO/TAP] button. 6 Press the [SETUP (WAKE UP)] button. Close the [USER SETUP] screen. ! To close the [CLUB SETUP] screen, press the [POWER] button to turn this unit's power off. About the auto standby function When [Auto Standby] is set to [ON], the standby mode is set automatically if 4 hours pass with all of the conditions shown below met. - That none of this unit's buttons or controls are operated. - That no audio signals of -10 dB or greater are input to this unit's input terminals. ! When the [SETUP (WAKE UP)] button is pressed, the standby mode is canceled. ! This unit is shipped with the auto standby function turned on. If you do not want to use the auto standby function, set [Auto Standby] to [OFF]. About the talk over function The talk over function has the two modes described below. - [ADV] (advanced talk over): The mid-range only of the sound of chan- nels other than the [MIC] channel is attenuated according to the [Talk Over LEVEL] setting value and output. dB Frequency - [NOR] (normal talk over): The sound of channels other than the [MIC] channel is attenuated according to the [Talk Over LEVEL] setting value and output. dB Frequency Setting preferences *: Setting upon purchase Mode Options settings MIDI CH USER SETUP MIDI Button Type Talk Over Mode Screen display MIDI CH MIDI BT TLK MOD CLUB SETUP Talk Over LEVEL TLK LVL Digital Master Out Level Digital Master Out Sampling Rate DOUT LV DOUT FS MASTER ATT. MST ATT Auto Standby Mic Output To Booth Monitor Peak Limiter AUTOSTB MIC BTH PKLIMIT PC UTILITY PC UTLY Factory Reset INITIAL Setting value 1* to 16 TGL*, TRG ADV*, NOR -6 dB, -12 dB, -18 dB*, -24 dB -19 dB*, -15 dB, -10 dB, -5 dB Descriptions Sets the MIDI channel. Selects the MIDI signal transmission mode, [TGL (TOGGLE)] or [TRG (TRIGGER)]. Selects the talk over function's mode, [ADV(ADVANCED)] or [NOR(NORMAL)]. Sets the talk over function's sound attenuation level. Sets the maximum level of the sound output from the [DIGITAL MASTER OUT] terminals. 1 48 kHz, 96 kHz* Sets the digital signal's sampling rate. -6 dB, -3 dB, 0 dB* ON*, OFF ON*, OFF ON*, OFF ON*, OFF YES, NO* Sets the attenuation level of the sound output from the [MASTER1] and [MASTER2] terminals. Turns the auto standby function on and off. Sets whether or not to output the microphone's audio signals from [BOOTH] terminals. Lessens sudden, unpleasant digital clipping of the master output. Sets whether or not to launch the computer's setting utility software automatically when a USB cable is connected. Restores all the settings to their factory defaults. 1 Note that the output sound may be distorted even if the master level indicator does not light up to the very top. En 21
-
 1
1 -
2
-
3
-
4
-
5
-
6
-
7
-
8
-
9
-
10
-
11
-
12
-
13
-
14
-
15
-
 16
16 -
 17
17 -
 18
18 -
 19
19 -
 20
20 -
 21
21 -
 22
22 -
 23
23 -
 24
24 -
 25
25
 |
 |