Pioneer DMH-WT8600NEX Installation Manual - Page 10
Installation tips - head unit
 |
View all Pioneer DMH-WT8600NEX manuals
Add to My Manuals
Save this manual to your list of manuals |
Page 10 highlights
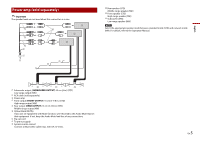
Monitor cover Binding head screw (4 mm × 12 mm) 5 Secure the monitor cable to the hook on the back of the LCD screen then attach the monitor cover ( ) by using the screws ( ). from the unit. For details, visit the Pioneer website for your region. For some types of vehicles, it is necessary to use an installation kit (sold separately) when installing. For details, visit the Pioneer website for your region. 1 First attach the supplied side brackets to the LCD screen ( ), then attach them to this unit ( ). After that, connect the monitor cable to the LCD screen ( ). Use either the binding head screws or flush surface screws, depending on the shape of the bracket's screw holes. TIP The amount of this unit's protrusion from the dashboard/console can be adjusted by shifting the position of the screw hole of this unit to the factory radio-mounting bracket. ▶DMH-W4600NEX/DMH-W4600NEX 1 Fasten this product to the factory radio-mounting bracket. Position this product so that its screw holes are aligned with the screw holes of the bracket, and tighten the screws at three locations on each side. Use either the truss head screws (5 mm × 9 mm) or flush surface screws (5 mm × 9 mm), depending on the shape of the bracket's screw holes. TIP The amount of this unit's protrusion from the dashboard/console can be adjusted by shifting the position of the screw hole of this unit to the factory radio-mounting bracket. Monitor cover Machine screw (2 mm × 4 mm) ▶DMH-WC6600NEX Installation tips The following procedure describes how to use the supplied parts to install this product with the LCD screen attached to the unit. It is also possible to install this product so that the LCD screen is separate 10 En Side bracket (for attaching LCD screen to unit) Binding head screw (5 mm) Be sure to use the screws supplied with this product. Monitor cable Attach the monitor cable to the unit with heat resistant tape (sold separately). 2 Fasten this product to the factory radio-mounting bracket. Position this product so that its screw holes are aligned with the screw holes of the bracket, and tighten the screws at three locations on each side. Factory radio-mounting bracket If the pawl interferes with installation, you may bend it down out of the way. Dashboard or console Binding head screw (8 mm) or flush surface screw Be sure to use the screws supplied with this product. Factory radio-mounting bracket If the pawl interferes with installation, you may bend it down out of the way. Dashboard or console
-
 1
1 -
2
-
3
-
4
-
 5
5 -
 6
6 -
 7
7 -
 8
8 -
 9
9 -
 10
10 -
 11
11 -
 12
12 -
 13
13 -
 14
14 -
 15
15 -
16
-
17
-
18
-
19
-
20
-
21
-
22
-
23
-
24
-
25
-
26
-
27
-
28
-
29
-
30
-
31
-
32
-
33
-
34
-
35
-
36
-
37
-
38
-
39
-
40
-
41
-
42
-
43
-
44
-
45
-
46
-
47
-
48
-
49
-
50
-
51
-
52
 |
 |
