Pioneer DVJ-X1 Owner's Manual - Page 28
Adjusting picture quality
 |
UPC - 012562683249
View all Pioneer DVJ-X1 manuals
Add to My Manuals
Save this manual to your list of manuals |
Page 28 highlights
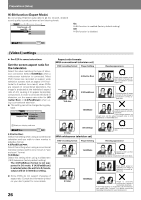
Preparations (Setup) 2. Press the ENTER button. The Picture Quality Controls menu will appear. 3. Use the cursor button's up/down sides (5/∞) to select the item you wish to adjust. Video Memory Select Video Setup 3. Select [Video Memory Select] and press the ENTER button. Fine Focus Move On Off ENTER Select DISPLAY Check When the DISPLAY button is pressed, a submenu list of the selected adjustment items will be displayed. Press the DISPLAY button once again to return to the previous menu. Standard Memory 1 Cinema Animation Memory 2 Memory 3 4. Use the four sides of the cursor button (2/3/5/ ∞) to select the desired preset picture quality. Standard: Reproduces the picture quality recorded on the disc as is. Cinema: Optimum for watching in a darkened room, to recreate the atmosphere of a movie theater. Animation: Produces bright, crisp colors, optimum for watching video animation. Memory1/Memory2/Memory3: Favorite picture quality settings can be recorded in memory, as described in the following section, "Adjusting picture quality". 5. Press the ENTER button. The Picture Quality Controls menu will close. If the Picture Quality Controls menu closes automatically, any set contents will be canceled. Adjusting picture quality 1. Use the four sides of the cursor button (2/3/5/ ∞) to select [Video2] \ [Video Adjust] \ [Start], then press the ENTER button. The Picture Quality Controls menu will appear. Fine Focus Contrast Sharpness Chroma Level Hue Memory On Off min max soft fine min max green red Off 1 2 3 Fine Focus: Set to [On] to reproduce high-resolution images. Contrast: Use to adjust the ratio between the brightest and darkest parts of the image. Sharpness: Use to adjust the image brightness with respect to the middle frequency range. This function is disabled when [Fine Focus] is set to [On]. Chroma Level: Use to adjust the depth of color. This function is particularly effective when watching heavily colored animations. Hue: Use to adjust the red-green balance (this function is disabled with component video signals). 4. Use the cursor button's left/right sides (2/3) to adjust the selected item's level. When setting [Fine Focus], select between [On] or [Off]. 5. Repeat steps 3-4 for all desired setting items. If you wish to record the selected settings in memory, use the cursor button's up/down sides (5/∞) to select [Memory], then use the cursor button's left/right (2/3) sides to select [1], [2], or [3] to record the combination of settings in the corresponding memory space. • If a combination of settings has previously been memo- rized in the selected memory space, the previous settings will be overwritten (erased) by the new settings. Video Memory Select Video Setup 2. Use the cursor button's up/down sides (5/∞) to select [Video Setup] and press the ENTER button. Video Memory Select Video Setup 28 Memory Move Off 1 2 3 ENTER Select DISPLAY Check 6. Press the ENTER button. The Picture Quality Controls menu will close. • If the ENTER button is not pressed, the newly modified picture quality control settings will not be recorded in [Memory]. • The effect of picture quality control changes may not appear as distinct with some DVDs and on some television sets. • Picture adjustments are reflected on interlaced output. When the [Progressive] is selected with [Component Out], picture adjustments are not applied to the component output.
-
 1
1 -
2
-
3
-
4
-
5
-
6
-
7
-
8
-
9
-
10
-
11
-
12
-
13
-
14
-
15
-
16
-
17
-
18
-
19
-
20
-
21
-
22
-
 23
23 -
 24
24 -
 25
25 -
 26
26 -
 27
27 -
 28
28 -
 29
29 -
 30
30 -
 31
31 -
 32
32 -
 33
33 -
34
-
35
-
36
-
37
-
38
-
39
-
40
-
41
-
42
-
43
-
44
-
45
-
46
-
47
-
48
-
49
-
50
-
51
-
52
 |
 |
