Pioneer DVR 108 Operating Instructions - Page 7
Anschl, Connections, Raccordement, Installation, Einbau
 |
View all Pioneer DVR 108 manuals
Add to My Manuals
Save this manual to your list of manuals |
Page 7 highlights
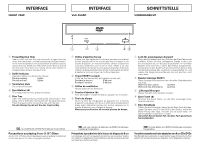
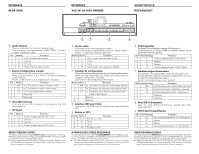
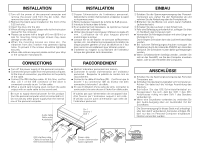
INSTALLATION 1 Turn off the power of the personal computer and remove the power cord from the AC outlet, then remove the cover or the front panel. 2 Remove the blank panel installed on the front of the 5.25 inch slot. 3 Insert the drive into the slot. 4 When affixing is required, please refer to the instruction manual for the computer. ÷ Please use screws with a length of 5 mm (3/16 in.) or less for mounting. Using longer screws may cause damage on the drive. ÷ When the mounting screws are loose etc., the vibrations from disc rotation may generate ripping noise. To prevent it the screws should be tightened securely. ÷ When slide rails are required, please contact your shop or the computer manufacturer. CONNECTIONS ÷ Turn off the power supply of the personal computer. ÷ Connect the power cable from the personal computer. At the time of connection, pay attention to the polarity of the cable. ÷ Connect the IDE interface cable. At this time, confirm that pin 1 of the IDE connector of the drive is connected correctly to pin 1 of the cable. ÷ When a sound card is being used, connect the audio output with an audio cable to the sound card. Be sure to supply electrical power for this product from the personal computer which is connected to it. Do not use any other power supply than the internal one of the personal computer. Audio Cable Câble audio Audiokabel INSTALLATION 1Couper l'alimentation de l'ordinateur personnel, débrancher le cordon d'alimentation et déposer le capot ou le panneau avant. 2 Retirer la plaque masquant de la fente de 5,25 pouces. 3 Introduire le lecteur dans la fente. 4 Si un ajustement est nécessaire, se reporter au manuel d'instruction de l'ordinateur. ÷ Utiliser des vis ayant une longueur inférieure ou égale à 5 mm. L'utilisation de vis plus longues pourrait endommager le lecteur. ÷ Lorsque les vis de fixation ne sont pas suffisamment serrées, etc., les vibrations provoquées par la rotation du disque peuvent générer un bruit de déchirure et il faut donc serrer les vis solidement pour éliminer ce bruit. ÷ S'adresser au magasin ou au fabricant de l'ordinateur lorsque des glissières sont nécessaires. RACCORDEMENT ÷ Mettre l'ordinateur personnel hors tension. ÷ Connecter le cordon d'alimentation de l'ordinateur personnel. Respecter la polarité du cordon lors du raccordement. ÷ Connecter le câble d'interface IDE. Confirmer que la broche 1 du connecteur IDE du lecteur est bien connectée à la broche 1 du câble. ÷ En cas d'utilisation d'une carte de sons, connecter la sortie audio à la carte de son à l'aide d'un câble audio. N'oubliez pas que l'alimentation de cet appareil doit être fournie par l'ordinateur auquel il est relié. N'utilisez aucune autre alimentation que celle de l'ordinateur personnel. Pin 1 Broche 1 Stift 1 EINBAU 1 Schalten Sie die Spannungsversorgung des PersonalComputers aus, ziehen Sie den Netzstecker ab und nehmen Sie die Abdeckung oder die Frontplatte ab. 2 Entfernen Sie die Blende von einem leeren 5,25-ZollLaufwerkschacht. 3 Schieben Sie das Laufwerk in den Schacht ein. 4 Falls eine Befestigung erforderlich ist, schlagen Sie bitte im Handbuch des Computers nach. ÷ Verwenden Sie Montageschrauben mit einer Länge von höchstens 5 mm. Durch längere Schrauben kann das Laufwerk beschädigt werden. ÷ Bei lockeren Befestigungsschrauben erzeugen die Vibrationen durch die rotierende DVD/CD ein störendes Geräusch. Die Schrauben müssen daher gut festgezogen werden. ÷ Wenn Schiebeschienen benötigt werden, wenden Sie sich an das Geschäft, wo Sie den Computer erworben haben, oder an den Hersteller des Computers. ANSCHLÜSSE ÷ Schalten Sie die Spannungsversorgung des PersonalComputers aus. ÷ Schließen Sie das Spannungskabel vom Computer an. Achten Sie dabei auf die richtige Ausrichtung des Steckers. ÷ Schließen Sie das IDE-Schnittstellenkabel an. Vergewissern Sie sich, daß der Stift 1 des IDEAnschlusses richtig mit dem Stift 1 des Steckers verbunden ist. ÷ Wenn eine Soundkarte vorhanden ist, verbinden Sie den Audio-Ausgang über ein Audiokabel mit der Soundkarte. Die Stromversorgung für dieses Greät muß unbedingt über den damit verbundenen Computer erfolgen. Es darf nur das im Personal-Computer eingebaute Netzteil verwendet werden. IDE Interface cable Câble d'interface IDE IDE-Schnittstellenkabel Power cable Cordon d'alimentation Spannungskabel - 7 - DC INPUT 1 2 5V G G 12V
-
 1
1 -
 2
2 -
 3
3 -
 4
4 -
 5
5 -
 6
6 -
 7
7 -
 8
8
 |
 |
