Pioneer DVR-531H-S Owner's Manual - Page 92
The Initial Setup menu
 |
View all Pioneer DVR-531H-S manuals
Add to My Manuals
Save this manual to your list of manuals |
Page 92 highlights
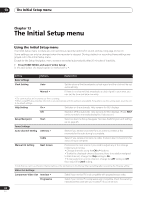
13 The Initial Setup menu Chapter 13 The Initial Setup menu Using the Initial Setup menu The Initial Setup menu is where you can set various recorder options for sound, picture, language and so on. Some settings can only be changed when the recorder is stopped. During playback or recording these settings are grayed out in the Initial Setup menu. Except for the Setup Navigator, menu screens are exited automatically after 20 minutes of inactivity. • Press HOME MENU and select 'Initial Setup'. In the table below, the default option is marked with a •. Setting Options Explanation Basic Settings Clock Setting Auto Set the channel that broadcasts a clock signal and the clock will be set automatically. Manual • If there is no channel that broadcasts a clock signal in your area, you can set the time and date manually. • The clock must be set in order to use timer recording. • When using EPG data download, the clock is set automatically and this setting is unavailable. To be able to use this setting again, reset the unit to its default settings. Help Setting On • Switches on the automatic Help screens for GUI displays. Off Switches off the automatic Help screens for GUI displays. (Press HELP on the remote to manually display the Help screen.) Setup Navigator Start Select to start the Setup Navigator. See also Switching on and setting up on page 25. Tuner Settings Auto Channel Setting Antenna • Select if you receive channels from an antenna. It takes a few moments for the auto tuning to complete. Cable Select if you receive channels via cable. It takes a few moments for the auto tuning to complete. Manual CH Setting Next Screen Proceed to the next screen if you need to adjust any of the settings made by auto tuning. • Change channels using the CH +/- buttons. • To skip the displayed channel (because there is no station assigned to that channel), change the Skip setting to On. • To manually fine tune the channel, change the AFT setting to Off then adjust the Level setting. • Note that you can't use the Auto Channel Setting or the skip feature (in the Manual Channel Setting) after completing the TV Guide setting. Video Out Settings Component Video Out Interlace • Select if your monitor/TV is not compatible with progressive-scan video. Progressive Select if your monitor/TV is progressive-scan compatible. Check the operating instructions that came with your monitor/TV if you're not sure. 92 En
-
 1
1 -
2
-
3
-
4
-
5
-
6
-
7
-
8
-
9
-
10
-
11
-
12
-
13
-
14
-
15
-
16
-
17
-
18
-
19
-
20
-
21
-
22
-
23
-
24
-
25
-
26
-
27
-
28
-
29
-
30
-
31
-
32
-
33
-
34
-
35
-
36
-
37
-
38
-
39
-
40
-
41
-
42
-
43
-
44
-
45
-
46
-
47
-
48
-
49
-
50
-
51
-
52
-
53
-
54
-
55
-
56
-
57
-
58
-
59
-
60
-
61
-
62
-
63
-
64
-
65
-
66
-
67
-
68
-
69
-
70
-
71
-
72
-
73
-
74
-
75
-
76
-
77
-
78
-
79
-
80
-
81
-
82
-
83
-
84
-
85
-
86
-
 87
87 -
 88
88 -
 89
89 -
 90
90 -
 91
91 -
 92
92 -
 93
93 -
 94
94 -
 95
95 -
 96
96 -
 97
97 -
98
-
99
-
100
-
101
-
102
-
103
-
104
-
105
-
106
-
107
-
108
-
109
-
110
-
111
-
112
-
113
-
114
-
115
-
116
 |
 |
