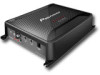
Pioneer GM-D8601 Owner's Manual
Pioneer GM-D8601 Manual
 |
View all Pioneer GM-D8601 manuals
Add to My Manuals
Save this manual to your list of manuals |
Pioneer GM-D8601 manual content summary:
- Pioneer GM-D8601 | Owner's Manual - Page 1
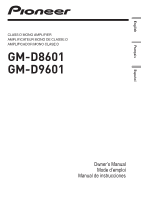
English Français Español CLASS D MONO AMPLIFIER AMPLIFICATEUR MONO DE CLASSE D AMPLIFICADOR MONO CLASE D GM-D8601 GM-D9601 Owner's Manual Mode d'emploi Manual de instrucciones - Pioneer GM-D8601 | Owner's Manual - Page 2
CAUTIONs in this manual. Please keep the manual in a safe and accessible place for future reference. After-sales service for Pioneer products Please contact U.S.A. Pioneer Electronics (USA) Inc. CUSTOMER SUPPORT DIVISION P.O. Box 1760 Long Beach, CA 90801-1760 800-421-1404 CANADA Pioneer Electronics - Pioneer GM-D8601 | Owner's Manual - Page 3
the RCA input of this product, output is mixed because this product is a mono amplifier. Before connecting/ installing the amplifier installing this unit, make sure to connect the ground wire first. Ensure that the ground wire is properly connected to metal parts of the car's body. The ground wire - Pioneer GM-D8601 | Owner's Manual - Page 4
the temperature inside the amplifier gets too high. - If a DC voltage is applied to the speaker output terminal. ! The POWER/PROTECT indicator will turn red and the output will be muted in the situations outlined below. - If the speaker output terminal and speaker wire are short-circuited. Important - Pioneer GM-D8601 | Owner's Manual - Page 5
instruction of connecting the bass boost remote control to the amplifier, see the Connection diagram on page 7. To adjust the switch, use a flathead screwdriver if needed. 1 POWER/PROTECT indicator The power indicator lights up to indicate power ON. ! If something is not normal, the indicator turns - Pioneer GM-D8601 | Owner's Manual - Page 6
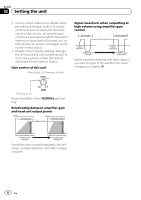
cuts out periodically. In such cases, please contact the nearest authorized Pioneer Service Station. Gain control of this unit Preout level: 2 V (Standard: 500 mV) Signal waveform when outputting at high volume using amplifier gain control Signal waveform distorted with high output, if you raise - Pioneer GM-D8601 | Owner's Manual - Page 7
. 7 Car stereo with RCA output jacks (sold separately) 8 External output 9 Connecting wire with RCA pin plugs (sold se- parately) a Amplifier with RCA input jacks (sold sepa- rately) b Bass boost level remote control c Bass boost level remote control wire (5 m (16 ft. 5 in.)) d RCA input jack e RCA - Pioneer GM-D8601 | Owner's Manual - Page 8
cables. ! If the system remote control wire of the amplifier is connected to the power terminal via the ignition switch (12 V DC), the amplifier will remain on with the ignition whether the car stereo is on or off, which may exhaust battery if the engine is at rest or idling. ! Install and route the - Pioneer GM-D8601 | Owner's Manual - Page 9
, connect the head unit and all amplifiers via the system remote control wire. ! Connect the system remote control wire when you wish to only turn on the car stereo, not the amplifier. ! This amplifier automatically selects an input signal mode between the RCA level and the speaker level by - Pioneer GM-D8601 | Owner's Manual - Page 10
is 30 cm (12 in.). 3 Fuse 100 A (GM-D8601) / 150 A (GM-D9601) (sold separately) Each amplifier must be separately fused at 100 A (GM-D8601) / 150 A (GM-D9601). 2 Use wire cutters or a utility knife to strip the end of the battery wire, ground wire and system remote control wire to expose about 10 mm - Pioneer GM-D8601 | Owner's Manual - Page 11
- pending on the car model. Secure the amplifier at a sufficiently rigid location. ! Check all connections and systems before final installation. ! After installing the amplifier, confirm that the spare tire, jack and tools can be easily removed. Attaching the Bass boost remote control Attach with - Pioneer GM-D8601 | Owner's Manual - Page 12
3 Install the amplifier with the use of supplied tapping screws (4 mm × 18 mm ( 5/32 in. × 3/4 in.)). 1 3 2 4 5 1 Tapping-screws (4 mm × 18 mm (5/32 in. × 3/4 in.)) 2 Drill a 2.5 mm (3/32 in.) diameter hole. 3 Floor mat or chassis 4 Hole-to-hole distance: 257 mm (10-1/8 in.) (GM-D8601) / 307 - Pioneer GM-D8601 | Owner's Manual - Page 13
Hz Cut off slope 12 dB/oct Bass boost: Frequency 50 Hz Level 0 dB to 18 dB Gain control: RCA 200 mV to 6.5 V Speaker 0.8 V to 16 V Maximum input level / impedance: RCA 6.5 V / 25 kW Speaker 16 V / 12 kW CEA2006 Specifications Power output 300 W RMS × 1 Channel (at 14.4 V, 4 W, 20 Hz to 240 - Pioneer GM-D8601 | Owner's Manual - Page 14
CEA2006 Specifications Power output 500 W RMS × 1 Channel (at 14.4 V, 4 W, 20 Hz to 240 Hz and ≦ 1 % THD+N) 800 W RMS × 1 Channel (at 14.4 V, 2 W, 100 Hz and ≦ 1 % THD+N) 1 200 W RMS × 1 audio signal is input. Use this value when working out total current drawn by multiple power amplifiers. 14 En - Pioneer GM-D8601 | Owner's Manual - Page 15
-dessous sans avoir pris contact au préalable. États-Unis Pioneer Electronics (USA) Inc. CUSTOMER SUPPORT DIVISION P.O. Box 1760 Long Beach, CA 90801-1760 800-421-1404 CANADA Pioneer Électroniques du Canada, Inc. DÉPARTEMENT DE SERVICE AUX CONSOMMATEURS 340 Ferrier Street Unit 2 Markham, Ontario L3R - Pioneer GM-D8601 | Owner's Manual - Page 16
optimal de votre matériel et - plus important encore - la protection de votre ouïe, réglez le volume à un niveau raisonnable. Pour à l'entrée RCA de ce produit, la sortie sera combinée étant donné que ce produit est un amplificateur mono. Avant de connecter/ d'installer l'amplificateur ATTENTION ! - Pioneer GM-D8601 | Owner's Manual - Page 17
de protéger le produit et la sortie du haut-parleur. ! L'indicateur POWER/PROTECT devient rouge et l'amplificateur se met hors service dans les situations indiquées ci-dessous. - Si la température à l'intérieur de l'amplifi- cateur est trop élevée. - Si une tension CC est appliquée à la borne - Pioneer GM-D8601 | Owner's Manual - Page 18
Hz. 4 Jack BASS BOOST REMOTE (télécommande du niveau d'accentuation des graves) En connectant la télécommande du niveau d'accentuation des graves au jack de l'appareil central, vous pourrez sélectionner le niveau d'accentuation de graves entre 0 dB et 18 dB. Pour des instructions sur la connexion - Pioneer GM-D8601 | Owner's Manual - Page 19
02 Français Réglage correct du gain ! Fonction de protection incluse pour éviter tout dysfonctionnement de l'appareil et/ou des cas, veuillez contacter le Centre d'entretien agréé par Pioneer le plus proche. Commande de gain de l'appareil Niveau de préamp : 2 V (standard : 500 mV) Relation entre - Pioneer GM-D8601 | Owner's Manual - Page 20
du niveau d'accentuation des graves (5 m) d Jack d'entrée RCA e Jack de sortie RCA f Fil de la télécommande du système (vendu séparé instructions de connexion des hautparleurs. Reportez-vous à la page 22, Connexions lors de l'utilisation du fil d'entrée des haut-parleurs. h Fusible 40 A × 2 (GM-D8601 - Pioneer GM-D8601 | Owner's Manual - Page 21
d'autres équipements. La capacité en courant du fil est limitée. PRÉCAUTION ! Ne raccourcissez jamais aucun fil, faute de quoi le circuit de protection risque de fonctionner de manière incorrecte. ! Ne câblez jamais le câble négatif du haut-parleur directement à la masse. ! Ne réunissez jamais - Pioneer GM-D8601 | Owner's Manual - Page 22
RCA Vers le jack d'entrée RCA de cet appareil Remarques ! Si les fils des haut-parleurs avec cordon RCA d'un appareil central sont connectés à cet amplificateur, l'amplificateur se met automatiquement en service La taille de fils recommandée (AWG : American Wire Gauge) est la suivante. Le fil de la - Pioneer GM-D8601 | Owner's Manual - Page 23
et la borne positive + de la batterie est de 30 cm. 3 Fusible 100 A (GM-D8601) / 150 A (GMD9601) (vendu séparément) Chaque amplificateur doit être doté d'un fusible distinct de 100 A (GM-D8601) / 150 A (GM-D9601). 2 Utilisez une pince coupante ou un couteau à lame rétractable pour dénuder l'extr - Pioneer GM-D8601 | Owner's Manual - Page 24
Section 03 Connexion des appareils Connexion des bornes de sortie des haut-parleurs 1 Utilisez une pince coupante ou un couteau à lame rétractable pour dénuder l'extrémité des fils des haut-parleurs et exposer environ 10 mm de fil, puis torsadez le fil. Torsadez 10 mm 2 Connectez les fils des haut- - Pioneer GM-D8601 | Owner's Manual - Page 25
fils ne sont pas coincés dans le mécanisme coulissant des sièges ou ne touchent pas les jambes d'un passager, car cela pourrait entraîner un court-circuit. ! Lorsque vous percez pour installer l'amplificateur, vérifiez toujours qu'il n'y a aucune pièce derrière le panneau et que tous les câbles et - Pioneer GM-D8601 | Owner's Manual - Page 26
Section 04 Installation 3 Installez l'amplificateur à l'aide des vis autotaraudeuses fournies (4 mm × 18 mm ). 1 3 2 4 5 1 Vis autotaraudeuses (4 mm × 18 mm ) 2 Percez un trou de 2,5 mm de diamètre. 3 Tapis de sol ou châssis 4 Distance entre les trous : 257 mm (GM- D8601) / 307 mm (GM-D9601) 5 - Pioneer GM-D8601 | Owner's Manual - Page 27
Annexe Informations complémentaires Français Caractéristiques techniques GM-D8601 Tension d'alimentation ......... 14,4 V CC (10,8 V à 15,1 V 0 dB à 18 dB Commande de gain : RCA 200 mV à 6,5 V Haut-parleur 0,8 V à 16 V Niveau d'entrée maximal/impédance : RCA 6,5 V / 25 kW Haut-parleur 16 V - Pioneer GM-D8601 | Owner's Manual - Page 28
Annexe Informations complémentaires Haut-parleur 16 V / 12 kW Caractéristiques CEA2006 Puissance de sortie 500 W eff. × 1 voie (à 14,4 V, 4 W, 20 Hz à 240 Hz et ≦ 1 % DHT+N) 800 W eff. × 1 voie (à 14,4 V, 2 W, 100 Hz et ≦ 1 % DHT +N) 1 200 W eff. × 1 voie (à 14,4 V, 1 W, 100 Hz et ≦ 1 % DHT+N) - Pioneer GM-D8601 | Owner's Manual - Page 29
robo. ! Acceso a manuales de instrucciones, información sobre piezas de recambio y mucho más. EE.UU. Pioneer Electronics (USA) Inc. CUSTOMER SUPPORT DIVISION P.O. Box 1760 y R (derecho) están conectados a la entrada RCA de este producto, la salida se mezcla debido a que este producto es un amplificador mono - Pioneer GM-D8601 | Owner's Manual - Page 30
la batería. ! Siempre conecte primero el cable a tierra cuando instale esta unidad. Dicho cable debe estar conectado adecuadamente a las partes (GM-D8601) / 500 W (GM-D9601) o superior y una impedancia de 4 W, 2: un altavoz de subgraves con una entrada nominal de 500 W (GM-D8601) / 800 W (GM-D9601 - Pioneer GM-D8601 | Owner's Manual - Page 31
demasiado la temperatura del interior del amplificador. - Si se aplica un voltaje CC al terminal de salida del altavoz. ! El indicador POWER/PROTECT se iluminará en rojo y la salida de sonido se silenciará en las situaciones indicadas a continuación. - Si se encuentran cortocircuitados el terminal - Pioneer GM-D8601 | Owner's Manual - Page 32
GM-D8601 Parte delantera 1 23 4 Parte trasera GM-D9601 Parte delantera 1 23 4 Parte trasera Para ajustar el interruptor, si es preciso utilice un destornillador de cabeza plana. 1 Indicador POWER/PROTECT vehículo Pioneer provisto de RCA, con Hz. 4 Conector BASS BOOST REMOTE (mando a distancia - Pioneer GM-D8601 | Owner's Manual - Page 33
ganancia, el sonido de la unidad aún se interrumpe cada cierto tiempo. De presentarse esta situación, contacte con el servicio técnico oficial Pioneer más cercano a su domicilio. Control de ganancia de esta unidad Nivel de salida del preamplificador: 2 V (estándar: 500 mV) Relación entre ganancia - Pioneer GM-D8601 | Owner's Manual - Page 34
del nivel de intensificación de graves (5 m) d Toma de entrada RCA e Toma de salida RCA f Cable de control a distancia del sistema (se vende por separado) cable de entrada del altavoz en la página 36. h Fusible 40 A × 2 (GM-D8601) / 40 A × 3 (GMD9601) i Parte delantera j Parte trasera Antes de - Pioneer GM-D8601 | Owner's Manual - Page 35
, lo que puede agotar la batería si el motor permanece inactivo o en marcha al ralentí. ! Instale y pase el cable de la batería (adquirido por separado) lo más lejos posible de los cables del altavoz. Instale y pase el cable de la batería (adquirido por separado), junto con el cable de puesta - Pioneer GM-D8601 | Owner's Manual - Page 36
al amplificador utilizando el cable de entrada del altavoz facilitado con el cable del conector RCA. 1 Estéreo del vehículo 2 Salida del altavoz 3 Rojo: derecha + selecciona automáticamente un modo de señal de entrada entre el nivel RCA y el nivel del altavoz mediante la detección de una señal de - Pioneer GM-D8601 | Owner's Manual - Page 37
el fusible y el terminal positivo + de la batería es de 30 cm. 3 Fusible 100 A (GM-D8601) / 150 A (GMD9601) (se vende por separado) Cada amplificador ha de llevar sus propios fusibles de 100 A (GM-D8601) / 150 A (GMD9601). 2 Utilice un cortaalambres o un cutter para pelar los extremos del cable de - Pioneer GM-D8601 | Owner's Manual - Page 38
Sección 03 Conexión de las unidades Conexión de los terminales de salida del altavoz 1 Utilice un cortaalambres o un cúter para pelar los extremos de los cables de los altavoces aproximadamente 10 mm y trence el cable. Gírelos 10 mm 2 Conecte los cables del altavoz a los terminales de salida del - Pioneer GM-D8601 | Owner's Manual - Page 39
Instalación Sección 04 Español Antes de instalar el amplificador ADVERTENCIA ! Para garantizar una instalación correcta, utili- ce las piezas facilitadas del modo indicado. El uso de otras piezas diferentes a las facilitadas, puede dañar las partes internas del amplificador o aflojarse haciendo - Pioneer GM-D8601 | Owner's Manual - Page 40
Instale el amplificador utilizando los tornillos con rosca cortante facilitados (4 mm x 18 mm). 1 3 2 4 5 1 Tornillos de rosca cortante (4 mm × 18 mm) 2 Perfore un orificio de 2,5 mm de diámetro. 3 Moqueta o chasis del automóvil 4 Distancia entre agujero y agujero: 257 mm (GM-D8601) / 307 mm (GM - Pioneer GM-D8601 | Owner's Manual - Page 41
Especificaciones GM-D8601 Fuente de ón de señal a ruido .... 100 dB (red IHF-A) Filtro de paso bajo: Frecuencia de corte RCA 200 mV a 6,5 V Altavoz 0,8 V a 16 V Nivel de entrada máximo / impedancia: RCA 6,5 V / 25 kW Altavoz 16 V / 12 kW Especificaciones CEA2006 Potencia de salida 300 W RMS - Pioneer GM-D8601 | Owner's Manual - Page 42
Nivel de entrada máximo / impedancia: RCA 6,5 V / 25 kW Altavoz 16 V / 12 kW Especificaciones CEA2006 Potencia de salida 500 W RMS × 1 canal (a 14,4 V, 4 W, 20 Hz a 240 Hz y ≦ 1 % THD+N) 800 W RMS × 1 canal (a 14,4 V, 2 W, 100 Hz y ≦ 1 % THD+N) 1 200 W RMS × 1 canal (a 14,4 V, 1 W, 100 Hz - Pioneer GM-D8601 | Owner's Manual - Page 43
Español Es 43 - Pioneer GM-D8601 | Owner's Manual - Page 44
ELECTRONICS OF CANADA, INC. 340 Ferrier Street, Unit 2, Markham, Ontario L3R 2Z5, Canada TEL: 1-877-283-5901 TEL: 905-479-4411 PIONEER ELECTRONICS DE MEXICO, S.A. de C.V. Blvd.Manuel Avila Camacho 138 10 piso Col.Lomas de Chapultepec, Mexico, D.F. 11000 TEL: 55-9178-4270 407號8 886-(0)2-2657
-
 1
1 -
 2
2 -
 3
3 -
 4
4 -
 5
5 -
 6
6 -
 7
7 -
8
-
9
-
10
-
11
-
12
-
13
-
14
-
15
-
16
-
17
-
18
-
19
-
20
-
21
-
22
-
23
-
24
-
25
-
26
-
27
-
28
-
29
-
30
-
31
-
32
-
33
-
34
-
35
-
36
-
37
-
38
-
39
-
40
-
41
-
42
-
43
-
44
 |
 |

Owner’s Manual
Mode d’emploi
Manual de instrucciones
CLASS D MONO AMPLIFIER
AMPLIFICATEUR MONO DE CLASSE D
AMPLIFICADOR MONO CLASE D
English
Français
Español
GM-D8601
GM-D9601