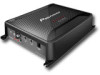
Pioneer GM-D8601 Owner's Manual - Page 9
Connections when using, the speaker input wire, Solderless terminal, connections, Connecting - rca input not working
 |
View all Pioneer GM-D8601 manuals
Add to My Manuals
Save this manual to your list of manuals |
Page 9 highlights
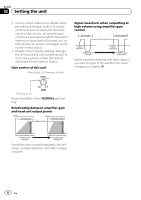
Connecting the units Section 03 English Connections when using the speaker input wire Connect the car stereo speaker output wires to the amplifier using the supplied speaker input wire with RCA pin cord. 1 Car Stereo 2 Speaker output 3 Red: Right + 4 Black: Right * 5 Black: Left * 6 White: Left + 7 Speaker input wire with RCA pin cord To the RCA input jack of this unit Notes ! If speaker wires with an RCA pin cord from a headunit are connected to this amplifier, the amplifier will automatically turn on when the headunit is turned on. When the headunit is turned off, the amplifier turns off automatically. This function may not work with some headunits. In such cases, please use a system remote control wire (sold separately). If multiple amplifiers are to be connected together synchronously, connect the head unit and all amplifiers via the system remote control wire. ! Connect the system remote control wire when you wish to only turn on the car stereo, not the amplifier. ! This amplifier automatically selects an input signal mode between the RCA level and the speaker level by detecting an input signal. Solderless terminal connections ! Since the wire will become loose over time, it must be periodically inspected and tightened as necessary. ! Do not solder or bind the ends of the twisted wires. ! Fasten while making sure to not to clamp the insulating sheath of the wire. ! Use the supplied hexagonal wrench to tighten and loosen the terminal screw of the amplifier and use it to securely fasten the wire. Be careful to avoid excessive tightening of this screw, which may damage the wire. Connecting the power terminal WARNING If the battery wire is not securely fixed to the terminal using the terminal screws, there is a risk of overheating, malfunction and injury, including minor burns. ! Always use the recommended battery and ground wire, which is sold separately. Connect the battery wire directly to the car battery positive (+) terminal and the ground wire to the car body. ! Recommended wires size (AWG: American Wire Gauge) is as follows. The battery wire, the ground wire and the optional direct ground wire must be same size. ! Use a wire of 8 AWG to 16 AWG wire for the speaker wire. Battery wire and ground wire size Wire length less than 3.6 m (11 ft. 10 in.) less than 6.4 m (20 ft. 12 in.) Wire size 6 AWG 4 AWG En 9
-
 1
1 -
2
-
3
-
 4
4 -
 5
5 -
 6
6 -
 7
7 -
 8
8 -
 9
9 -
 10
10 -
 11
11 -
 12
12 -
 13
13 -
 14
14 -
15
-
16
-
17
-
18
-
19
-
20
-
21
-
22
-
23
-
24
-
25
-
26
-
27
-
28
-
29
-
30
-
31
-
32
-
33
-
34
-
35
-
36
-
37
-
38
-
39
-
40
-
41
-
42
-
43
-
44
 |
 |
