Pioneer PRO-151FD Owner's Manual - Page 122
Add a Computer PC
 |
UPC - 012562887128
View all Pioneer PRO-151FD manuals
Add to My Manuals
Save this manual to your list of manuals |
Page 122 highlights
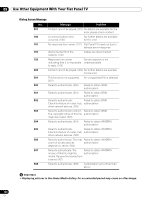
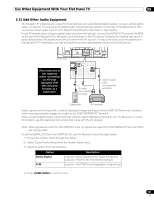
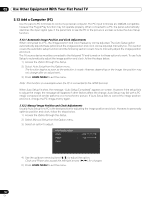
05 Use Other Equipment With Your Flat Panel TV 5.13 Add a Computer (PC) Use the panel's PC terminals to connect a personal computer. The PC input terminals are DDC2B-compatible; however, the Plug & Play function may not operate properly. When connected to a PC, the panel automatically identifies the input signal type. If the panel fails to see the PC or the picture is unclear, activate the Auto Setup function. 5.13.1 Automatic Image Position and Clock Adjustments When connected to a PC, the image position and clock frequency can be adjusted. The Auto Setup option automatically adjusts these options but the image position and clock can be adjusted manually too. This section covers the automatic setup function and the following section covers how to manually adjust the image position and clock. The AV source device must be connected to the flat panel TV and turned on for these options to work. To use Auto Setup to automatically adjust the image position and clock, follow the steps below. 1 ) Access the Option through the Setup. 2 ) Select Auto Setup from the Option menu. The function begins as soon as the selection is made. However, depending on the image, the position may not change after an adjustment. 3 ) Press HOME MENU to exit the menu. Note: This function is unavailable when the PC is connected to the HDMI terminal. When Auto Setup finishes, the message, "Auto Setup Completed" appears on screen. However, if the setup fails to adjust the image, the message still appears if other factors affect the change. Auto Setup may fail with a PC image composed of similar patterns or a monochrome picture. If Auto Setup fails to correct the image position and clock, change the PC image and try again. 5.13.2 Manual Image Position and Clock Adjustments Usually Auto Setup for a PC is the best practice for adjusting the image position and clock. However, to personally optimize position and clock, follow the steps below. 1 ) Access the Option through the Setup. 2 ) Select Manual Setup from the Option menu. 3 ) Select an option to adjust. H/V Position Adjust Clock : +120 Phase : +15 Reset 4 ) Use the up/down arrow buttons (/) to adjust the option. Clock and Phase also accept the left/right arrows (/) for changes. 5 ) Press HOME MENU to exit the menu. 122 En
-
 1
1 -
2
-
3
-
4
-
5
-
6
-
7
-
8
-
9
-
10
-
11
-
12
-
13
-
14
-
15
-
16
-
17
-
18
-
19
-
20
-
21
-
22
-
23
-
24
-
25
-
26
-
27
-
28
-
29
-
30
-
31
-
32
-
33
-
34
-
35
-
36
-
37
-
38
-
39
-
40
-
41
-
42
-
43
-
44
-
45
-
46
-
47
-
48
-
49
-
50
-
51
-
52
-
53
-
54
-
55
-
56
-
57
-
58
-
59
-
60
-
61
-
62
-
63
-
64
-
65
-
66
-
67
-
68
-
69
-
70
-
71
-
72
-
73
-
74
-
75
-
76
-
77
-
78
-
79
-
80
-
81
-
82
-
83
-
84
-
85
-
86
-
87
-
88
-
89
-
90
-
91
-
92
-
93
-
94
-
95
-
96
-
97
-
98
-
99
-
100
-
101
-
102
-
103
-
104
-
105
-
106
-
107
-
108
-
109
-
110
-
111
-
112
-
113
-
114
-
115
-
116
-
 117
117 -
 118
118 -
 119
119 -
 120
120 -
 121
121 -
 122
122 -
 123
123 -
 124
124 -
 125
125 -
 126
126 -
 127
127 -
128
-
129
-
130
-
131
-
132
-
133
-
134
-
135
-
136
-
137
-
138
-
139
-
140
-
141
-
142
-
143
-
144
-
145
-
146
-
147
-
148
-
149
-
150
-
151
-
152
-
153
-
154
-
155
-
156
-
157
-
158
-
159
-
160
-
161
-
162
-
163
-
164
-
165
-
166
-
167
 |
 |