Pioneer PRO-151FD Owner's Manual - Page 26
Attach the Color Sensor
 |
UPC - 012562887128
View all Pioneer PRO-151FD manuals
Add to My Manuals
Save this manual to your list of manuals |
Page 26 highlights
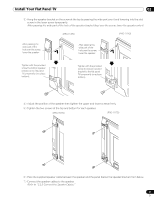
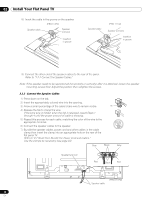
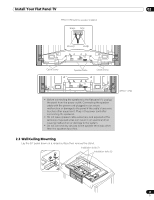
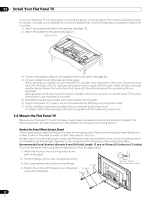
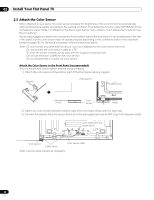
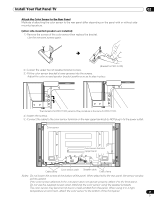
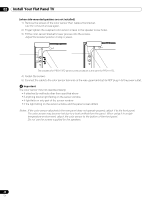
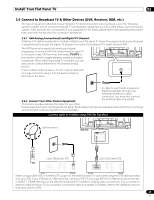
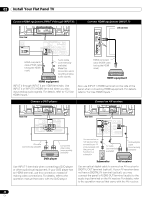
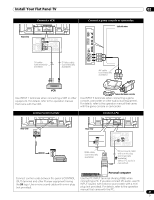
02 Install Your Flat Panel TV 2.5 Attach the Color Sensor When attached to your panel, the color sensor analyses the brightness of the environment to automatically optimize the picture quality according to the viewing condition. To activate this function, select OPTIMUM on the AV Selection menu, Mode 1 or Mode 2 on the Room Light Sensor menu (refer to "3.4.1 Adjust the Picture for Your Room Lighting." We strongly suggest you attach the color sensor to the bottom right of the front panel. It can be attached to the rear of the panel, but the color sensor may not operate properly depending on the conditions (refer to the Important bullets on page 28). For the actual procedure, follow the directions below. Note: Do not connect any other external device, such as a keyboard to the color sensor terminal. Do not connect the color sensor cable to a PC. To clean the sensor window, gently wipe with the supplied cleaning cloth. Do not use extension cables for the color sensor. Do not disassemble or modify the color sensor. Attach the Color Sensor to the Front Panel (recommended) This is a simple and easy-to-attach method using a magnet. 1 ) Attach the color sensor at the bottom right of the front panel using a magnet. Magnet Flat panel TV (Front) Color sensor (Rear) 2 ) Attach the color sensor along the bottom edge of the front panel flush with the right side. 3 ) Connect the cable to the color sensor terminal on the rear upper bank but do NOT plug in to the power outlet. Color sensor terminal (upper bank) Color sensor Cable clamp Color sensor cable Note: Use the cable clamps as necessary. 26 En
-
 1
1 -
2
-
3
-
4
-
5
-
6
-
7
-
8
-
9
-
10
-
11
-
12
-
13
-
14
-
15
-
16
-
17
-
18
-
19
-
20
-
 21
21 -
 22
22 -
 23
23 -
 24
24 -
 25
25 -
 26
26 -
 27
27 -
 28
28 -
 29
29 -
 30
30 -
 31
31 -
32
-
33
-
34
-
35
-
36
-
37
-
38
-
39
-
40
-
41
-
42
-
43
-
44
-
45
-
46
-
47
-
48
-
49
-
50
-
51
-
52
-
53
-
54
-
55
-
56
-
57
-
58
-
59
-
60
-
61
-
62
-
63
-
64
-
65
-
66
-
67
-
68
-
69
-
70
-
71
-
72
-
73
-
74
-
75
-
76
-
77
-
78
-
79
-
80
-
81
-
82
-
83
-
84
-
85
-
86
-
87
-
88
-
89
-
90
-
91
-
92
-
93
-
94
-
95
-
96
-
97
-
98
-
99
-
100
-
101
-
102
-
103
-
104
-
105
-
106
-
107
-
108
-
109
-
110
-
111
-
112
-
113
-
114
-
115
-
116
-
117
-
118
-
119
-
120
-
121
-
122
-
123
-
124
-
125
-
126
-
127
-
128
-
129
-
130
-
131
-
132
-
133
-
134
-
135
-
136
-
137
-
138
-
139
-
140
-
141
-
142
-
143
-
144
-
145
-
146
-
147
-
148
-
149
-
150
-
151
-
152
-
153
-
154
-
155
-
156
-
157
-
158
-
159
-
160
-
161
-
162
-
163
-
164
-
165
-
166
-
167
 |
 |
