Pioneer PRO-151FD Owner's Manual - Page 126
Issue, Possible Solutions
 |
UPC - 012562887128
View all Pioneer PRO-151FD manuals
Add to My Manuals
Save this manual to your list of manuals |
Page 126 highlights
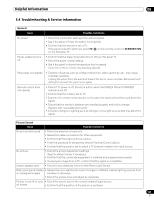
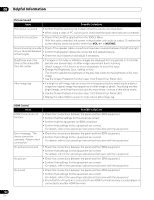
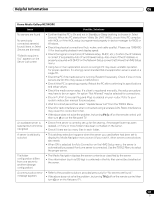
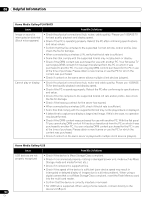
06 Helpful Information Picture/Sound Issue Possible Solutions Picture but no sound • Confirm that the sound is not muted or that the volume is turned down. • When using a video or PC input source, check that the audio terminals are connected. Sound but no picture • Check if Picture Off is selected from the TOOLS Menu. With this option selected, the screen is deactivated; only audio is output. To restore the screen display, press any button other than VOL +/- or MUTING. Sound is wrong (one side • Check if the speaker cable connections have been reversed between the left and right. only or reversed between • Confirm that speaker cables are connected and seated properly. left and right) • Check the sound balance and adjust if necessary. Brightness and color tone on the sides differ from the center • If images in 4:3 mode or letterbox images are displayed for long periods or for shorter periods over several days, an after-image may remain due to burning. Watch images in Full screen as much as possible to avoid this issue. • Change the Brightness Sync. setting to Auto. This function adjusts the brightness of the gray side masks for the brightness of the main image. • Use the Screen Protection function (see "3.6.2 Extend Your Panel Life"). After-image lag • If a bright or still image was on screen for a long period before switching to a darker image the original image may appear as an after-image or ghost. Try playing another bright image, switching the picture quickly many times, or show a very active scene. • Use the Screen Protection function (see "3.6.2 Extend Your Panel Life"). • Display the Video Pattern screen to help reduce after-image lag. HDMI Control Issue HDMI Controls do not function Error message: "The device cannot be operated. Please check connection" No picture and sound No picture No sound Possible Solutions • Check the connections between the panel and the HDMI equipment. • Confirm that the settings for the panel are correct. • Confirm that the equipment is HDMI compliant. • Confirm that settings for the equipment are correct. For details, refer to the operating instructions that came with the equipment. • Check the connections between the panel and the HDMI equipment. • Confirm that settings for the equipment are correct. For details, refer to the operating instructions that came with the equipment. • Check the connections between the panel and the HDMI equipment. • Confirm that settings for the equipment are correct. For details, refer to the operating instructions that came with the equipment. • Check the connections between the panel and the HDMI equipment. • Confirm that settings for the equipment are correct. For details, refer to the operating instructions that came with the equipment. • Check the connections between the panel and the HDMI equipment. • Confirm that settings for the equipment are correct. For details, refer to the operating instructions that came with the equipment. • Check that the AV system is connected to an HDMI terminal and any recorder/player is connected to another HDMI terminal. 126 En
-
 1
1 -
2
-
3
-
4
-
5
-
6
-
7
-
8
-
9
-
10
-
11
-
12
-
13
-
14
-
15
-
16
-
17
-
18
-
19
-
20
-
21
-
22
-
23
-
24
-
25
-
26
-
27
-
28
-
29
-
30
-
31
-
32
-
33
-
34
-
35
-
36
-
37
-
38
-
39
-
40
-
41
-
42
-
43
-
44
-
45
-
46
-
47
-
48
-
49
-
50
-
51
-
52
-
53
-
54
-
55
-
56
-
57
-
58
-
59
-
60
-
61
-
62
-
63
-
64
-
65
-
66
-
67
-
68
-
69
-
70
-
71
-
72
-
73
-
74
-
75
-
76
-
77
-
78
-
79
-
80
-
81
-
82
-
83
-
84
-
85
-
86
-
87
-
88
-
89
-
90
-
91
-
92
-
93
-
94
-
95
-
96
-
97
-
98
-
99
-
100
-
101
-
102
-
103
-
104
-
105
-
106
-
107
-
108
-
109
-
110
-
111
-
112
-
113
-
114
-
115
-
116
-
117
-
118
-
119
-
120
-
 121
121 -
 122
122 -
 123
123 -
 124
124 -
 125
125 -
 126
126 -
 127
127 -
 128
128 -
 129
129 -
 130
130 -
 131
131 -
132
-
133
-
134
-
135
-
136
-
137
-
138
-
139
-
140
-
141
-
142
-
143
-
144
-
145
-
146
-
147
-
148
-
149
-
150
-
151
-
152
-
153
-
154
-
155
-
156
-
157
-
158
-
159
-
160
-
161
-
162
-
163
-
164
-
165
-
166
-
167
 |
 |