Pioneer PRO-800HD Owner's Manual - Page 30
Adjusting the Image Position and, Clock Automatic Adjustment, Manual Adjustment of Screen, Position
 |
View all Pioneer PRO-800HD manuals
Add to My Manuals
Save this manual to your list of manuals |
Page 30 highlights
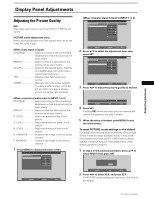
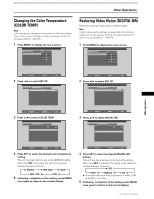
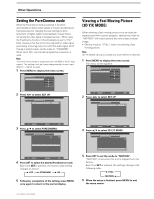
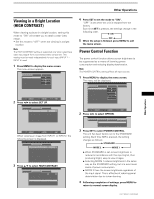
Display Panel Adjustments Adjusting the Image Position and Clock (Automatic Adjustment) Pressing AUTO SET UP on either the main unit operating panel or the remote control unit will adjust the screen position and clock to optimum values. Notes ÷ This adjustment is supported only when a computer signal is input. ÷ Perform this adjustment individually for each input function (INPUT1 or INPUT2), and each signal type. AUTO SET UP S-VIDEO VIDEO AUTO SET UP Main Unit Operating Panel Remote Control Unit Press AUTO SET UP on either the main unit operating panel or remote control unit. ÷ Optimum settings may not be possible for low- luminance and certain other kinds of signals. In this case, following the instructions in the following section "Manual Adjustment of Screen Position and Clock" to make more precise adjustments. Manual Adjustment of Screen Position and Clock This setting can be adjusted when a computer signal is input. (The settings on this page are not supported when a signal is input from a connected video component.) Note Make these adjustments for each input (INPUT1 to INPUT2) and signals. SCREEN mode adjustment items Below are brief descriptions of the options that can be set in the SCREEN mode. POSITION H.POSITION Adjust the picture's position to the left or right. V.POSITION Adjust the picture's position upward or downward. CLOCK/PHASE CLOCK Adjust letter breakup or noise on the screen. This setting adjusts the unit's internal clock signal frequency that corresponds to the input video signal. PHASE Adjust so that there is minimum flicker of screen letters or color misalignment. This setting adjusts the phase of the internal clock signal adjusted by the CLOCK setting. 1 Press MENU to display the menu screen. MAIN MENU PICTURE SCREEN CONT RAST BR I GHT . R. L EVEL G. L E V E L B. L EVEL H. E NHANCE V. ENHANCE :0 :0 : +60 : +60 : +60 :0 :0 SET UP INPUT1 OPTION RE S ET SELECT SET ENTER MENU EXIT 2 Press 2/3 to select SCREEN. MAIN MENU PICTURE SCREEN POS I T I ON : CL OCK / PHASE : SET UP 0/ 0 0/ 0 RE S ET INPUT1 OPTION 26 PRO-1000HD / PRO-800HD SELECT SET ENTER MENU EXIT
-
 1
1 -
2
-
3
-
4
-
5
-
6
-
7
-
8
-
9
-
10
-
11
-
12
-
13
-
14
-
15
-
16
-
17
-
18
-
19
-
20
-
21
-
22
-
23
-
24
-
 25
25 -
 26
26 -
 27
27 -
 28
28 -
 29
29 -
 30
30 -
 31
31 -
 32
32 -
 33
33 -
 34
34 -
 35
35 -
36
-
37
-
38
-
39
-
40
-
41
-
42
-
43
-
44
 |
 |
