Pioneer PRO-800HD Owner's Manual - Page 35
Viewing in a Bright Location, HIGH CONTRAST, Power Control Function
 |
View all Pioneer PRO-800HD manuals
Add to My Manuals
Save this manual to your list of manuals |
Page 35 highlights
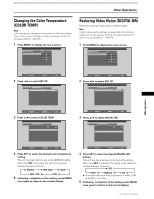
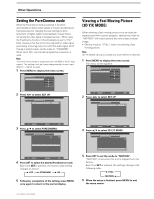
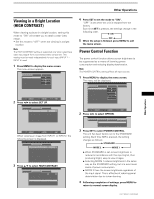
Other Operations Other Operations Viewing in a Bright Location (HIGH CONTRAST) When viewing a picture in a bright location, setting this mode to "ON" will enable you to obtain a clear video image. • Set this mode to "OFF" when not viewing in a bright location. Note The HIGH CONTRAST setting is supported only when selecting a video input signal from a connected video component. This setting must be made independently for each input (INPUT 1 - INPUT 4) used. 1 Press MENU to display the menu screen. The menu screen appears. MAIN MENU PICTURE CONT RAST BR I GHT . CO LOR T I NT S H ARP SET UP :0 :0 :0 :0 :0 OPTION INPUT4 RE S ET SELECT SET ENTER MENU EXIT 2 Press 2/3 to select SET UP. MAIN MENU INPUT4 PICTURE SET UP OPTION I NPUT L ABEL : I NPUT 4 AUT O P OWER OF F : OF F COL OR T EMP : M I DDL E D I G I T AL NR : L OW H I GH CON TRAS T : OF F P URE C I NEMA : OFF 3 D Y / C MODE : MOT I O N SELECT SET ENTER MENU EXIT When viewing an image from INPUT1 or INPUT2, the following screen is displayed. MAIN MENU INPUT1 PICTURE SET UP OPTION I NPUT L ABEL : I NPUT 1 AUT O P OWER OF F : OF F COL OR T EMP : M I DDL E D I G I T AL NR : L OW H I GH CON TRAS T : OF F P URE C I NEMA : OFF CL AMP P OS I T I ON : AU T O SETT I NG : V I DEO V I DEO S I GNAL : RGB 3 Press 5/∞ to select HIGH CONTRAST. MAIN MENU INPUT4 PICTURE SET UP OPTION I NPUT L ABEL : I NPUT 4 AUT O P OWER OF F : OF F COL OR T EMP : M I DDL E D I G I T AL NR : L OW H I GH CON TRA S T : OF F P URE C I NEMA : OFF 3 D Y / C MOD E : MOT I O N 4 Press SET to set the mode to "ON". "OFF" is set when this unit is shipped from the factory. Each time SET is pressed, the settings change in the following order. 3 ON OFF 2 5 When the setup is finished, press MENU to exit the menu screen. Power Control Function The power control function allows screen brightness to be suppressed as a means of lowering power consumption and reducing display deterioration. Note The POWER CONTROL setting affects all input sources. 1 Press MENU to display the menu screen. The menu will be displayed. MAIN MENU INPUT1 PICTURE SCREEN CONT RAST BR I GHT . R. L EVEL G. L E V E L B. L EVEL H. E NHANCE V. ENHANCE :0 :0 : +60 : +60 : +60 :0 :0 SET UP OPTION RE S ET SELECT SET ENTER MENU EXIT 2 Press 2/3 to select OPTION. MAIN MENU INPUT1 PICTURE SCREEN SET UP OPTION POWER CONT R OL : S T A NDA RD AUT O F U NCT I ON : OF F AUD I O OUT :F I XED 3 Press SET to select POWER CONTROL. The unit has been factory set to the STANDARD setting. Each time SET is pressed, the setting changes as follows: 3 STANDARD MODE 2 2 MODE 1 2 ÷ When STANDARD is set, screen brightness is reduced in accordance with the input signal, thus producing bright, easy-to-view images. ÷ Selecting MODE 1 reduces brightness in the same way as the STANDARD setting, but at a even lower levels of power consumption. ÷ MODE 2 fixes the screen brightness regardless of the input signal. This is effective at reducing panel deterioration due to screen burning. 4 Following completion of settings, press MENU to return to normal screen display. 31 PRO-1000HD / PRO-800HD
-
 1
1 -
2
-
3
-
4
-
5
-
6
-
7
-
8
-
9
-
10
-
11
-
12
-
13
-
14
-
15
-
16
-
17
-
18
-
19
-
20
-
21
-
22
-
23
-
24
-
25
-
26
-
27
-
28
-
29
-
 30
30 -
 31
31 -
 32
32 -
 33
33 -
 34
34 -
 35
35 -
 36
36 -
 37
37 -
 38
38 -
 39
39 -
 40
40 -
41
-
42
-
43
-
44
 |
 |
