Pioneer S-DJ08 Owner's Manual - Page 8
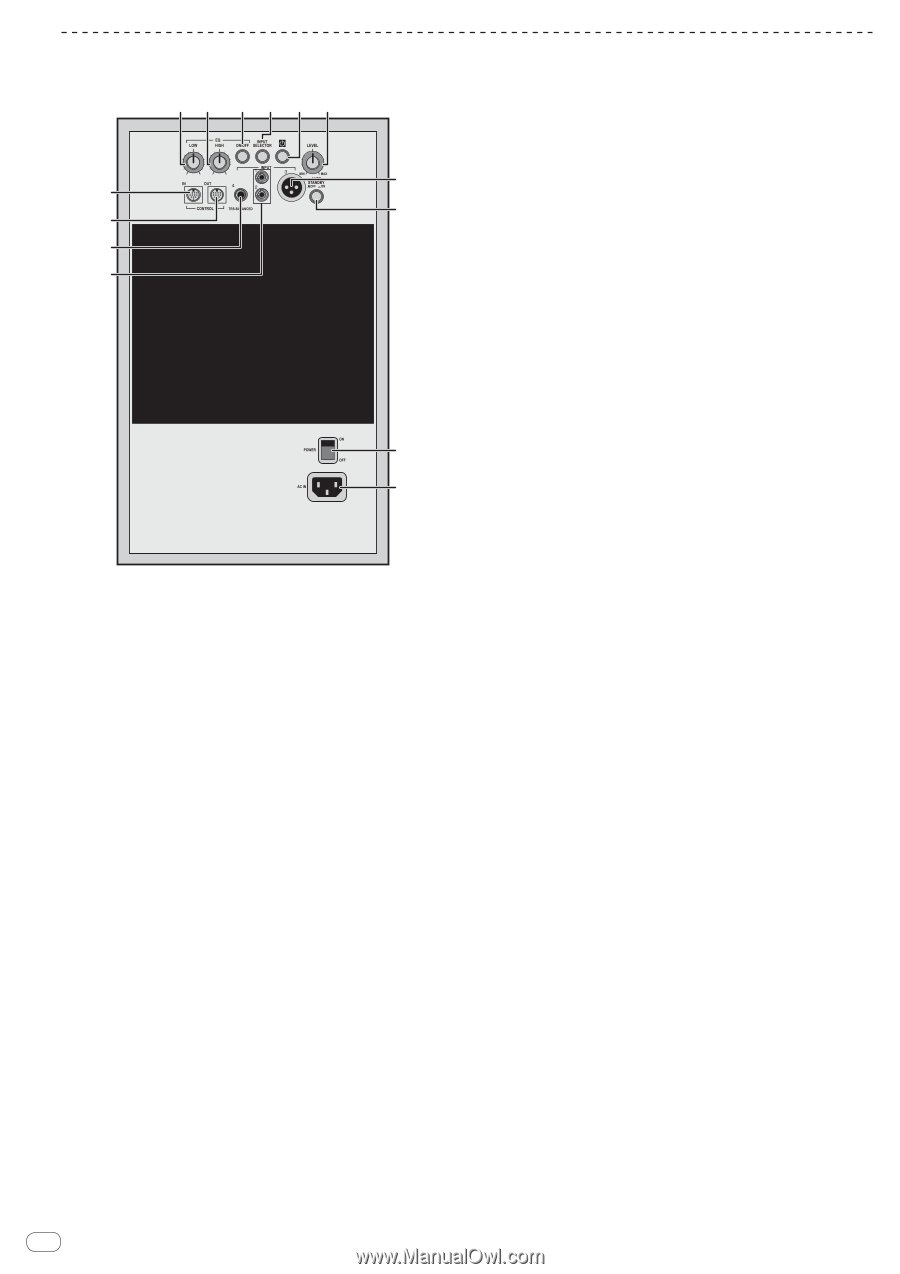
Rear Panel Facilities
 |
UPC - 884938122696
View all Pioneer S-DJ08 manuals
Add to My Manuals
Save this manual to your list of manuals |
Page 8 highlights
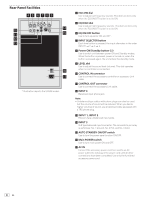
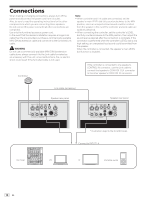
Rear Panel Facilities 45 6789 a b c d - 6 dB + 6 dB - 6 dB +6 dB e f g h * Illustration depicts the S-DJ08 model. 4 EQ LOW dial Use to adjust low-frequency sounds. This dial functions only when the EQ ON/OFF button is set to ON. 5 EQ HIGH dial Use to adjust high-frequency sounds. This dial functions only when the EQ ON/OFF button is set to ON. 6 EQ ON/OFF button Use to turn equalizer ON and OFF. 7 INPUT SELECTOR button Each time button is pressed, the input alternates in the order INPUT 1d 2 d 3 d 4. 8 Power ON/Standby button (u) Use to switch unit between power ON and Standby modes. When the button is pressed, power is turned on; when the button is pressed again, the unit enters the standby mode. 9 LEVEL dial Use to adjust the sound level (volume). This dial operates when no controller is connected. a CONTROL IN connector Use to connect the accessory controller or accessory Link cable. b CONTROL OUT connector Use to connect the accessory Link cable. c INPUT 4 Balanced-input phone jack. Note: ! Unbalanced-type cables with phone plugs can also be used, but the volume of sound will be reduced. When you desire higher volumes of sound, use a balanced cable equipped with a TRS phone plug. d INPUT 1, INPUT 2 RCA pin-type unbalanced input jacks. e INPUT 3 XLR type balanced input connector. The connector's pin array is as follows: No. 1 Ground, No. 2 Hot, and No. 3 Cold. f AUTO STANDBY ON/OFF switch Use to turn the power-save function ON/OFF. g Main POWER switch Use to turn main power ON and OFF. h AC IN Connect the accessory power cord here and to an AC power outlet. Do not plug in the power cord until all other connections have been completed. Use only the furnished accessory power cord. 8 En
-
 1
1 -
2
-
 3
3 -
 4
4 -
 5
5 -
 6
6 -
 7
7 -
 8
8 -
 9
9 -
 10
10 -
 11
11 -
 12
12 -
 13
13 -
14
-
15
-
16
-
17
-
18
-
19
-
20
-
21
-
22
-
23
-
24
-
25
-
26
-
27
-
28
 |
 |