Pioneer SC-57 Owner's Manual
Pioneer SC-57 Manual
 |
View all Pioneer SC-57 manuals
Add to My Manuals
Save this manual to your list of manuals |
Pioneer SC-57 manual content summary:
- Pioneer SC-57 | Owner's Manual - Page 1
57 SC55 SC- - Pioneer SC-57 | Owner's Manual - Page 2
openings. Install in accordance with the manufacturer's instructions. 8) Do not install near of time. 14) Refer all servicing to qualified service personnel. Servicing is required when the apparatus has the receiver is connected. - Consult the dealer or an experienced radio/TV technician for help. - Pioneer SC-57 | Owner's Manual - Page 3
clearly, without distortion. • Once you have established a comfortable sound level, set the dial and leave it there. BE SURE TO OBSERVE THE FOLLOWING you can't hear what's around you. • Use caution or temporarily discontinue use in potentially hazardous situations. • Do not use headphones while - Pioneer SC-57 | Owner's Manual - Page 4
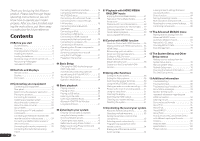
speakers 16 Installing your speaker system 17 About the audio connection 22 About the video converter 22 About HDMI 22 Connecting your TV and playback components 23 Connecting an HDD/DVD recorder, BD recorder and other video sources 24 Connecting a satellite/cable receiver or other set-top - Pioneer SC-57 | Owner's Manual - Page 5
the Video options (page 58) j 12 Other optional adjustments and settings ! Control with HDMI function (page 53) ! The Advanced MCACC menu (page 69) ! The System Setup and Other Setup menus (page 76) j 13 Making maximum use of the remote control ! Operating multiple receivers (page 63) ! Setting the - Pioneer SC-57 | Owner's Manual - Page 6
Apple AirPlay® With AirPlay you can stream music from iTunes to the SC-57 and SC-55 and play it through your home theater system. You can even use the receiver to view metadata including song title, artist as well as album art on a connected display. With Pioneer's AirPlay-compatible receivers, you - Pioneer SC-57 | Owner's Manual - Page 7
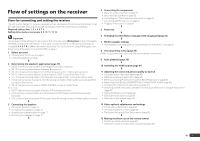
completed easily simply by following the instructions on the screen to make the connections and settings. There are also other features enabling easy use of various functions, including an Interactive Manual that operates in association with the receiver, updating of various types of software, and - Pioneer SC-57 | Owner's Manual - Page 8
, then install the AVNavigator of the other model. Deleting the AVNavigator You can use the following method to uninstall (delete) the AVNavigator from your PC. % Delete from the Control Panel of the PC. From the Start menu, click "Program" d "PIONEER CORPORATION" d "AVNavigator(SC-57 or SC-55 - Pioneer SC-57 | Owner's Manual - Page 9
HDMI SAT TV CD HMG ADPT USB iPod OPTION TUNER SIRIUS INPUT SELECT TV CTRL RECEIVER INPUT MASTER VOLUME TV CONTROL CH VOL MUTE AUDIO PARAMETER LIST VIDEO PARAMETER TUNE TOOLS TOP MENU BAND T.EDIT GUIDE input function (page 36). 5 TV CTRL Set the preset code of your TV's manufacturer - Pioneer SC-57 | Owner's Manual - Page 10
VIDEO HMG USB BD DVR HDMI [ 2 ] [ 3 ] [ 4 ] 6 16 17 18 19 20 dB 21 1 Signal indicators Light to indicate the currently selected input signal. AUTO lights when the receiver is set to select the input signal automatically (page 45). 2 Program format indicators Light to indicate the channels SACDs - Pioneer SC-57 | Owner's Manual - Page 11
MCACC SETUP MIC USB 5V 2.1 A HDMI 3 INPUT TUNE iPod iPhone iPad 15 16 17 18 19 20 21 1 u STANDBY/ON This switches between standby and on for this receiver. 2 INPUT SELECTOR dial Use to select an input function. 3 Indicators ! ADVANCED MCACC - Lights when EQ is set to ON in the AUDIO - Pioneer SC-57 | Owner's Manual - Page 12
being connected (amplifier, receiver, etc.), the methods of connection and terminal names may differ from the explanations in this manual. Also refer to the operating instructions of the respective devices. Important Illustration shows the SC-57, however connections for the SC-55 are the same except - Pioneer SC-57 | Owner's Manual - Page 13
/usage pattern before connecting the speakers. For instructions on connections, see Installing your speaker system on page 17 . ! speaker terminals on page 59 . [A] 9.2 channel surround system (Front height/Front wide) connection *Default setting ! Speaker System setting: 9.1ch FH/FW FHL L SW - Pioneer SC-57 | Owner's Manual - Page 14
SW 1 C Main zone SR SL R L R L ZONE 3 ZONE 2 Sub zone [H] 5.2 channel surround system & Speaker B Bi-amping connection SC-57 only ! Speaker System setting: 5.1ch + SP-B Bi-Amp With these connections you can simultaneously enjoy 5.2-channel surround sound in the main zone with stereo playback - Pioneer SC-57 | Owner's Manual - Page 15
channel surround sound. Front Bi-Amp SR SL [I] 5.2 channel surround system & Front and Surround Bi-amping connection (High quality surround) SC-57 only ! Speaker System setting quality of the sound. The following guidelines should help you to get the best sound from your system. ! The subwoofer can - Pioneer SC-57 | Owner's Manual - Page 16
the receiver setting the power to the standby mode. Bare wire connections CAUTION Make sure that all speakers are securely installed the amplifier. See your speaker manual for more information. ! If your speakers they support bi-amping. ! With these connections, the Speaker System setting makes - Pioneer SC-57 | Owner's Manual - Page 17
03 Installing 7.2 channel surround system & Speaker B connection ! Select '7.1ch + Speaker B' from the Speaker System menu. See Speaker system setting on LEVEL INPUT Front left IN 1 IN 2 HDMI ASSIGNABLE 16 ASSIGNABLE Y COMPONENT VIDEO PB PR IN 1 (DVD) IN 4 (VIDEO) BD IN IN 5 (DVD) IN - Pioneer SC-57 | Owner's Manual - Page 18
LINE LEVEL INPUT Low IN 1 IN 2 HDMI ASSIGNABLE 16 ASSIGNABLE COMPONENT VIDEO Y PB PR IN 1 (DVD) IN 4 (VIDEO) BD IN IN 5 (DVD) IN channel surround system (Surround back) & ZONE 2 connection (Multi Zone) ! Select '7.1ch + ZONE 2' from the Speaker System menu. See Speaker system setting - Pioneer SC-57 | Owner's Manual - Page 19
setting on page 76 to do this. Front wide right Front height right Front height left Front wide left Front right Subwoofer 1 LINE LEVEL INPUT Center Subwoofer 2 LINE LEVEL INPUT Front left IN 1 IN 2 HDMI ASSIGNABLE 16 ASSIGNABLE Y COMPONENT VIDEO [F] 5.2 channel surround system - Pioneer SC-57 | Owner's Manual - Page 20
channel surround system & Speaker B Bi-amping connection SC-57 only ! Select '5.1ch + SP-B Bi-Amp' from the Speaker System menu. See Speaker system setting /BDR) (VIDEO) ADAPTER PORT (OUTPUT 5 V 0.1 A MAX) OUT AC IN IN 2 (DVR/ BDR) IN 3 (VIDEO) MONITOR OUT ZONE 2 ZONE 3 DVD TV/SAT VIDEO OUT OUT - Pioneer SC-57 | Owner's Manual - Page 21
compatible speaker Surround right Connecting your equipment 03 [J] 5.2 channel surround system & Front and Center Bi-amping connection (High quality surround) SC-57 only ! Select '5.1ch F+C Bi-Amp' from the Speaker System menu. See Speaker system setting on page 76 to do this. Bi-amp compatible - Pioneer SC-57 | Owner's Manual - Page 22
to be displayed, but so long as there is no problem with displaying video this is not a malfunction. ! Depending on the component you have connected, using a DVI connection may result in unreliable signal transfers. ! This receiver supports SACD, Dolby Digital Plus, Dolby TrueHD and DTS-HD Master - Pioneer SC-57 | Owner's Manual - Page 23
are connected by HDMI connections, if the TV supports the HDMI ARC (Audio Return Channel) function, the sound of the TV is input to the receiver via the HDMI OUT terminal, so there is no need to connect an audio cable. In this case, set TV Audio at HDMI Setup to via HDMI (see HDMI Setup on page - Pioneer SC-57 | Owner's Manual - Page 24
on the receiver. Do not use an HDMI cable to input video signals. Depending on the video component, it may not be possible to output signals connected by HDMI and other methods simultaneously, and it may be necessary to make output settings. Please refer to the operating instructions supplied with - Pioneer SC-57 | Owner's Manual - Page 25
If your set-top box is equipped with an HDMI output terminal, we recommend connecting it to the receiver's HDMI IN 1 or IN 2 terminal. When doing so, also connect the receiver and TV by HDMI (see Connecting using HDMI on page 23 ). IN 1 IN 2 HDMI ASSIGNABLE 16 ASSIGNABLE COMPONENT VIDEO Y PB - Pioneer SC-57 | Owner's Manual - Page 26
inputs SC-57 only For DVD Audio and SACD playback, your DVD player may have 5.1, 6.1 or 7.1 channel analog outputs (depending on whether your player supports surround back channels). Make sure that the player is set to output multichannel analog audio. DVD player, etc. VIDEO OUT VIDEO SUBWOOFER - Pioneer SC-57 | Owner's Manual - Page 27
antenna. For the best possible reception, suspend receiver. ! COMPONENT VIDEO ZONE 2 OUT can be used to output clear images. ! The GUI screen is not displayed if only the COMPONENT VIDEO ZONE 2 OUT jack is connected. Sub zone (ZONE 2) VIDEO IN AUDIO IN R L Main zone IN 1 IN 2 HDMI - Pioneer SC-57 | Owner's Manual - Page 28
ZONE 2+3 in Speaker system setting on page 76 to use VIDEO ZONE 3 OUT jack on this receiver. Sub zone (ZONE 3) Main zone VIDEO IN L R IN 1 IN 2 HDMI ASSIGNABLE 16 ASSIGNABLE Y COMPONENT VIDEO tuner. ! For instructions on playing the an ISP (Internet Service Provider) beforehand. When - Pioneer SC-57 | Owner's Manual - Page 29
your USB device to the USB terminal on the front panel of this receiver. ! This receiver does not support a USB hub. ! For instructions on playing the USB device, see Playing a USB device on page 37 . Connecting an HDMI-equipped component to the front panel input Connecting a USB device It is - Pioneer SC-57 | Owner's Manual - Page 30
receiver. Closet or shelving unit Pioneer component Non-Pioneer component CONTROL IR IN OUT IN IN 1 IN 2 HDMI ASSIGNABLE 16 ASSIGNABLE Y COMPONENT VIDEO PB PR IN 1 (DVD) IN 4 (VIDEO) BD IN IN 5 (DVD) IN 2 (DVR/ BDR) IN 3 (VIDEO least one set of analog audio, video or HDMI jacks - Pioneer SC-57 | Owner's Manual - Page 31
while. If you find it damaged, ask your nearest Pioneer authorized independent service company for a replacement. ! Do not use any HDMI indicator in the front panel display blinks during this process, and you can turn on this receiver once it has stopped blinking. When you set the Control with HDMI - Pioneer SC-57 | Owner's Manual - Page 32
instructions are for when English is selected for the GUI screen. 1 Press u RECEIVER to switch on the receiver and your TV. Make sure that the TV's video input is set to this receiver (for example, if you connected this receiver to the VIDEO object to install the microphone. Install the microphone - Pioneer SC-57 | Owner's Manual - Page 33
are set to SMALL). In other cases, leave at NO. 4 Press then select START. 5 Follow the instructions on displayed on-screen while the receiver outputs more test tones to determine the optimum receiver settings. Again, try to be we recommend adjusting the settings manually. Problems when using the - Pioneer SC-57 | Owner's Manual - Page 34
MULTI CH IN k SIRIUS k a With Control with HDMI set to ON, assignments cannot be made (see Control with HDMI function on page 53 ). b SC-57 only Operation Mode Setup This receiver is equipped with a great number of functions and settings. The Operation Mode feature is provided for users - Pioneer SC-57 | Owner's Manual - Page 35
(Virtual channel sound for play- 56 Height) back. V.DEPTH (Virtual Depth) Plays with a sound field suited for 3D images. 56 Other functions INPUT SELECT (INPUT Switches the input. 36 SELECTOR) MASTER VOLUME +/-, MUTE Use to set the listening volume. 36 LISTENING MODE Only Pioneer - Pioneer SC-57 | Owner's Manual - Page 36
of iPod/iPhone/iPad indicated on the website of Pioneer (http:// pioneer.jp/homeav/support/ios/na/). ! Installing software versions other than indicated on the website of Pioneer to your iPod/iPhone/iPad may result in incompatibility with this receiver. ! iPod, iPhone and iPad are licensed for - Pioneer SC-57 | Owner's Manual - Page 37
playback controls This receiver's remote control buttons can be used for basic playback of files stored on USB memory devices. ! Press iPod USB to switch the remote control to the iPod/USB operation mode. AUDIO PARAMETER LIST VIDEO PARAMETER TUNE TOOLS TOP MENU BAND T.EDIT GUIDE PRESET ENTER - Pioneer SC-57 | Owner's Manual - Page 38
set to ON. 3 When you're finished, press RETURN. You will return to the USB Top menu. About playable file formats The USB function of this receiver supports Audio Layer-3 Quantization bitrate Channel Bitrate 16 bit 2 ch 8 kbps to 320 kbps VBR/CBR Supported/Supported Sampling frequency 32 kHz, - Pioneer SC-57 | Owner's Manual - Page 39
to follow installation and setup instructions are provided with the SIRIUS tuner. There are a variety of programming packages available, including the option of adding "The Best of XM" programming to the SIRIUS service. The "Best of XM" service is not available to SIRIUS Canada subscribers at this - Pioneer SC-57 | Owner's Manual - Page 40
best reception, you may need to move the SiriusConnectTM tuner antenna near a window (refer to the manual and the receiver stores the SIRIUS channel. Note reset the Channel presets, Memory, Channel Skip/Add, Parental Lock and Password settings in Resetting the system on page 61 . Listening to channel - Pioneer SC-57 | Owner's Manual - Page 41
The AS-BT100 and AS-BT200 models supports SCMS-T contents protection, so music instructions displayed on the GUI screen to conduct pairing with the Bluetooth wireless technology device. Switch on the Bluetooth wireless technology device that you want to make pair, place it near the receiver and set - Pioneer SC-57 | Owner's Manual - Page 42
the remote control to switch the receiver to ADAPTER PORT input. ! When technology device. This receiver's remote control to a source, set the remote control to the receiver operation mode, then PIONEER CORPORATION is under license. Other trademarks and trade names are those of their respective owners - Pioneer SC-57 | Owner's Manual - Page 43
. ALC - In the Auto level control (ALC) mode, this receiver equalizes playback sound levels. Also, the low and high frequency sounds, video games ! Neural Surround - Up to 7.1 channel sound (surround back), especially suited to music sources ! STEREO - The audio is heard with your sound settings - Pioneer SC-57 | Owner's Manual - Page 44
and the setting for surround back channel processing (see THX Audio Setting on page 78 for more on this). 1 Press mode. to the receiver operation 2 for both mono and stereo TV sources ! ADVANCED GAME - Suitable for video games ! SPORTS - Suitable for sports programs ! CLASSICAL - Gives a large - Pioneer SC-57 | Owner's Manual - Page 45
, make the proper digital connections (page 22) and set the signal input to DIGITAL. ! Some DVD players don't output DTS signals. For more details, refer to the instruction manual supplied with your DVD player. 1 Press mode. to the receiver operation 2 Press SIGNAL SEL to select the input signal - Pioneer SC-57 | Owner's Manual - Page 46
between channels ensure better surround sound integration for multichannel setting. 1 Press mode. to the receiver operation the PURE DIRECT mode is switched on. - When the HDMI audio output parameter is set to THROUGH in Setting the Setting the Audio options on page 56 . Using the Full - Pioneer SC-57 | Owner's Manual - Page 47
service exclusively for use with the Pioneer installed ! PCs running Microsoft Windows 7 with Windows Media Player 12 installed receiver or remote control. Using AirPlay on iPod touch, iPhone, iPad, and iTunes This receiver supports AirPlay is necessary to set up the network manually. Otherwise, you - Pioneer SC-57 | Owner's Manual - Page 48
being connected. For more information on authorizing this receiver, refer to the instruction manual of your server. Playback with Home Media Gallery radio station. Check the firewall settings. ! A list of Internet radio stations provided by the vTuner database service is subject to change or - Pioneer SC-57 | Owner's Manual - Page 49
on the receiver as favorite broadcast stations and can be played. Listening to Rhapsody Rhapsody is a paid digital music broadcast service provided by RealNetworks. Rhapsody offers 30-day free trial. Access the website in order to set up a trial account: http://www.rhapsody. com/pioneer/signup ! You - Pioneer SC-57 | Owner's Manual - Page 50
Set Account ! Sign out 5 Follow the instructions on the screen to input and set. Note ! When disposing of the product, we recommend you reset it to delete the data. See Resetting can only be played on media servers supporting WMDRM. Content owners use WMDRM technology to protect their intellectual - Pioneer SC-57 | Owner's Manual - Page 51
problems installed on a connected PC and the setting of such software, network connection may be blocked. Pioneer receiver supports Channel Bitrate VBR/CBR Sampling frequency Quantization bitrate Channel Sampling frequency Quantization bitrate Channel Sampling frequency Quantization bitrate Channel - Pioneer SC-57 | Owner's Manual - Page 52
inputs Category Extension Stream Sampling frequency 32 kHz to 192 kHz Quantization bitrate 8 bit, 16 bit, 24 bit FLAC .flac FLAC Channel 2 ch Bitrate - VBR/CBR - a "MPEG Layer-3 audio decoding technology licensed from Fraunhofer IIS and Thomson multimedia." b Only streaming data from - Pioneer SC-57 | Owner's Manual - Page 53
are connected by HDMI connections, if the TV supports the HDMI ARC (Audio Return Channel) function, the sound of the TV is input to the receiver via the HDMI OUT terminal, so there is no need to connect an audio cable. In this case, set TV Audio at HDMI Setup to via HDMI (see HDMI Setup on page - Pioneer SC-57 | Owner's Manual - Page 54
the 'TV Audio' setting you want. When a TV supporting the HDMI ARC (Audio Return Channel) function is connected to the receiver, the sound of the TV can be input via the HDMI OUT terminal. ! Normal - The TV's sound is input from the Audio input terminals other than HDMI inputs. ! via HDMI - The TV - Pioneer SC-57 | Owner's Manual - Page 55
Mode setting to ALL. See HDMI Setup on page 53 . 2 Set the STREAM (Stream Smoother) setting to AUTO. See Setting the Video options on page 58 . Cautions on the Control with HDMI function ! Connect the TV directly to this receiver. Interrupting a direct connection with other amps or an AV converter - Pioneer SC-57 | Owner's Manual - Page 56
ON Also, when a player supporting the Auto Sound Retriever Link function is connected to the receiver by HDMI, by set- ting this to ON, video tape with lots of background noise) when switched on. ON This only has an effect with 2-channel signal inputs. Localizes dialog in the center channel - Pioneer SC-57 | Owner's Manual - Page 57
problems using this with most SACD discs, but if the sound distorts, it is best to switch the gain setting back to 0dB. f ! The HDMI Audio setting cannot be switched while performing synchronized amp mode operations. ! The synchronized amp mode must be turned on in order to play the receiver's HDMI - Pioneer SC-57 | Owner's Manual - Page 58
. Important ! Note that if an option cannot be selected on the VIDEO PARAMETER menu, it is unavailable due to the current source, setting and status of the receiver. ! All of the setting items can be set for each input function. ! Setting items other than V.CONV can only be selected when V.CONV is - Pioneer SC-57 | Owner's Manual - Page 59
Video Adjust) is set to MEMORY. e ! This setting is only displayed when the video signals below are being input: - 480i, 576i, 480p, 576p, 720p, 1080i analog video signals - 480i, 576i, 480p, 576p, 720p, 1080i, 1080p, 1080p24 HDMI video sources will be downmixed to 2 channels). ! SP: OFF - No sound - Pioneer SC-57 | Owner's Manual - Page 60
HDMI output on page 61 . ! The subwoofer output depends on the settings you made in Manual speaker setup on page 76 . However, if SP: B ON is selected above, no sound is heard from the subwoofer (the LFE channel the sub and main rooms so that this receiver is in standby. MULTI-ZONE remote controls - Pioneer SC-57 | Owner's Manual - Page 61
system Use this procedure to reset all the receiver's settings to the factory default. Use the front panel controls to do this. Set MULTI-ZONE to MULTI ZONE OFF. ! Disconnect the iPod and USB memory device from the receiver beforehand. ! Set the Control with HDMI to OFF (see HDMI Setup on page 53 - Pioneer SC-57 | Owner's Manual - Page 62
and possible settings on page 34 . HDMI HDMI Audio Amp HDMI output HDMI OUT 0.0 frame 62 En Setting Default Dual Mono CH1 DRC AUTO SACD Gain 0 dB LFE also Setting the Audio options on page 56 for other default DSP settings. MCACC MCACC Position Memory M1: MEMORY 1 Channel Level - Pioneer SC-57 | Owner's Manual - Page 63
This is a function for resetting all remote control unit settings you have made to the defaults set upon shipment from the factory. See Resetting the remote control settings on page 66 . Change RC mode If you have multiple Pioneer receivers, amplifiers, etc., this setting can be used to prevent - Pioneer SC-57 | Owner's Manual - Page 64
SOURCE RCU SETUP BDR BD DVD DVR HDMI SAT TV CD HMG ADPT USB iPod OPTION TUNER SIRIUS INPUT SELECT TV CTRL RECEIVER INPUT MASTER VOLUME TV CONTROL CH VOL MUTE AUDIO PARAMETER LIST VIDEO PARAMETER TUNE TOOLS TOP MENU BAND T.EDIT GUIDE PRESET ENTER PRESET CATEGORY RETURN HOME - Pioneer SC-57 | Owner's Manual - Page 65
! With Multi operation, the HDMI and TV CTRL settings cannot be made. For other settable input functions, see Setting the remote to control other components ! You don't need to program the receiver to switch on or off. This is done automatically. With Pioneer components, you don't need to program - Pioneer SC-57 | Owner's Manual - Page 66
SOURCE RCU SETUP BDR BD DVD DVR HDMI SAT TV CD HMG ADPT USB iPod OPTION TUNER SIRIUS INPUT SELECT TV CTRL RECEIVER INPUT MASTER VOLUME TV CONTROL CH VOL MUTE AUDIO PARAMETER LIST VIDEO PARAMETER TUNE TOOLS TOP MENU BAND T.EDIT GUIDE PRESET ENTER PRESET CATEGORY RETURN HOME - Pioneer SC-57 | Owner's Manual - Page 67
GUIDE/EPG USER MENU TOOLS GUIDE - i/j/k/l i/j/k/l i/j/k/l i/j/k/l - ENTER ENTER ENTER ENTER - GUIDE - m - n AV SELEC- o TION Video components Button(s) u SOURCE Number buttons !/CLR ENTER (CLASS) i/j/k/l ENTER d e g m n o p AUDIO DISP a Controls for MD. b Controls for SACD - Pioneer SC-57 | Owner's Manual - Page 68
(Projector) POWER ON MOVIE STANDARD DYNAMIC USER1 USER2 USER3 COLOR+ SHARP+ GAMMA COLOR- SHARP- COLOR TEMP EXIT INFO i/j/k/l ENTER TEST HIDE MENU HDMI1 HDMI2 COMP. VIDEO S-VIDEO BRIGHT- BRIGHT+ POWER OFF ASPECT CONTRAST+/- 68 En - Pioneer SC-57 | Owner's Manual - Page 69
Making receiver settings from the Advanced MCACC menu The Advanced MCACC (Multi Channel ACoustic Calibration) system was developed in Pioneer's after calibration ("After"), take the measurement using the EQ Professional menu in the Manual MCACC setup (page 71). - The EQ Pro & S-Wave measurement is - Pioneer SC-57 | Owner's Manual - Page 70
not have a tripod, use some other object to install the microphone. ! It may not be possible to measure correctly if the microphone is placed on a table, sofa, etc. 4 When you're finished setting the options, select START then press ENTER. 5 Follow the instructions on-screen. 70 En 6 Wait for the - Pioneer SC-57 | Owner's Manual - Page 71
(see Acoustic Calibration EQ Professional on page 72 ). ! Precision Distance (SC-57 only) - Fineadjusting the positions of the speakers (see Precision Distance on page 73 ). Fine Channel Level ! Default setting: 0.0dB (all channels) You can achieve better surround sound by properly adjusting the - Pioneer SC-57 | Owner's Manual - Page 72
presets. ! Standing Wave control filter settings cannot be changed during playback of sources using the HDMI connection. 1 Select 'Standing Wave' from the Manual MCACC setup menu. 2 Adjust the parameters for the Standing Wave Control. ! Filter Channel - Select the channel to which you will apply the - Pioneer SC-57 | Owner's Manual - Page 73
channels during calibration. When you're finished, select START. It will take about 2 to 4 minutes for the calibration to finish. After the Acoustic Calibration Equalization is set, you are given the option to check the settings on-screen. Precision Distance SC-57 by skilled installers by ear - Pioneer SC-57 | Owner's Manual - Page 74
page 69 or after fine-adjusting at Manual MCACC setup on page 71 , you can check your calibrated settings using the GUI screen. 1 Press on to display the calibration values for the frequency response of the various channels set in the different MCACC presets. See Acoustic Calibration EQ Adjust on - Pioneer SC-57 | Owner's Manual - Page 75
(for example, watching movies from a sofa, or playing a video game close to the TV). From this menu you can copy setting you want to copy. ! All Data - Copies all the settings of the selected MCACC preset memory. ! Level & Distance - Copies only the channel level and speaker distance settings - Pioneer SC-57 | Owner's Manual - Page 76
HDMI Setup - Synchronizes this receiver with your Pioneer component supporting Control with HDMI (page 53). ! Other Setup - Makes customized settings to reflect how you are using the receiver (see The Other Setup menu on page 80 ). Manual speaker setup This receiver 7.1-channel surround system with - Pioneer SC-57 | Owner's Manual - Page 77
it set to PLUS and YES or the front speakers set to LARGE and SMALL alternatively and let your ears judge which sounds best. If you're having problems, is set to 80Hz. 4 When you're finished, press RETURN. You will return to the Manual SP Setup menu. Channel Level Using the channel level settings, - Pioneer SC-57 | Owner's Manual - Page 78
to the Manual SP Setup menu. Note ! You can change the channel levels by press to the receiver operation mode, You will return to the Manual SP Setup menu. Note ! For best surround sound, make sure ULTRA2 for the SC-57, SELECT2 for the SC-55. 1 Select 'THX Audio Setting' from the Manual SP Setup menu - Pioneer SC-57 | Owner's Manual - Page 79
the DHCP server function, and you will not need to set up the network manually. You must set up the network as described below only when you have connected this receiver to a broadband router without a DHCP server function. Before you set up the network, consult with your ISP or the network manager - Pioneer SC-57 | Owner's Manual - Page 80
Manual Setting - Connection settings are made by manually receiver is in the standby mode (page 81). ! Pairing Bluetooth Setup - Use to pair a Bluetooth ADAPTER and Bluetooth wireless technology device (page 41). ! SC-57 only: Multi Ch In Setup - Specifies the optional settings for a multi-channel - Pioneer SC-57 | Owner's Manual - Page 81
can be operated even when the receiver is in the standby mode. 1 Select 'EXTENSION Setup' from the Other Setup menu. 2 Select the EXTENSION setting you want. 3 When you're finished, press RETURN. You will return to the Other Setup menu. Multi Channel Input Setup SC-57 only You can adjust the level - Pioneer SC-57 | Owner's Manual - Page 82
file must first be inserted into the USB port on the receiver's front panel. ! If an update file is provided on the Pioneer website, download it onto your computer. When downloading an update file from the Pioneer website onto your computer, the file will be in ZIP format. Unzip the ZIP file before - Pioneer SC-57 | Owner's Manual - Page 83
. Remedy The receiver may have a serious problem. Do not try switching the receiver on. Unplug the receiver from the wall and call a Pioneer authorized independent service company. Allow the unit to cool down in a well-ventilated place before switching back on (see Installing the receiver on page - Pioneer SC-57 | Owner's Manual - Page 84
is set to On. If the source component has a digital volume control, make sure this is not turned down. If the HDMI input function is selected, sound is muted until exiting the Home Menu. Other audio problems Symptom Remedy Speaker switching sound (clicking sound) is heard from receiver during - Pioneer SC-57 | Owner's Manual - Page 85
of the source component. For HDMI, or when digital video conversion is set to OFF and a TV and another component are connected with different cords (in Setting the Video options on page 58 ), you must connect your TV to this receiver using the same type of video cable as you used to connect - Pioneer SC-57 | Owner's Manual - Page 86
(Expert) on page 69 if this is a recurring problem. Can't adjust the Fine Speaker Check that the speakers are all in phase (make sure the positive (+) and nega- Distance setting properly. tive (-) terminals are matched up properly). SC-57 only: Gauge (value) Check that the speakers are all - Pioneer SC-57 | Owner's Manual - Page 87
EQ adjustments made using the Manual MCACC setup do not appear receiver. Make sure that the receiver is set to AUTO or DIGITAL (see Choosing the input signal on page 45 ). If a two channel connections of the CONTROL IN jacks (see Operating other Pioneer components with this unit's sensor on page 30 - Pioneer SC-57 | Owner's Manual - Page 88
and receiver. If the problem still persists when connecting your HDMI component directly to your monitor, please consult the component or monitor manual or contact the manufacturer for support. If video images do not appear on your TV, try adjusting the resolution, Deep Color or other setting for - Pioneer SC-57 | Owner's Manual - Page 89
does not work, try restarting your PC, and starting the installer (AVNV_XXX_xxx.exe) with no other applications active. Software updating does not operate well. There may be a problem with your Internet Service Provider's network. Contact your contracted provider. USB interface Symptoms Causes - Pioneer SC-57 | Owner's Manual - Page 90
not support the mass installed in the connected security software installed receiver or the power supply. The PC or Internet radio is not properly operated. The corresponding IP address is Switch on the built-in DHCP server function of your not properly set. router, or set up the network manually - Pioneer SC-57 | Owner's Manual - Page 91
. remote control. Press HMG to set the remote control to the Home Media Gallery mode (page 48). SIRIUS radio messages Status messages Antenna Error Check Sirius Tuner Acquiring Signal Subscription Updating Updating Channels Invalid Channel Firmware Updating Causes Remedy The SIRIUS antenna is - Pioneer SC-57 | Owner's Manual - Page 92
receiver manually. The access point's security settings use WEP 152-bit length code key or shared key authentication. ! The receiver does not support WEP 152-bit length code key or shared key authentication. Network connections cannot be established even when the above measures are taken. ! Reset - Pioneer SC-57 | Owner's Manual - Page 93
folder is already full. Speaker Setting Guide In order to achieve an even For the distance, on this receiver it is possible to automatically Distance (or Precision Distance - SC57 only) functions to make them will seem cramped. Testing by the Pioneer Multi-channel Research Group has shown that a - Pioneer SC-57 | Owner's Manual - Page 94
recommended) for sending audio to the receiver. See the operating instructions for more on audio connections. Set the display volume to minimum when using this configuration. Note ! If your display only has one HDMI terminal, you can only receive HDMI video from the connected component. ! Depending - Pioneer SC-57 | Owner's Manual - Page 95
and video cassettes. SC-57 trademarks are the property of their respective owners. THX Cinema processing THX is an exclusive set help create channel. This expands the listening position and creates-with only two speakers- the same spacious surround experience as in a movie theatre. In case of SC-55 - Pioneer SC-57 | Owner's Manual - Page 96
channel levels and frequency response. This enables users to experience the true impact of soundtracks regardless of the volume setting affect wireless performance. Apple, AirPlay, the AirPlay logo, iPad, iPhone, iPod its subsidiaries. All rights reserved. Service not available in Alaska and Hawaii. - Pioneer SC-57 | Owner's Manual - Page 97
sources As above Surround Back speaker(s): Not connected DVD-A sources/Multi-ch PCM Straight decoding SACD sources (5.1 channel encoding) As above Other 5.1/6.1/7.1 channel sources As above a Unavailable with only one surround back speaker connected. PURE DIRECT / DIRECT Dolby Digital - Pioneer SC-57 | Owner's Manual - Page 98
a 5.1-channel audio coding system from DTS Inc. now widely used for DVD-Video, DVD-Audio, 5.1 music discs, digital broadcasts, and video games. Audio A high definition audio technology by which signals can be transferred over HDMI cables. DTS-ES DTS-ES (the ES stands for Extended Surround) is - Pioneer SC-57 | Owner's Manual - Page 99
is changed or a Control with HDMI-compatible component is played. ! The receiver's power is also set to standby, when the TV's power is set to standby. ARC (Audio Return Channel) When a TV supporting the HDMI ARC (Audio Return Channel) function is connected to the receiver, the sound of the TV can - Pioneer SC-57 | Owner's Manual - Page 100
, including push-button configuration and PIN code configuration. This AV receiver supports both push-button configuration and PIN code configuration. SSID Abbreviation of Service Set IDentifier. A wireless LAN access point identifier. Can be set as desired using up to 32 characters of English - Pioneer SC-57 | Owner's Manual - Page 101
on page 48 . DLNA See About network playback on page 50 . AirPlay See Using AirPlay on iPod touch, iPhone, iPad, and iTunes on page 47 . Wireless ARC (Audio Return Channel) See HDMI Setup on page 53 . SACD Gain See Setting the Audio options on page 56 . Auto delay See Setting the Audio options on - Pioneer SC-57 | Owner's Manual - Page 102
Continuous average power output of 140 watts* per channel, min., at 8 ohms, 1 kHz with no more than 0.08 %** total harmonic distortion. Multi channel simultaneous power output (1 kHz, 1 %, 8 W) 9 ch total..........810 W (SC-57)/720 W (SC-55) Continuous Power Output (1 kHz, 8 W, 0.08 %) Front 140 - Pioneer SC-57 | Owner's Manual - Page 103
13 Preset code list You should have no problem controlling a component if you find the manufacturer in commands from another remote control (see Programming signals from other remote controls on page 64 ). TV Pioneer 0004, 0006, 0113, 0115, 0116, 0117, 0119, 0122, 0123 Admiral 0001, 0014 - Pioneer SC-57 | Owner's Manual - Page 104
2085 Lenoxx 2074, 2090 LG 2019, 2051, 2061, 2082, 2087 Liquid Video 2075 Liteon 2025, 2092 Magnavox 2067, 2076, 2091 Memorex 2066 Microsoft 2077 operations with the preset codes for the DVD, DVR (BDR, HDR). Pioneer 2159, 2160 Denon 2147, 2148, 2149 Hitachi 2144, 2145, 2146 JVC 2127, 2128, 2130 - Pioneer SC-57 | Owner's Manual - Page 105
, 1003 Touch 1017 UltimateTV 1031 Unitech 1002 Vector Research 1000 Video Concepts 1000 Videosonic 1002 Viewsonic 1017 Voodoo 1017 Wards 1002, 1003, 1004, 1005 Yamaha 1000, 1001 Zenith 1013, 1018 ZT Group 1017 Satellite Set Top Box Pioneer 0126, 6097, 6098, 6145 Echostar 6002, 6089, 6036, 6005 - Pioneer SC-57 | Owner's Manual - Page 106
13 Additional information CD (SACD) Pioneer 5065, 5066 AKAI 5043 Asuka 5045 Denon 5019 Fisher 5048 Goldstar 5040 Hitachi 5042 Kenwood 5020, 5021, 5031 Luxman 5049 Marantz 5033 Onkyo 5017, 5018, 5030, 5050 Panasonic 5036 Philips 5022, 5032, - Pioneer SC-57 | Owner's Manual - Page 107
Additional information 13 En 107 - Pioneer SC-57 | Owner's Manual - Page 108
le service après-vente agréé le plus proche et pour acheter des pièces de rechange, des modes d'emploi ou des accessoires, reportez-vous aux URL suivantes : In the USA/Aux Etats-Unis http://www.pioneerelectronics.com In Canada/Aux Canada http://www.pioneerelectronics.ca S018_B1_EnFr PIONEER
-
 1
1 -
 2
2 -
 3
3 -
 4
4 -
 5
5 -
 6
6 -
 7
7 -
8
-
9
-
10
-
11
-
12
-
13
-
14
-
15
-
16
-
17
-
18
-
19
-
20
-
21
-
22
-
23
-
24
-
25
-
26
-
27
-
28
-
29
-
30
-
31
-
32
-
33
-
34
-
35
-
36
-
37
-
38
-
39
-
40
-
41
-
42
-
43
-
44
-
45
-
46
-
47
-
48
-
49
-
50
-
51
-
52
-
53
-
54
-
55
-
56
-
57
-
58
-
59
-
60
-
61
-
62
-
63
-
64
-
65
-
66
-
67
-
68
-
69
-
70
-
71
-
72
-
73
-
74
-
75
-
76
-
77
-
78
-
79
-
80
-
81
-
82
-
83
-
84
-
85
-
86
-
87
-
88
-
89
-
90
-
91
-
92
-
93
-
94
-
95
-
96
-
97
-
98
-
99
-
100
-
101
-
102
-
103
-
104
-
105
-
106
-
107
-
108
 |
 |

SC-
57
SC-
55