Pioneer SC-65 Owner's Manual - Page 44
Select 'System Setup' from the Home Menu. - how to hook up zone 2 on
 |
View all Pioneer SC-65 manuals
Add to My Manuals
Save this manual to your list of manuals |
Page 44 highlights
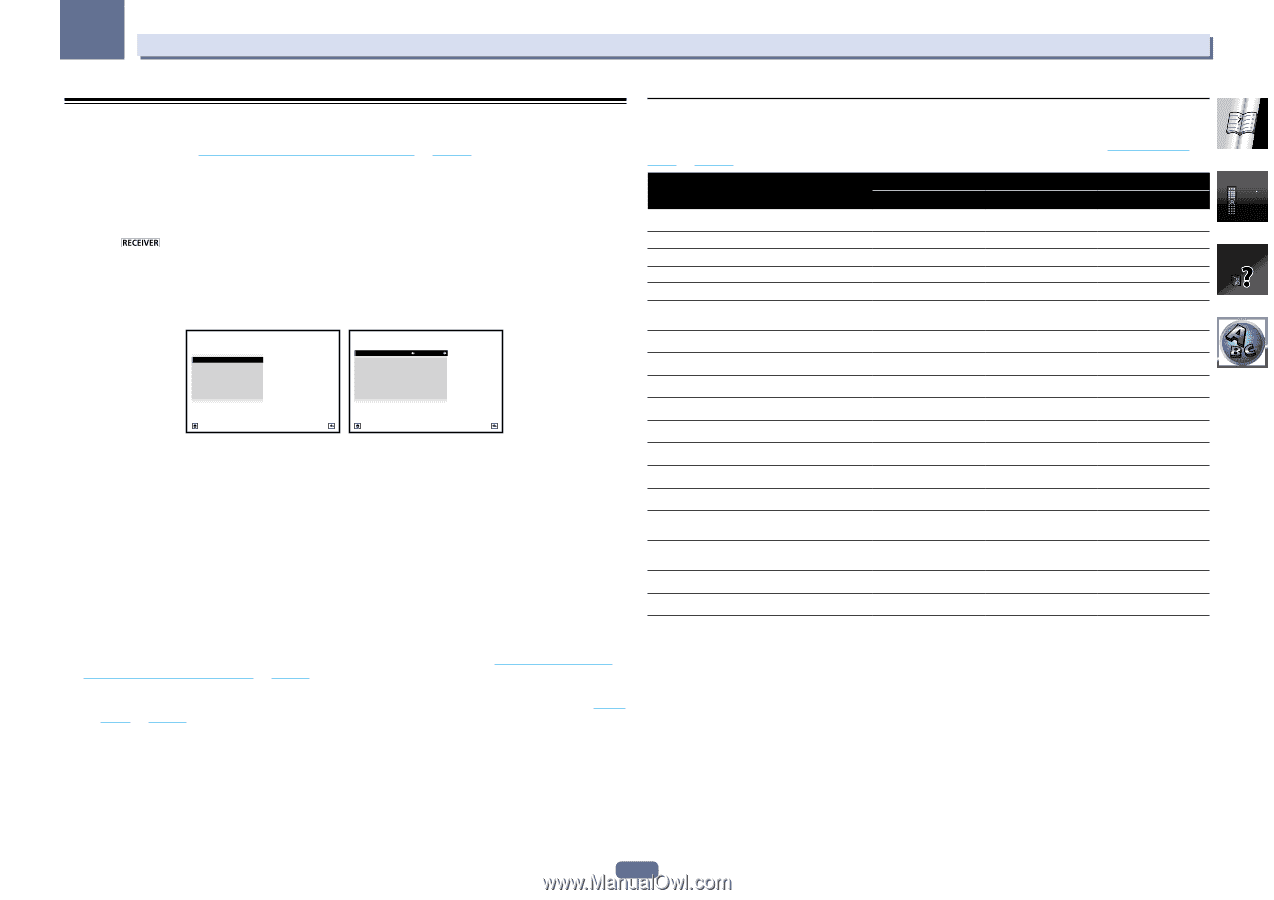
04 Basic Setup The Input Setup menu You only need to make settings in the Input Setup menu if you didn't hook up your digital equipment according to the default settings (see Input function default and possible settings on page 44). In this case, you need to tell the receiver what equipment is hooked up to which terminal so the buttons on the remote control correspond to the components you've connected. ! The OSD display is only displayed when the receiver's HDMI OUT terminal and the TV's HDMI input are con- nected with an HDMI cable. If the TV is connected with anything other than an HDMI cable, watch the front panel display while performing the various operations and making settings. 1 Press on the remote control, then press HOME MENU. A Graphical User Interface (GUI) screen appears on your TV. Use i/j/k/l and ENTER to navigate through the screens and select menu items. Press RETURN to exit the current menu. 2 Select 'System Setup' from the Home Menu. 3 Select 'Input Setup' from the System Setup menu. 4.System Setup A/V RECEIVER a.Manual SP Setup b. Input Setup c. OSD Language d. Network Setup e. HDMI Setup f. Other Setup 4b.Input Setup A/V RECEIVER Input Input Name Input Skip : DVD : Rename : OFF Audio In : HDMI Input : Component In : 12V Trigger 1 : 12V Trigger 2 : COAX-1 Input-1 In-1 OFF OFF Exit Return Exit Return 4 Select the input function that you want to set up. The default names correspond with the names next to the terminals on the rear panel (such as DVD or SAT/CBL which, in turn, correspond with the names on the remote control. 5 Select the input(s) to which you've connected your component. For example, if your DVD player only has an optical output, you will need to change the DVD input function's Audio In setting from COAX-1 (default) to the optical input you've connected it to. The numbering (OPT-1 to OPT-2) corresponds with the numbers beside the inputs on the back of the receiver. 6 When you're finished, proceed to the settings for other inputs. There are optional settings in addition to the assignment of the input jacks: ! Input Name - You can choose to rename the input function for easier identification. Select Rename to do so, or Default to return to the system default. ! Input Skip - When set to ON, that input is skipped when selecting the input using INPUT SELECT. (DVD and other inputs can be still be selected directly with the input function buttons.) ! 12V Trigger 1/2 - After connecting a component to one of the 12 volt triggers (see Switching components on and off using the 12 volt trigger on page 39), select MAIN, ZONE 2, ZONE 3 or OFF for the corresponding trigger setting to switch it on automatically along with the (main or sub) zone specified. - Devices connected to 12 volt triggers can be associated with HDMI OUT switching. For details, see HDMI Setup on page 66. 7 When you're finished, press RETURN. You will return to the System Setup menu. Input function default and possible settings The terminals on the receiver generally correspond to the name of one of the input functions. If you have connected components to this receiver differently from (or in addition to) the defaults below, see The Input Setup menu on page 44 to tell the receiver how you've connected up. The dots (k) indicate possible assignments. Input function HDMI Input Terminals Audio Component BD (BD) DVD SAT/CBL DVR/BDR VIDEO HDMI 5/MHL (front panel) IN 1 COAX-1 IN 1 IN 2 COAX-2 k IN 3 OPT-2 IN 2 IN 4 k k IN 5 HDMI 6 IN 6 HDMI 7 IN 7 INTERNET RADIO SiriusXM PANDORA MEDIA SERVER FAVORITES iPod/USB TV CD TUNER OPT-1 ANALOG-1 ADAPTER PORT a When ARC at HDMI Setup is set to ON, it is not possible to make assignments to the TV input's Audio In terminals. b Only the TV and CD inputs can be assigned to ANALOG-1. 44
-
 1
1 -
2
-
3
-
4
-
5
-
6
-
7
-
8
-
9
-
10
-
11
-
12
-
13
-
14
-
15
-
16
-
17
-
18
-
19
-
20
-
21
-
22
-
23
-
24
-
25
-
26
-
27
-
28
-
29
-
30
-
31
-
32
-
33
-
34
-
35
-
36
-
37
-
38
-
 39
39 -
 40
40 -
 41
41 -
 42
42 -
 43
43 -
 44
44 -
 45
45 -
 46
46 -
 47
47 -
 48
48 -
 49
49 -
50
-
51
-
52
-
53
-
54
-
55
-
56
-
57
-
58
-
59
-
60
-
61
-
62
-
63
-
64
-
65
-
66
-
67
-
68
-
69
-
70
-
71
-
72
-
73
-
74
-
75
-
76
-
77
-
78
-
79
-
80
-
81
-
82
-
83
-
84
-
85
-
86
-
87
-
88
-
89
-
90
-
91
-
92
-
93
-
94
-
95
-
96
-
97
-
98
-
99
-
100
-
101
-
102
-
103
-
104
-
105
-
106
-
107
-
108
-
109
-
110
-
111
-
112
-
113
-
114
-
115
-
116
-
117
-
118
-
119
-
120
-
121
-
122
-
123
 |
 |