Pioneer VSX-09TX Service Manual - Page 79
Pioneer VSX-09TX Manual
 |
View all Pioneer VSX-09TX manuals
Add to My Manuals
Save this manual to your list of manuals |
Page 79 highlights
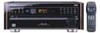
VSX-D906S, VSX-07TX, VSX-09TX 8. PANEL FACILITIES AND SPECIFICATIONS NAMES OF PARTS * The size of characters shown in the figure may differ from that on the actual product. Front panel 1T T® OD PIONISF_11. AUDIO/VIDEO TERE RECEIVER VS \_ O SE ti HI ZMO5DE ii, STEREO -.%005 o CI - 0 STA',NXDBVY/I00 STAY MVO LO IntAliµnt ',Arm Contra °P.,!l''TI VIDEO VeC)R VCR 2 OD TUNER PHONO TAPE I MONITOR (0 0000 ,..._ MNER 5-CH NNELMALPOWEROUTPUT ver, OPTICAL RE T DIRECT LO,UDoNE_SS CDO0gOr CLOS MELTIT MPX PHONES IVNIDPEUOT VIDEO L AUDIOR C SPEAKERS BASS TREBLE BAND LIST IN OP I- EC) O • A [ a) t AIIII I FM ) MIN MAX oc)8(Dgc)c) DSP MODE button*NOTE DO button SIGNAL SELECT button STEREO button RESET button Displays LOUDNESS button*NOTE Press this button when the volume is low to raise the low and high frequency levels so that the sound can be heard more easily. This button operates in stereo mode only. DYNAMIC RANGE CONTROL button The volume is constantly controlled to maintain an even level and to make it possible to hear clearly even when the volume is set to a low level. (Works only when operating in DOLBY DIGITAL mode.) O CLASS button MEMORY button MPX button Use to switch the auto stereo/monaural mode for receiving FM broadcasts. When the received broadcast signal is weak, press this button to set the monaural mode. SYSTEM SET UP button Function buttons STANDBY indicator POWER STANDBY/ON button PHONES jack (Headphone terminal) Video input terminals Connect to a video camera, etc. OPTICAL button SPEAKERS A, B buttons ON/OFF switches for the A and B speaker systems. DIRECT button*NOTE Use to play back sound without going through the tone control circuits. This button operates in stereo mode only. BASS -, + buttons*NOTE Use to adjust tone. This button operates in stereo mode only. TREBLE -, + buttons*NOTE Use to adjust tone. This button operates in stereo mode only. AM, FM buttons LIST IN button vii Select/Adjust buttons MASTER VOLUME *NOTE These operation buttons do not function during AC-3 input.
-
 1
1 -
2
-
3
-
4
-
5
-
6
-
7
-
8
-
9
-
10
-
11
-
12
-
13
-
14
-
15
-
16
-
17
-
18
-
19
-
20
-
21
-
22
-
23
-
24
-
25
-
26
-
27
-
28
-
29
-
30
-
31
-
32
-
33
-
34
-
35
-
36
-
37
-
38
-
39
-
40
-
41
-
42
-
43
-
44
-
45
-
46
-
47
-
48
-
49
-
50
-
51
-
52
-
53
-
54
-
55
-
56
-
57
-
58
-
59
-
60
-
61
-
62
-
63
-
64
-
65
-
66
-
67
-
68
-
69
-
70
-
71
-
72
-
73
-
 74
74 -
 75
75 -
 76
76 -
 77
77 -
 78
78 -
 79
79 -
 80
80 -
 81
81 -
 82
82 -
 83
83 -
 84
84
 |
 |
