Pioneer VSX-51 Owner's Manual - Page 24
Plugging in the receiver
 |
View all Pioneer VSX-51 manuals
Add to My Manuals
Save this manual to your list of manuals |
Page 24 highlights
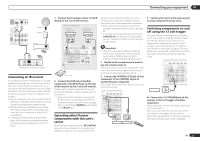
03 Connecting your equipment Plugging in the receiver Only plug in after you have connected all your components to this receiver, including the speakers. CAUTION ! Handle the power cord by the plug part. Do not pull out the plug by tugging the cord, and never touch the power cord when your hands are wet, as this could cause a short circuit or electric shock. Do not place the unit, a piece of furniture, or other object on the power cord or pinch the cord in any other way. Never make a knot in the cord or tie it with other cables. The power cords should be routed so that they are not likely to be stepped on. A damaged power cord can cause a fire or give you an electric shock. Check the power cord once in a while. If you find it damaged, ask your nearest Pioneer authorized independent service company for a replacement. ! Do not use any power cord other than the one supplied with this unit. ! Do not use the supplied power cord for any purpose other than that described below. ! The receiver should be disconnected by removing the mains plug from the wall socket when not in regular use, e.g., when on vacation. 1 Plug the supplied power cord into the AC IN socket on the back of the receiver. 2 Plug the other end into a power outlet. ! After this receiver is connected to an AC outlet, a 2 second to 10 second HDMI initialization process begins. You cannot carry out any operations during this process. The HDMI indicator in the front panel display blinks during this process, and you can turn on this receiver once it has stopped blinking. When you set the Control with HDMI to OFF, you can skip this process. For details about the Control with HDMI feature, see Control with HDMI function on page 44 . 24 En
-
 1
1 -
2
-
3
-
4
-
5
-
6
-
7
-
8
-
9
-
10
-
11
-
12
-
13
-
14
-
15
-
16
-
17
-
18
-
 19
19 -
 20
20 -
 21
21 -
 22
22 -
 23
23 -
 24
24 -
 25
25 -
 26
26 -
 27
27 -
 28
28 -
 29
29 -
30
-
31
-
32
-
33
-
34
-
35
-
36
-
37
-
38
-
39
-
40
-
41
-
42
-
43
-
44
-
45
-
46
-
47
-
48
-
49
-
50
-
51
-
52
-
53
-
54
-
55
-
56
-
57
-
58
-
59
-
60
-
61
-
62
-
63
-
64
-
65
-
66
-
67
-
68
-
69
-
70
-
71
-
72
-
73
-
74
-
75
-
76
-
77
-
78
-
79
-
80
-
81
-
82
-
83
-
84
-
85
-
86
-
87
-
88
-
89
-
90
-
91
-
92
 |
 |
