Pioneer VSX-517-S Owner's Manual
Pioneer VSX-517-S - AV Receiver Manual
 |
View all Pioneer VSX-517-S manuals
Add to My Manuals
Save this manual to your list of manuals |
Pioneer VSX-517-S manual content summary:
- Pioneer VSX-517-S | Owner's Manual - Page 1
AUDIO/VIDEO MULTI-CHANNEL RECEIVER RECEPTEUR AUDIOVISUEL A VOIES MULTI-CANAUX VSX-517 Register your product at: www.pioneerelectronics.com (US) www.pioneerelectronics.ca (Canada) • Protect your new investment The details of your purchase will be on file - Pioneer VSX-517-S | Owner's Manual - Page 2
, including interference that may cause undesired operation. Product Name: AUDIO/VIDEO MULTI-CHANNEL RECEIVER Model Number: VSX-517-K, VSX-517-S Responsible Party Name: PIONEER ELECTRONICS SERVICE INC. Address: 1925 E. DOMINGUEZ ST. LONG BEACH, CA 90801-1760, USA Phone: 1-800-421-1404 - Pioneer VSX-517-S | Owner's Manual - Page 3
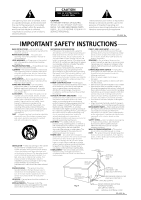
USER-SERVICEABLE PARTS INSIDE. REFER SERVICING TO QUALIFIED SERVICE home connected OVERLOADING - Do not overload instructions. Adjust only those controls that are covered by the operating instructions as an improper adjustment of other controls may result in damage and will often require extensive work - Pioneer VSX-517-S | Owner's Manual - Page 4
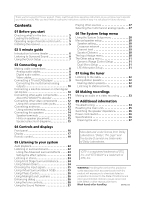
range of remote control unit. . . . . . 5 Installing the receiver 5 02 5 minute guide Introduction to home theater 6 Listening to Surround Sound 6 Using the Quick Setup 7 03 Connecting up Making cable connections 8 Analog audio cables 8 Digital audio cables 8 Video cables 8 Connecting a TV - Pioneer VSX-517-S | Owner's Manual - Page 5
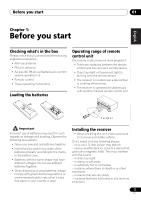
confirm system operation) x2 • Remote control • These operating instructions Loading the batteries Operating range of remote control unit The remote control may not work properly if: • There are obstacles between the remote control and the receiver's remote sensor. • Direct sunlight or fluorescent - Pioneer VSX-517-S | Owner's Manual - Page 6
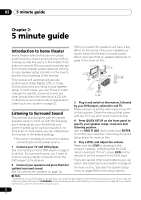
DVD player, subwoofer and TV. Make sure you've set the video input on your TV to this receiver. Check the manual that came with the TV if you don't know how to do this. 4 Press QUICK SETUP on the front panel to specify your speaker setup, room size and listening position. Use the MULTI JOG dial to - Pioneer VSX-517-S | Owner's Manual - Page 7
JOG ENTER VSX-517 MULTI JOG TUNING STATION STEREO/ ADVANCED F.S.SURR STANDARD SURROUND LISTENING MODE MASTER VOLUME DOWN UP 1 If the receiver is off, press STANDBY/ON to turn the power on. 2 Press QUICK SETUP. 3 Use the MULTI JOG dial to choose your subwoofer setting. Select YES or - Pioneer VSX-517-S | Owner's Manual - Page 8
may cause a humming noise from the speakers. Digital audio cables Commercially available coaxial digital audio cables or optical cables should be used to connect digital components to this receiver.1 Important • Before making or changing any connections, switch off the power and disconnect the - Pioneer VSX-517-S | Owner's Manual - Page 9
DVD player and TV to the receiver. 1 Connect a coaxial digital audio output on your DVD player to the DIGITAL COAX 1 (DVD/LD) input on this receiver. Use a coaxial digital audio cable for the connection.1 2 Connect the composite video output and the stereo analog audio outputs2 on your DVD player to - Pioneer VSX-517-S | Owner's Manual - Page 10
DVD/multi-channel decoder with multi-channel analog output jacks Connecting a satellite receiver or other digital set-top box Satellite and cable receivers, and terrestrial digital TV tuners are all examples of so-called 'set-top boxes'. 2 DIGITAL OUT OPTICAL COAXIAL 1 R AUDIO L AV OUT VIDEO - Pioneer VSX-517-S | Owner's Manual - Page 11
OPT 1 (CD) input. 2 If necessary, connect the analog audio outputs of the component to a set of spare audio inputs on this receiver. You'll need to make this connection for components without a digital output, or if you want to record from a digital component. Use a stereo RCA phono cable as shown - Pioneer VSX-517-S | Owner's Manual - Page 12
and HDD recorders. 1 Connect a set of audio/video outputs on the recorder to the DVR/VCR AUDIO and VIDEO inputs on this receiver. Use a stereo RCA phono cable for the audio connection and a standard RCA video cable for the video connection. 2 Connect a set of audio/video inputs on the recorder to - Pioneer VSX-517-S | Owner's Manual - Page 13
Français Italiano Nederlands Español 1 Connect the component video outputs of your source to a set of component video inputs on this receiver. Use a three-way component video cable. 2 If necessary, assign the component video inputs to the input source you've connected. This only needs to be done - Pioneer VSX-517-S | Owner's Manual - Page 14
03 Connecting up Connecting the speakers A complete setup of six speakers (including the subwoofer) is shown below, but everyone's home setup will vary. Simply connect the speakers you have in the manner shown below. The receiver will work with just two stereo speakers (the front speakers in the - Pioneer VSX-517-S | Owner's Manual - Page 15
, this may cause the receiver to turn off automatically. Speaker placement diagrams The following illustrations show 5.1 channel speaker setups. 3-D view of 5.1 channel speaker setup Overhead view of speaker setup Front left Center Front right Surround left Subwoofer Surround right Listening - Pioneer VSX-517-S | Owner's Manual - Page 16
34 ENTER VSX-517 MULTI JOG PHASE DIALOGUE AUTO SURR/ CONTROL ENHANCEMENT DIRECT DVD / LD DVD 5.1 TV /SAT DVR / VCR CD CD-R / TAPE / MD FM STANDBY/ON PHONES SOUND MIDNIGHT/ RETRIEVER LOUDNESS VSB MODE TONE SIGNAL SELECT DIMMER TUNER EDIT QUICK SETUP SETUP RETURN MULTI JOG AM - Pioneer VSX-517-S | Owner's Manual - Page 17
Control (page 26). 8 DIALOGUE ENHANCEMENT Use to make dialog stand out when watching TV or a movie (page 26). 9 STANDBY/ON 10 PHONES jack Use to connect headphones (when connected, there is no sound output from the speakers). 11 SOUND RETRIEVER Press to restore CD quality sound to compressed audio - Pioneer VSX-517-S | Owner's Manual - Page 18
mode. 10 Tuner indicators / MONO Lights when the mono mode is set using the MPX button. / STEREO Lights when a stereo FM broadcast is being received in auto stereo mode. / TUNED Lights when a broadcast is being received. 11 Speaker indicator Shows if the speaker system is on or not. SPA means the - Pioneer VSX-517-S | Owner's Manual - Page 19
Nederlands Español Remote control RECEIVER SLEEP DIMMER PHASE 1 INPUT SELECTOR DVD 5.1 DVD TV DVR RECEIVER CD CD-R FM AM STEREO/ 2 AUTOSURR F.S.SURR STANDARD ADV.SURR TOP MENU S.RETRIEVER MENU 3 MIDNIGHT DIALOG TUNER EDIT ENTER ONE TOUCH COPY 4 SETUP VOLUME RETURN 5 EFFECT - Pioneer VSX-517-S | Owner's Manual - Page 20
to control a Pioneer DVD player or recorder connected to your system (press SHIFT to access the commands bordered by a rectangle). Button What it does DVD/ Turns DVD power on/off. DVR CH +/- Switches channels. SUBTITLE Displays/changes the subtitles on multilingual DVD-Video discs. AUDIO - Pioneer VSX-517-S | Owner's Manual - Page 21
Controls and displays 04 MPX Use to switch between auto stereo and mono reception of FM broadcasts. If the signal is weak then switching to mono will improve the sound quality (page 32). English Deutsch Français Italiano Nederlands Español 21 En - Pioneer VSX-517-S | Owner's Manual - Page 22
is being processed. Listening in surround sound Using this receiver, you can listen to any source in surround sound. However, the options available will depend on your speaker setup and the type of source you're listening to. CD CD-R FM AM STEREO/ AUTOSURR F.S.SURR STANDARD ADV.SURR TOP MENU - Pioneer VSX-517-S | Owner's Manual - Page 23
- Gives multichannel sound to a stereo source, using all of your speakers. • PHONESUR. - Creates the effect of overall surround with headphones. 1 Press EFFECT/CH SEL repeatedly to select the setting you want to adjust. Depending on the current status / mode of the receiver, certain options may not - Pioneer VSX-517-S | Owner's Manual - Page 24
AM STEREO/ AUTOSURR F.S.SURR STANDARD ADV.SURR • While listening to a source, press AUTO SURR to select Stream Direct mode. • AUTOSURR. - See Auto playback on page 22. • DIRECT - Sources are heard according to the settings made in the Surround Setup (speaker setting, channel level, speaker distance - Pioneer VSX-517-S | Owner's Manual - Page 25
details, refer to the instruction manual supplied with your DVD player. 2 The Virtual Surround Back mode is not effective when using headphones, Stream Direct, Stereo, Front Stage Surround Advance mode. It is also unavailable if the surround speaker is set to NO in Speaker setting on page 28. 25 - Pioneer VSX-517-S | Owner's Manual - Page 26
Listening position ? P Front speaker H A S E C O N T R O L Sound O N source Subwoofer Listening position Phase Control technology provides coherent sound reproduction through the use of phase matching1 for an optimal sound image at your listening position. The default setting is on and - Pioneer VSX-517-S | Owner's Manual - Page 27
quality sound back to compressed 2-channel audio by restoring sound pressure and connected a decoder or a DVD player with multichannel analog outputs to this receiver (page 10), you must select the analog multichannel inputs for surround sound.2 • Press DVD 5.1 (SHIFT+DVD) on the remote control - Pioneer VSX-517-S | Owner's Manual - Page 28
FM AM SETUP VOLUME RETURN 1 Press RECEIVER on the remote control, then press the SETUP button. 2 Use / to select the setting you want to adjust then press ENTER. • SP SETUP - Specify the size, number, distance and overall balance of the speakers you've connected (see Manual speaker setup below - Pioneer VSX-517-S | Owner's Manual - Page 29
speaker to 75 dB SPL (C-weighting/slow reading). • The subwoofer test tone is output at low volumes. You may need to adjust the level after testing with an actual soundtrack. • You can change the channel levels at any time by using EFFECT/CH SEL and +/- on the remote control. You can set two channel - Pioneer VSX-517-S | Owner's Manual - Page 30
need to specify the distance of your speakers from the listening position. The receiver can then add the proper delay needed for effective surround sound. 1 Select 'SP DISTN.' from the SP SETUP menu. 2 Use / to choose the speaker that you want then set the distance. Use / to adjust the distance - Pioneer VSX-517-S | Owner's Manual - Page 31
with some Dolby Digital and DTS audio sources) from distorting the sound from the speakers: • LFEATT 0 - No limiting (recommended setting) • LFEATT 10 - 10dB of limiting • LFEATT ** - No sound from LFE channel Dynamic Range Control Setup • Default setting: OFF Specifies the amount of dynamic - Pioneer VSX-517-S | Owner's Manual - Page 32
and hold TUNING +/- for about a second. Searching automatically stops at the next station. Manual tuning - To change the frequency one step at a be up to four characters long. • Use the MULTI JOG dial (front panel) or the STATION +/- buttons (remote) to select characters, and ENTER to confirm. If - Pioneer VSX-517-S | Owner's Manual - Page 33
this. Most video recorders set the audio recording level automatically-check the component's instruction manual if you're unsure. 5 Start recording, then start playback of the source component. RECEIVER SLEEP DIMMER PHASE INPUT SELECTOR DVD 5.1 DVD TV DVR RECEIVER CD CD-R FM AM STEREO/ AUTOSURR - Pioneer VSX-517-S | Owner's Manual - Page 34
, take the unit to your nearest Pioneer authorized service center or your dealer for servicing. No sound is output when a function is selected. • Make sure the component is connected correctly (refer to Connecting up on page 8). • Press MUTE on the remote control to turn muting off. No image - Pioneer VSX-517-S | Owner's Manual - Page 35
DTS source you are listening to may not have an LFE channel. • Switch the subwoofer setting in Speaker setting on page 28 to YES or PLUS. • Switch the LFE Attenuator Setup on page 31 to LFEATT 0 or LFEATT 10. The PHASE CONTROL feature doesn't seem to have an audible effect. • If applicable, check - Pioneer VSX-517-S | Owner's Manual - Page 36
the power cord once in a while. When you find it damaged, ask your nearest Pioneer authorized service center or your dealer for a replacement. Specifications Amplifier section • Continuous power output (stereo) Front . .110 W (20 Hz to 20 kHz, THD 0.2 %, 8 Ω)1 • Rated power output (surround / 20 Hz - Pioneer VSX-517-S | Owner's Manual - Page 37
dB Component video section • Stereo: 70 dB (at 85 dBf) Distortion Stereo: 0.5 % (1 kHz) Alternate Channel Selectivity . . . 60 dB (400 kHz) Stereo Parts AM loop antenna 1 FM wire antenna 1 Dry cell batteries (AA size IEC R6 2 Remote control 1 These operating instructions Note • Specifications - Pioneer VSX-517-S | Owner's Manual - Page 38
Selecting fine audio equipment by setting your equipment at a safe level BEFORE your hearing adapts. To establish a safe level: • Start your volume control at a low setting. • pneumatic drill 120 Rock band concert in front of speakers, thunderclap 140 Gunshot blast, jet plane 180 Rocket launching - Pioneer VSX-517-S | Owner's Manual - Page 39
39 En 09 English Deutsch Français Italiano Nederlands Español Additional information - Pioneer VSX-517-S | Owner's Manual - Page 40
correctement après sa dépose. L'appareil doit être déconnecté en débranchant sa fiche secteur au niveau de de non utilisation (par exemple avant un départ en vacances). D3-4-2-2-1a_A_Fr NOTE IMPORTANTE SUR LE temps en temps. Contacter le service après-vente PIONEER le plus proche ou le revendeur - Pioneer VSX-517-S | Owner's Manual - Page 41
de la télécommande 5 Installation du récepteur 5 02 Guide en 5 minutes Présentation de l'appareil de cin rapide Quick Setup 7 03 Raccordements Raccordements des câbles 8 Câbles audio analogiques 8 Câbles audio numériques (VSB 25 Utilisation de la fonction Phase Control . . . . . 26 Midnight et - Pioneer VSX-517-S | Owner's Manual - Page 42
08 Pour faire un enregistrement Faire un enregistrement audio ou vidéo . . . . 33 09 Information complémentaire Guide de dépannage 34 Réinitialisation de l'appareil principal 35 Permutation de l'impédance des enceintes . . 36 Précautions d'usage pour le cordon d'alimentation 36 Spécifications - Pioneer VSX-517-S | Owner's Manual - Page 43
English Deutsch Français Italiano Nederlands Español Chapitre 1: Préparatifs Vérification des accessoires livrés avec l'appareil Veuillez vérifier que les accessoires suivants sont livrés avec l'appareil: • Antenne cadre AM • Antenne filaire FM • Piles à anode sèche AA IEC R6 (pour vérifier le bon - Pioneer VSX-517-S | Owner's Manual - Page 44
Guide en 5 minutes Présentation de l'appareil de cinéma à domicile Le système de cinéma à domicile repose sur l'utilisation de pistes audio de DVD, du subwoofer et du télé MULTI JOG pour sélectionner ENTER et confirmer votre sélection. Consultez Utilisation de la touche de réglage rapide Quick Setup - Pioneer VSX-517-S | Owner's Manual - Page 45
CONTROL PHASE DIALOGUE AUTO SURR/ CONTROL ENHANCEMENT DIRECT DVD / LD DVD 5.1 TV / SAT DVR / VCR STANDBY/ON PHONES SOUND MIDNIGHT/ VSB RETRIEVER LOUDNESS MODE TONE SIGNAL SELECT DIMMER TUNER EDIT QUICK SETUP SETUP RETURN MULTI JOG ENTER VSX-517 MULTI JOG TUNING STATION STEREO - Pioneer VSX-517-S | Owner's Manual - Page 46
ce cas, le champ magnétique produit par les transformateurs de l'appareil pourrait provoquer le ronflement des enceintes. Câbles audio numériques Les câbles audio numériques coaxiaux ou les câbles optiques disponibles dans le commerce doivent être utilisés pour raccorder les appareils numériques - Pioneer VSX-517-S | Owner's Manual - Page 47
rique optique du téléviseur à l'entrée DIGITAL OPT 1 (CD) du récepteur. Utilisez un câble optique pour ce raccordement.4 1 COAXIAL DIGITAL OUT 2 R AUDIO L ANALOG OUT VIDEO OUT 4 Raccordez la prise vidéo MONITOR OUT du récepteur à une entrée vidéo de votre téléviseur. Utilisez un câble vidéo RCA - Pioneer VSX-517-S | Owner's Manual - Page 48
IN DVD / LD FRONT PLAY CD-R / TAPE / MD D V D 5.1CH INPUT IN REC L AM LOOP VIDEO ANTENNA OUT MONITOR OUT SUB WOOFER PREOUT 2 DIGITAL OUT OPTICAL COAXIAL 1 R AUDIO L AV OUT VIDEO Raccordement d'un récepteur satellite ou d'un boîtier décodeur numérique STB Les récepteurs satellites - Pioneer VSX-517-S | Owner's Manual - Page 49
Professional) intégré ; il est donc possible de lire des supports audio WMA9 Pro encodés grâce à un raccordement numérique coaxial ou optique si un lecteur compatible avec le système WMA9 Pro est raccordé. Toutefois, les appareils connectés (lecteur DVD, boîtier décodeur, etc.) doivent posséder une - Pioneer VSX-517-S | Owner's Manual - Page 50
/ LD FRONT PLAY CD-R D V D 5.1CH INPUT IN / TAPE / MD REC L AM LOOP VIDEO ANTENNA OUT MONITOR OUT SUB WOOFER PREOUT 3 2 1 OPTICAL COAXIAL DIGITAL OUT R IN L REC AUDIO IN VIDEO IN R OUT L PLAY AUDIO OUT VIDEO OUT VCR, DVR, Lecteur LD, etc. Utilisation des prises femelles vidéo en - Pioneer VSX-517-S | Owner's Manual - Page 51
de l'appareil vidéo à la page 30. 3 Raccordez les prises femelles COMPONENT VIDEO MONITOR OUT du récepteur aux entrées vidéo en composantes de votre téléviseur de vinyle de 5 à 6 mètres de long à la borne d'antenne AM sans déconnecter l'antenne cadre AM fournie. AM LOOP 4 5m à 6m 1 2 FM UNBAL 75 - Pioneer VSX-517-S | Owner's Manual - Page 52
trois ; une configuration complète de huit enceintes est cependant idéale pour la production du son surround. Si vous n'utilisez pas de subwoofer, modifiez le réglage des enceintes avant (consultez Réglage des enceintes à la page 28) sur LARGE. Veillez à raccorder l'enceinte droite à la borne droite - Pioneer VSX-517-S | Owner's Manual - Page 53
sont sécurisées afin d'éviter des accidents d'une part et améliorer la qualité du son d'autre part. Attention • Si vous choisissez d'installer l'enceinte centrale des enceintes Avant gauche Centrale Avant droite Surround gauche Subwoofer Surround droite Position d'écoute 15 Fr English Deutsch - Pioneer VSX-517-S | Owner's Manual - Page 54
34 ENTER VSX-517 MULTI JOG PHASE DIALOGUE AUTO SURR/ CONTROL ENHANCEMENT DIRECT DVD / LD DVD 5.1 TV /SAT DVR / VCR CD CD-R / TAPE / MD FM STANDBY/ON PHONES SOUND MIDNIGHT/ RETRIEVER LOUDNESS VSB MODE TONE SIGNAL SELECT DIMMER TUNER EDIT QUICK SETUP SETUP RETURN MULTI JOG AM - Pioneer VSX-517-S | Owner's Manual - Page 55
PHASE CONTROL Appuyez sur cette touche pour activer/ désactiver Phase Control de qualité CD vers des sources audio compressées (page 27). 12 SETUP Voir Utilisation de la touche de réglage rapide Quick Setup à la page 7. 19 Commandes du menu de configuration du système SETUP Utilisez le cadran MULTI - Pioneer VSX-517-S | Owner's Manual - Page 56
est détecté. DTS S'allume lorsqu'une source comportant des signaux audio DTS encodés est détectée. 2 DIGITAL S'allume lorsqu'un MONO S'allume lorsque le mode mono est sélectionné à l'aide de la touche MPX. / STEREO S'allume lorsque la bande d'émission FM stéréo est captée en mode stéréo auto. / - Pioneer VSX-517-S | Owner's Manual - Page 57
TV DVR RECEIVER CD CD-R FM AM STEREO/ 2 AUTOSURR F.S.SURR STANDARD ADV.SURR TOP MENU S.RETRIEVER MENU 3 MIDNIGHT DIALOG TUNER EDIT ENTER ONE TOUCH COPY 4 SETUP VOLUME RETURN 5 EFFECT/CH SEL LEVEL ANALOG ATT MUTE DVD/DVR HDD CH DVD SUBTITLE CH GUIDE REC AUDIO TIMERREC INFO - Pioneer VSX-517-S | Owner's Manual - Page 58
Control RECEIVER vers des sources audio compressées ( DVD Pioneer raccordé guides sur un lecteur de DVD/DVR. REC* Permet de lancer l'enregistrement. TIMER REC* Permet d'accéder au menu d'enregistrement sur minuterie. INFO* Permet d'afficher des informations supplémentaires sur l'EPG. REC STOP - Pioneer VSX-517-S | Owner's Manual - Page 59
English Deutsch Français Italiano Nederlands Español DISPLAY Permet de naviguer entre l'affichage du nom des stations préréglées et la fréquence correspondante (lisez les conseils page 32). CLASS Permet de naviguer entre les trois rangées (classes) de stations de radio préréglées (page 32). MPX - Pioneer VSX-517-S | Owner's Manual - Page 60
automatiquement le type de source que vous écoutez et sélectionne un mode de lecture multicanaux ou stéréo selon les besoins.1 CD CD-R FM AM STEREO/ AUTOSURR F.S.SURR STANDARD ADV.SURR TOP MENU S.RETRIEVER MENU • Au moment d'écouter une source, appuyez sur AUTO SURR2 pour lancer la lecture de la - Pioneer VSX-517-S | Owner's Manual - Page 61
effets surround. Essayez différents modes sur différentes bandes sonores pour déterminer le mode que vous préférez.1 CD CD-R FM AM STEREO/ AUTOSURR F.S.SURR STANDARD ADV.SURR TOP MENU S.RETRIEVER MENU • Appuyez plusieurs fois sur la touche 'ADV.SURR' pour sélectionner un mode d'écoute. • ACTION - Pioneer VSX-517-S | Owner's Manual - Page 62
STEREO/F.S.SURR pour une lecture en mode stéréo. Appuyez plusieurs fois pour naviguer entre: • STEREO - La source audio de basses (subwoofer). CD CD-R FM AM STEREO/ AUTOSURR F.S.SURR STANDARD distance des enceintes) définis lors de l'étape Surround Setup sont appliqués à la source, ainsi que les - Pioneer VSX-517-S | Owner's Manual - Page 63
re (support encodé CONTROL ENHANCEMENT DIRECT DVD / LD DVD 5.1 TV / SAT DVR/ VCR CD CD-R / TAPE / MD FM STANDBY/ON PHONES SOUND MIDNIGHT/ VSB RETRIEVER LOUDNESS MODE TONE SIGNAL SELECT DIMMER TUNER EDIT QUICK SETUP SETUP RETURN MULTI modes Stream Direct, Stereo et Front Stage - Pioneer VSX-517-S | Owner's Manual - Page 64
sonore Subwoofer Position d'écoute ? P Enceinte avant H A S E C O N T R O L Source O N sonore Subwoofer Position d'écoute La technologie Phase Control garantit types de source sonore. RECEIVER SLEEP DIMMER PHASE INPUT SELECTOR • Appuyez sur PHASE (PHASE CONTROL) pour activer la - Pioneer VSX-517-S | Owner's Manual - Page 65
MULTI JOG pour modifier le niveau des graves et des aigus. Patientez quelques secondes pour que vos modifications prennent effet automatiquement. Utilisation de la fonction Sound Retriever Lorsque des données audio un son de qualité CD vers des sources audio compressées à 2 canaux en rétablissant la - Pioneer VSX-517-S | Owner's Manual - Page 66
menu System Setup. 2 Utilisez / pour sélectionner le réglage que vous désirez et appuyez sur ENTER. • SP SET - Définit la taille/le nombre des enceintes raccordées (reportez-vous à la section Réglage des enceintes ci-dessous). • X.OVER - Définit les fréquences qui seront envoyées vers le subwoofer - Pioneer VSX-517-S | Owner's Manual - Page 67
fréquences graves vers les autres enceintes ou vers le subwoofer. Si vous n'avez pas connecté d'enceinte centrale, choisissez NO (le canal central des sons graves du canal LFE. 1 Sélectionnez 'X.OVER' à partir du menu SP SETUP. 2 Utilisez / pour choisir le point de coupure de la fréquence. Les fr - Pioneer VSX-517-S | Owner's Manual - Page 68
des câbles vidéo en composantes. 1 Sélectionnez 'IN ASSIG.' à partir du menu System Setup. 2 Utilisez / pour sélectionner le réglage que vous désirez et appuyez sur ENTER. Assurez-vous d'avoir bien raccordé les câbles audio de l'appareil aux entrées correspondantes à l'arrière du récepteur. 30 Fr - Pioneer VSX-517-S | Owner's Manual - Page 69
é aux prises COMPONENT VIDEO MONITOR OUT du ré à partir du menu System Setup. 2 Utilisez / pour sé un canal lorsque vous écoutez des supports encodés en mode mono double ( tonalités extrêmement graves (y compris avec certaines sources audio Dolby Digital et DTS) produisent une distorsion du son - Pioneer VSX-517-S | Owner's Manual - Page 70
désirez donner à la station de radio, puis appuyez sur la touche ENTER. Les noms peuvent avoir quatre caractères maximum. • Utilisez le cadran MULTI JOG (panneau avant) ou les touches STATION +/- (télécommande) pour sélectionner des caractères, et appuyez sur la touche ENTER pour confirmer. Si aucun - Pioneer VSX-517-S | Owner's Manual - Page 71
amples informations sur les raccordements). RECEIVER SLEEP DIMMER PHASE INPUT SELECTOR DVD 5.1 DVD TV DVR RECEIVER CD CD-R FM AM STEREO/ AUTOSURR F.S.SURR STANDARD ADV. des enregistreurs vidéo règlent le niveau d'enregistrement audio automatiquement- consultez le mode d'emploi de l'appareil - Pioneer VSX-517-S | Owner's Manual - Page 72
Chapitre 9: Information complémentaire Guide de dépannage Une utilisation incorrecte de l'appareil est ne peut pas être résolu grâce à la liste de contrôles ci-dessous, consultez le service après-vente Pioneer agréé le plus proche de chez vous ou votre revendeur pour effectuer la réparation. • Si l' - Pioneer VSX-517-S | Owner's Manual - Page 73
La fonction PHASE CONTROL • Le cas échéant, vérifiez que le commutateur du filtre passe-bas de semble n'avoir aucun effet votre caisson de basses (subwoofer) est désactiv Lorsque RESET? apparaît sur l'afficheur, appuyez sur la touche ENTER. OK? apparaît sur l'afficheur. 4 Appuyez sur SETUP pour - Pioneer VSX-517-S | Owner's Manual - Page 74
STANDBY/ON tout en maintenant la touche QUICK SETUP enfoncée. À chaque pression sur cette touche, détériorations, demandez au service après-vente Pioneer agréé le plus 120 W par canal Centrale 120 W Surround 120 W par canal Section audio • Entrée (Sensibilité de mesure/Impédance) CD, DVR/VCR, - Pioneer VSX-517-S | Owner's Manual - Page 75
un chiffon à lustrer ou un chiffon sec et doux pour éliminer toute trace de poussière et de saleté. • Lorsque la surface de l'appareil est sale, essuyez-la en utilisant un tissu doux préalablement trempé dans une solution de nettoyage neutre diluée cinq à six fois et bien essoré, puis essuyez - Pioneer VSX-517-S | Owner's Manual - Page 76
Parts Labor Home Audio and Video USER OWNER'S MANUAL. THIS WARRANTY DOES NOT COVER THE COST OF PARTS OR LABOR WHICH WOULD BE OTHERWISE PROVIDED WITHOUT CHARGE UNDER THIS WARRANTY OBTAINED FROM ANY SOURCE OTHER THAN A PIONEER AUTHORIZED SERVICE SPECIFIC Support service representative the problem - Pioneer VSX-517-S | Owner's Manual - Page 77
DE GARANTIE DES PRODUITS Pièces Main-d'œuvre Produits audio et vidéo pour la maison ... Micros, é SUPPORT DIVISION PIONEER ELECTRONICS (USA) INC. P.O. BOX 1760 LONG BEACH, CALIFORNIA 90801 1-800-421-1404 http://www.pioneerelectronics.com AU CANADA DÉPARTÉMENT DE SERVICE AU CONSOMMATEUR PIONEER - Pioneer VSX-517-S | Owner's Manual - Page 78
or if you wish to purchase replacement parts, operating instructions, service manuals, or accessories, please call the number shown below. 8 0 0 - 4 2 1 - 1 4 0 4 Please do not ship your product to Pioneer without first calling the Customer Support Division at the above listed number for assistance
-
 1
1 -
 2
2 -
 3
3 -
 4
4 -
 5
5 -
 6
6 -
 7
7 -
8
-
9
-
10
-
11
-
12
-
13
-
14
-
15
-
16
-
17
-
18
-
19
-
20
-
21
-
22
-
23
-
24
-
25
-
26
-
27
-
28
-
29
-
30
-
31
-
32
-
33
-
34
-
35
-
36
-
37
-
38
-
39
-
40
-
41
-
42
-
43
-
44
-
45
-
46
-
47
-
48
-
49
-
50
-
51
-
52
-
53
-
54
-
55
-
56
-
57
-
58
-
59
-
60
-
61
-
62
-
63
-
64
-
65
-
66
-
67
-
68
-
69
-
70
-
71
-
72
-
73
-
74
-
75
-
76
-
77
-
78
 |
 |

Register your product at:
www.pioneerelectronics.com (US)
www.pioneerelectronics.ca (Canada)
• Protect your new investment
The details of your purchase will be on file for reference in the event of an
insurance claim such as loss or theft.
• Improve product development
Your input helps us continue to design products that meet your needs.
• Receive a free Pioneer newsletter
Registered customers can opt in to receive a monthly newsletter.
• Receive free tips, updates and service bulletins on
your new product
AUDIO/VIDEO MULTI-CHANNEL
RECEIVER
RECEPTEUR AUDIOVISUEL A
VOIES MULTI-CANAUX
VSX-517
Operating Instructions
Mode d'emploi