Pioneer VSX-522-K Owner's Manual - Page 36
Important information regarding the HDMI, connection, iPod messages, USB messages - problems with
 |
View all Pioneer VSX-522-K manuals
Add to My Manuals
Save this manual to your list of manuals |
Page 36 highlights
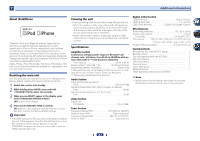
7 Additional information The front panel display switches over for no apparent reason to various different displays. This happens because the demo display is in operation. To turn off the demo display, press any button to go back to the original display, or set the FL Demo Mode to OFF (see The FL Demo Mode menu on page 33). The receiver doesn't recognize iPod touch/iPhone. Try the following. 1. Simultaneously keep pressing the sleep button and home button on the iPod touch or iPhone for over 10 seconds to restart. 2. Turn on the receiver. 3. Connect the iPod touch/iPhone to the receiver. HDMI No picture or sound. If the problem still persists when connecting your HDMI component directly to your monitor, please consult the component or monitor manual or contact the manufacturer for support. No picture. Video signals that are input from the analog video terminal will not output from the HDMI terminal. Signals that are input from the HDMI terminal will not output from the analog video terminal. Be consistent with the type of cable between input and output. Depending in the output settings of the source component, it may be outputting a video format that can't be displayed. Change the output settings of the source, or connect using the composite video jacks. This receiver is HDCP-compatible. Check that the components you are connecting are also HDCP-compatible. If they are not, please connect them using the composite video jacks. Depending on the connected source component, it's possible that it will not work with this receiver (even if it is HDCPcompatible). In this case, connect using the composite video jacks between source and receiver. If video images do not appear on your TV, try adjusting the resolution, Deep Color or other setting for your component. To output signals in Deep Color, use an HDMI cable (High Speed HDMI® Cable) to connect this receiver to a component or TV with the Deep Color feature. The OSD screen (Home Menu, etc.) isn't displayed. The OSD will not appear if you have connected using the HDMI output to your TV. Use composite connections when setting up the system. No sound, or sound suddenly ceases. Check that the HDMI setting is set to AMP (page 28). If the component is a DVI device, use a separate connection for the audio. HDMI format digital audio transmissions require a longer time to be recognized. Due to this, interruption in the audio may occur when switching between audio formats or beginning playback. Turning on/off the device connected to this unit's HDMI OUT terminal during playback, or disconnecting/connecting the HDMI cable during playback, may cause noise or interrupted audio. Important information regarding the HDMI connection There are cases where you may not be able to route HDMI signals through this receiver (this depends on the HDMI equipped component you are connecting-check with the manufacturer for HDMI compatibility information). If you aren't receiving HDMI signals properly through this receiver (from your component), please try the following configuration when connecting up. Configuration Connect your HDMI-equipped component directly to the display using an HDMI cable. Then use the most convenient connection (digital is recommended) for sending audio to the receiver. See the operating instructions for more on audio connections. Set the display volume to minimum when using this configuration. Note • Depending on the component, audio output may be limited to the number of channels available from the connected display unit (for example audio output is reduced to 2 channels for a monitor with stereo audio limitations). • If you want to switch the input source, you'll have to switch functions on both the receiver and your display unit. • Since the sound is muted on the display when using the HDMI connection, you must adjust the volume on the display every time you switch input sources. iPod messages 'iPod/USB Error 1 (I/U ERR1)', 'iPod/USB Error 3 (I/U ERR3)' Switch off the receiver and reconnect the iPod to the receiver. If this doesn't seem to work, try resetting your iPod. 'iPod/USB Error 2 (I/U ERR2)' Switch off the receiver and reconnect the iPod to the receiver. If this doesn't seem to work, try resetting your iPod. An iPod not supported by this receiver is connected. Connect the iPod supported by this receiver (page 22). 'No Track' When there are no tracks in the category selected on the iPod. Select a different category. USB messages 'iPod/USB Error 1 (I/U ERR1)' There is a problem with the signal path from the USB to the receiver. Switch off the receiver and reconnect the USB to the receiver. 'iPod/USB Error 3 (I/U ERR3)' When there is no response from the USB. Switch off the receiver and reconnect the USB to the receiver. 'iPod/USB Error 4 (I/U ERR4)' The power requirements of the USB device are too high for this receiver. Switch off the receiver and reconnect the USB to the receiver. 36
-
 1
1 -
2
-
3
-
4
-
5
-
6
-
7
-
8
-
9
-
10
-
11
-
12
-
13
-
14
-
15
-
16
-
17
-
18
-
19
-
20
-
21
-
22
-
23
-
24
-
25
-
26
-
27
-
28
-
29
-
30
-
 31
31 -
 32
32 -
 33
33 -
 34
34 -
 35
35 -
 36
36 -
 37
37 -
 38
38 -
 39
39
 |
 |