Pioneer VSX-70 Owner's Manual - Page 33
Switch the receiver into standby then use the MHL cable to connect your MHL enabled
 |
View all Pioneer VSX-70 manuals
Add to My Manuals
Save this manual to your list of manuals |
Page 33 highlights
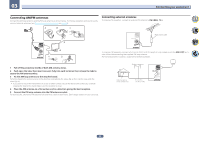
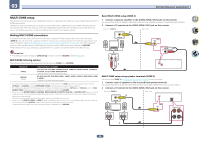
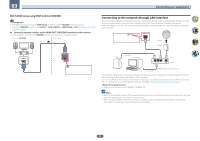
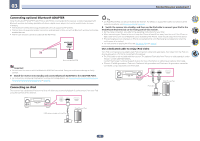
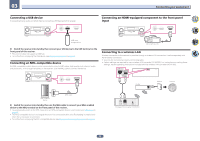
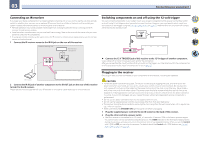
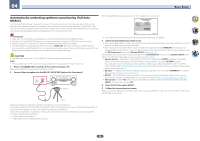
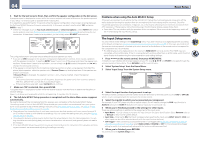
03 Connecting your equipment Connecting a USB device It is possible to play audio and photo files by connecting USB devices to this receiver. ADVANCED MCACC FL OFF HDMI iPod iPhone iPad INPUT SELECTOR STANDBY / ON SPEAKERS CONTROL - MULTI-ZONE - ON / OFF BAND TUNER EDIT AUTO SURR/ALC/ STANDARD STREAM DIRECT SURROUND ADVANCED SURROUND TUNE PRESET ECO iPod iPhone iPad DIRECT CONTROL PHONES MCACC SETUP MIC ENTER MASTER VOLUME with USB 5V 2.1A HDMI 5 INPUT/ MHL (5V 0.9 A) with USB 5V 2.1A HDMI 5 INPUT/ MHL (5V 0.9 A) Connecting an HDMI-equipped component to the front panel input ADVANCED MCACC FL OFF HDMI iPod iPhone iPad INPUT SELECTOR STANDBY/ ON SPEAKERS CONTROL - MULTI-ZONE - ON / OFF BAND TUNER EDIT AUTO SURR/ALC/ STANDARD STREAM DIRECT SURROUND ADVANCED SURROUND TUNE PRESET ECO iPod iPhone iPad DIRECT CONTROL PHONES MCACC SETUP MIC ENTER MASTER VOLUME with USB 5V 2.1A HDMI 5 INPUT/ MHL (5V 0.9 A) with USB 5V 2.1A HDMI 5 INPUT/ MHL (5V 0.9 A) USB mass storage device % Switch the receiver into standby then connect your USB device to the USB terminal on the front panel of this receiver. ! This receiver does not support a USB hub. ! For instructions on playing the USB device, see Playing a USB device on page 43. Connecting an MHL-compatible device An MHL-compatible mobile device can be connected to enjoy full-HD videos, high quality multi-channel audio, and photos etc., with charge the battery on the receiver. Use the MHL cable to connect the device. ADVANCED MCACC FL OFF HDMI iPod iPhone iPad INPUT SELECTOR STANDBY / ON SPEAKERS CONTROL - MULTI-ZONE - ON / OFF BAND TUNER EDIT AUTO SURR/ALC/ STANDARD STREAM DIRECT SURROUND ADVANCED SURROUND TUNE PRESET ECO iPod iPhone iPad DIRECT CONTROL PHONES MCACC SETUP MIC ENTER MASTER VOLUME with USB 5V 2.1A HDMI 5 INPUT/ MHL (5V 0.9 A) with USB 5V 2.1A HDMI 5 INPUT/ MHL (5V 0.9 A) Video camera (etc.) Connecting to a wireless LAN Wireless connection to the network is possible through a wireless LAN connection. Use the separately sold AS-WL300 for connection. ! Use only the furnished accessory connecting cable. ! Certain settings are required to use a wireless LAN converter (AS-WL300). For instructions on making these settings, see the operating instructions included with the wireless LAN converter (AS-WL300). LAN (10/100) DC OUTPUT for WIRELESS LAN (OUTPUT 5 V 0.6 A MAX) LAN (10/100) DC OUTPUT for WIRELESS LAN (OUTPUT 5 V 0.6 A MAX) Router Modem Internet WAN MHL enabled device MHL cable % Switch the receiver into standby then use the MHL cable to connect your MHL enabled device to the MHL terminal on the front panel of this receiver. ! To automatically switch to the MHL input when an MHL-compatible device is connected, see MHL Setup on page 87. ! The MHL-compatible device is recharged whenever it is connected to this unit. (Recharging is enabled only when the unit's power is turned on.) ! For instructions on playing the MHL-compatible device, see Playing an MHL-compatible device on page 44. DC 5V Ethernet WPS Wireless LAN converter (AS-WL300) 33
-
 1
1 -
2
-
3
-
4
-
5
-
6
-
7
-
8
-
9
-
10
-
11
-
12
-
13
-
14
-
15
-
16
-
17
-
18
-
19
-
20
-
21
-
22
-
23
-
24
-
25
-
26
-
27
-
 28
28 -
 29
29 -
 30
30 -
 31
31 -
 32
32 -
 33
33 -
 34
34 -
 35
35 -
 36
36 -
 37
37 -
 38
38 -
39
-
40
-
41
-
42
-
43
-
44
-
45
-
46
-
47
-
48
-
49
-
50
-
51
-
52
-
53
-
54
-
55
-
56
-
57
-
58
-
59
-
60
-
61
-
62
-
63
-
64
-
65
-
66
-
67
-
68
-
69
-
70
-
71
-
72
-
73
-
74
-
75
-
76
-
77
-
78
-
79
-
80
-
81
-
82
-
83
-
84
-
85
-
86
-
87
-
88
-
89
-
90
-
91
-
92
-
93
-
94
-
95
-
96
-
97
-
98
-
99
-
100
-
101
-
102
-
103
-
104
-
105
-
106
-
107
-
108
-
109
-
110
-
111
-
112
-
113
-
114
 |
 |
