Plantronics Savi Go User Guide - Page 11
Out of Range Warning, Low Battery Warning, Checking Battery Level, Turning Headset Indicator Blue - headset replacement
 |
View all Plantronics Savi Go manuals
Add to My Manuals
Save this manual to your list of manuals |
Page 11 highlights
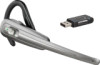
Out of Range Warning If you are on a call you will hear the audio degrade as you move out of range. If you stay out of range, active calls will be suspended. Calls will be re-established upon walking back into range. Low Battery Warning A repeating high/low tone pair every 10 seconds indicates the battery is low. You should recharge the headset immediately. Checking Battery Level You can check the battery level by moving the call control button to the volume down position, then pressing inwards and holding for two seconds. The headset indicator will flash red to indicate the remaining battery charge level. One red flash = low charge level Two red flashes = medium charge level Three red flashes = high charge level Turning Headset Indicator Blue Flash On/Off By default the headset indicator flashes blue to indicate the headset state as described in the section Headset Indicator Lights and Tones. This feature may be disabled by moving the call control button to the volume up position, then pressing inwards and holding for two seconds. The headset indicator will show a short burst of blue flashes. Repeat this operation to turn the headset blue flashing indicator back on. Mute Warning When mute is activated, you will hear a single low tone which will repeat every 30 seconds. Pairing Headset to USB Adapter The headset and USB adapter are supplied paired to each other. However, if you wish to use a replacement headset with your existing USB adapter, the units can be paired to each other by the following method: 1 Ensure your replacement headset is fully charged. 2 Power the headset off by pressing and holding the call control button for six seconds. The headset indicator light will be red for four seconds. 3 Place the headset in pairing mode by pressing and holding the call control button until the indicator light flashes red and blue. 4 Place the USB adapter in pairing mode by pressing and holding the pairing button on the adapter for two seconds. The pairing light will flash red and blue. 5 When the pairing light on the USB adapter goes solid blue, the headset and the USB adapter are paired. NOTE Take caution pairing the USB adapter. Do not press hard. Please "press" with both fingers rather than push on the USB adapter to avoid damage to the USB adapter or USB port. Plantronics Savi User Guide 11
-
 1
1 -
2
-
3
-
4
-
5
-
 6
6 -
 7
7 -
 8
8 -
 9
9 -
 10
10 -
 11
11 -
 12
12 -
 13
13 -
 14
14 -
 15
15
 |
 |
