Polaroid I1035 User Manual - Page 80
Setting the Date Stamp On/Off, DEFAULT, Selecting Paper Setting, Selecting Crop Setting
 |
UPC - 826219012869
View all Polaroid I1035 manuals
Add to My Manuals
Save this manual to your list of manuals |
Page 80 highlights
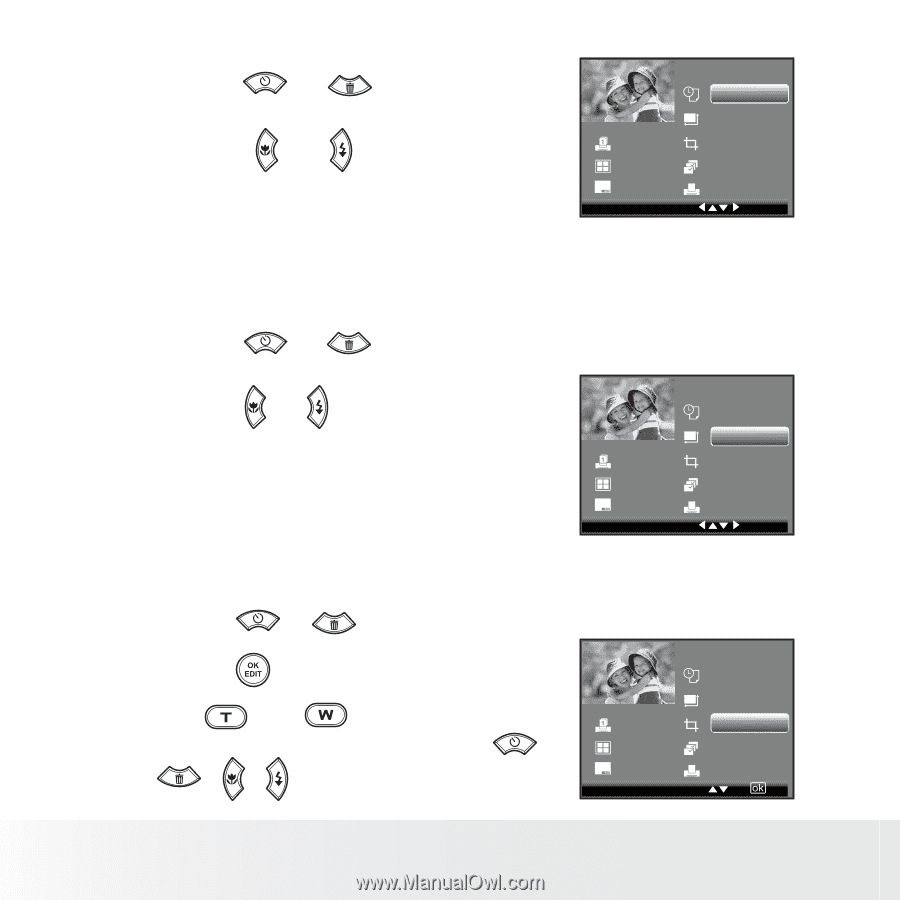
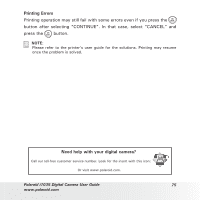
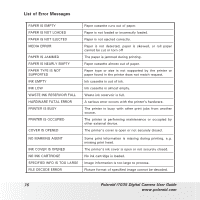
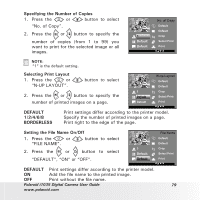
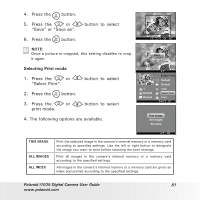
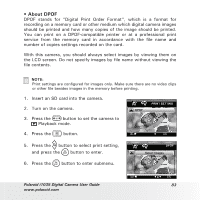
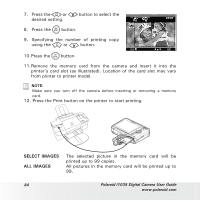
Setting the Date Stamp On/Off 1. Press the or "DATE STAMPING". button to select 2. Press the or button to select "DEFAULT", "ON" or "OFF". 1 Default Default Date Stamping Default Default Crop Select Print Print DEFAULT Print settings differ according to the printer model. ON Add the date stamp to the printed image. OFF Print without the date stamp. Selecting Paper Setting 1. Press the or "Paper Setting". button to select 2. Press the or button to select the paper size. The following paper sizes are supported: 8" x 10", 4" x 6", A4, A6, 11" x 17", B5, postcard, full and default. 1 Default Default Paper Setting Default Default Crop Select Print Print DEFAULT Print settings differ according to the printer model. Selecting Crop Setting 1. Press the or button to select "Crop". 2. Press the button to enter. 3. Press and buttons to control the size of the crop mark. Press the , , , buttons to move the crop 1 Default Default Crop Default Default Crop Select Print Print mark. 80 Polaroid i1035 Digital Camera User Guide www.polaroid.com
-
 1
1 -
2
-
3
-
4
-
5
-
6
-
7
-
8
-
9
-
10
-
11
-
12
-
13
-
14
-
15
-
16
-
17
-
18
-
19
-
20
-
21
-
22
-
23
-
24
-
25
-
26
-
27
-
28
-
29
-
30
-
31
-
32
-
33
-
34
-
35
-
36
-
37
-
38
-
39
-
40
-
41
-
42
-
43
-
44
-
45
-
46
-
47
-
48
-
49
-
50
-
51
-
52
-
53
-
54
-
55
-
56
-
57
-
58
-
59
-
60
-
61
-
62
-
63
-
64
-
65
-
66
-
67
-
68
-
69
-
70
-
71
-
72
-
73
-
74
-
 75
75 -
 76
76 -
 77
77 -
 78
78 -
 79
79 -
 80
80 -
 81
81 -
 82
82 -
 83
83 -
 84
84 -
 85
85 -
86
-
87
-
88
-
89
-
90
-
91
-
92
-
93
-
94
-
95
-
96
-
97
-
98
-
99
-
100
-
101
-
102
-
103
-
104
-
105
-
106
-
107
-
108
-
109
-
110
-
111
-
112
-
113
-
114
-
115
-
116
-
117
 |
 |