Poulan 1990-10 User Manual - Page 18
gasoline/oil
 |
View all Poulan 1990-10 manuals
Add to My Manuals
Save this manual to your list of manuals |
Page 18 highlights
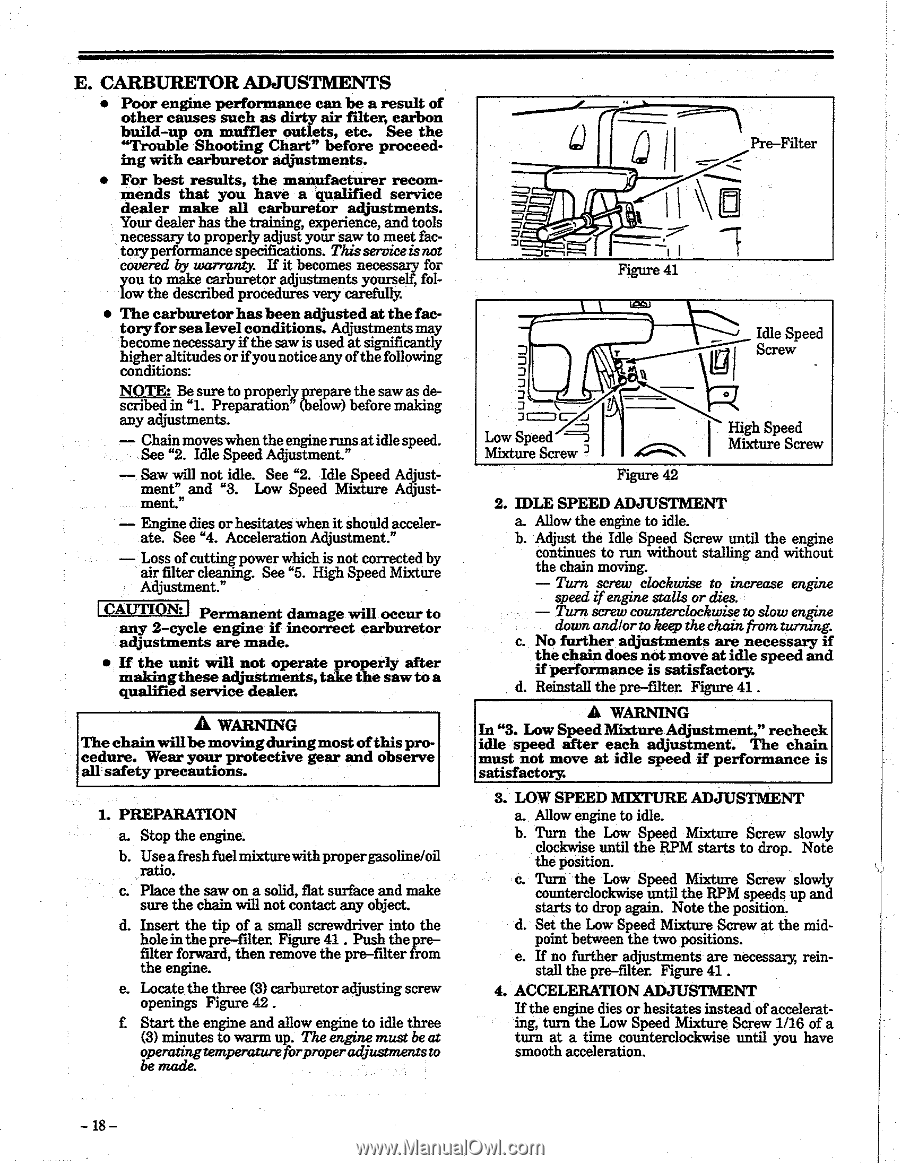
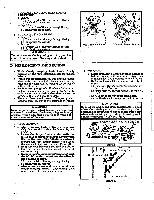
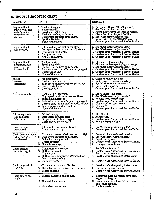
E CARBURETOR ADJUSTMENTS • Poor engine performance can be a result of other causes such as dirty air filter, carbon build-up on muffler outlets, etc. See the "Trouble Shooting Chart" before proceeding with carburetor adjustments. • For best results, the manufacturer recommends that you have a qualified service dealer make all carburetor .adjustments. Your dealer has the training, experience, and tools necessary to properly adjust your saw to meet factoryperformance specifications. Thisserviceisnot covered by warranty. If it becomes necessary for you to make carburetor adjustments yourself, follow the described procedures very carefully. • The carburetor has been adjusted at the factoryforsea level conditions. Adjustments may become necessary if the saw is used at significantly higher altitudes or if you notice any of the following conditions: NOTE: Be sure to properly prepare the saw as described in "1. Preparation" (below) before making any adjustments. - - Chain moveswhen the engine runsat idlespeed. See "2. Idle Speed Adjustment." - Saw will not idle. See "2. Idle Speed Adjustment" and "3. Low Speed Mixture Adjustment." - - Engine dies or hesitates when it should accelerate. See "4. Acceleration Adjustment." - Loss of cutting power which is not corrected by air filter cleaning. See "5. High Speed Mixture Adjustment." CAUTION: Permanent damage will occur to any 2-cycle engine if incorrect carburetor adjustments are made. • If the unit will not operate properly after makingthese adjustments, take the sawtoa qualified service dealer. A WARNING The chain willbe movingduringmost of this procedure. Wear your protective gear and observe all safety precautions. 1. PREPARATION a. Stop the engine. b. Useafresh fuel mixturewith propergasoline/oil ratio. c. Place the saw on a solid, flat surface and make sure the chain will not contact any object. d. Insert the tip of a small screwdriver into the hole in the pre-filter.. Figure 41 . Push the pre- filter forward, then remove the pre-filter from the engine. a Locate the three (3) carburetor adjusting screw openings Figure 42 . f. Start the engine and allow engine to idle three (3) minutes to warm up. The engine must be at operating temperatureforproperadjustments to be made. Pre-Filter I:=7) 7 -.0 Figure 41 J J J 3) /CJ Low Speed Mixture Screw Figure 42 Idle Speed Screw High Speed Mixture Screw 2. IDLE SPEED ADJUSTMENT a. Allow the engine to idle. b. Adjust the Idle Speed Screw until the engine continues to run without stalling and without the chain moving. - Turn screw clockwise to increase engine speed if engine stalls or dies. - Turn screw counterclockwise to slow engine down and/or to keep the chain from. turning. c. No further adjustments are necessary if the chain does not move at idle speed and if performance is satisfactory: d. Reinstall the pre-filter. Figure 41 . A WARNING In "3. Low Speed Mixture Adjustment," recheck idle speed after each adjustment. The chain must not move at idle speed if performance is satisfactory. 3. LOW SPEED MIXTURE ADJUSTMENT a. Allow engine to idle. b. Turn the Low Speed Mixture Screw slowly clockwise until the RPM starts to drop. Note the position. c. Turn the Low Speed Mixture Screw slowly counterclockwise until the RPM speeds up and starts to drop again. Note the position. d. Set the Low Speed Mixture Screw at the midpoint between the two positions. e. If no further adjustments are necessary, reinstall the pre-filter. Figure 41 . 4. ACCELERATION ADJUSTMENT If the engine dies or hesitates instead of accelerating, turn the Low Speed Mixture Screw 1/16 of a turn at a time counterclockwise until you have smooth acceleration. - 18 -
-
 1
1 -
2
-
3
-
4
-
5
-
6
-
7
-
8
-
9
-
10
-
11
-
12
-
 13
13 -
 14
14 -
 15
15 -
 16
16 -
 17
17 -
 18
18 -
 19
19 -
 20
20 -
 21
21 -
 22
22 -
 23
23 -
24
 |
 |