Poulan 220LE User Manual - Page 13
Service
 |
View all Poulan 220LE manuals
Add to My Manuals
Save this manual to your list of manuals |
Page 13 highlights
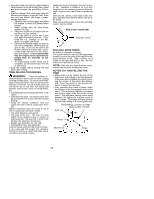
SERVICE WARNING: Disconnect the spark plug before performing maintenance except for carburetor adjustments. We recommend all service and adjustments not listed in this manual be performed by an authorized or Master Service Dealer. MAINTENANCE SCHEDULE Lubricate bar sprocket hole After each use Check: Fuel mixture level . . . . Before each use Bar lubrication Before each use Chain tension Before each use Chain sharpness . . . . Before each use For damaged parts . . Before each use For loose caps Before each use For loose fasteners. . . Before each use For loose parts Before each use Inspect and Clean: Bar Before each use Complete saw After each use Air filter Every 5 hours* Chain brake Every 5 hours* Spark arrestor screen and muffler Every 25 hours* Replace spark plug . Yearly Replace fuel filter . . . Yearly * Hours of Operation AIR FILTER CAUTION: Do not clean filter in gasoline or other flammable solvent to avoid creating a fire hazard or producing harmful evaporative emissions. Cleaning the air filter: A dirty air filter decreases engine perform- ance and increases fuel consumption and harmful emissions. Always clean after every 5 hours of operation. S Clean the cover and the area around it to keep dirt and sawdust from falling into the carburetor chamber when the cover is re- moved. S Remove the parts as illustrated below. S Wash the filter in soap and water. Air Filter Cylinder Cover Screws Cylinder Cover and must be removed to avoid creating a fire hazard or affecting engine performance. Replace the spark arresting screen if breaks occur. CLEANING THE SPARK ARRESTING SCREEN Cleaning is required every 25 hours of operation or annually, whichever comes first. Outlet Guide Muffler Backplate Muffler Bolts Muffler Gasket Bolt Cover Locknut S Loosen and remove the locknut from the bolt cover. S Remove the bolt cover. S Loosen and remove the 2 muffler bolts. Remove the muffler, muffler gasket, outlet guide and backplate. Notice the orienta- tion of these parts for reassembling. S Locate the 2 outlet cover screws on the muffler. Loosen and remove both screws. S Remove the outlet cover. Outlet Cover BACK VIEW OF MUFFLER Screws Muffler Spark Arresting Screen S Remove spark arresting screen. S Clean the spark arresting screen with a wire brush. Replace screen if any wires are bro- ken or screen is blocked after cleaning. S Reinstall spark arresting screen. S Reinstall outlet cover and 2 screws. En- sure outlet cover and both screws are re- installed correctly (see illustrations) to pre- vent damage to the saw. The exhaust outlet must face the chain brake (bar side) of the saw. Exhaust Outlet Cover Outlet INSPECT MUFFLER AND SPARK ARRESTING SCREEN Exhaust Outlet must face chain brake (bar side) of chain saw WARNING: The muffler on this product contains chemicals known to the State of California to cause cancer. As the unit is used, carbon deposits build up on the muffler and spark arresting screen, S Inspect the muffler gasket and replace if damaged. S Reinstall backplate, outlet guide, muffler gasket, and muffler using muffler bolts. Tighten until secure. S Reinstall bolt cover and locknut. 13
-
 1
1 -
2
-
3
-
4
-
5
-
6
-
7
-
 8
8 -
 9
9 -
 10
10 -
 11
11 -
 12
12 -
 13
13 -
 14
14 -
 15
15 -
 16
16
 |
 |
