Poulan 460ZX User Manual - Page 39
Pump Belt, Replacing EZT E-Series Zeroturn Transaxle belt, EZT Belt Removal, EZT Belt Installation
 |
View all Poulan 460ZX manuals
Add to My Manuals
Save this manual to your list of manuals |
Page 39 highlights
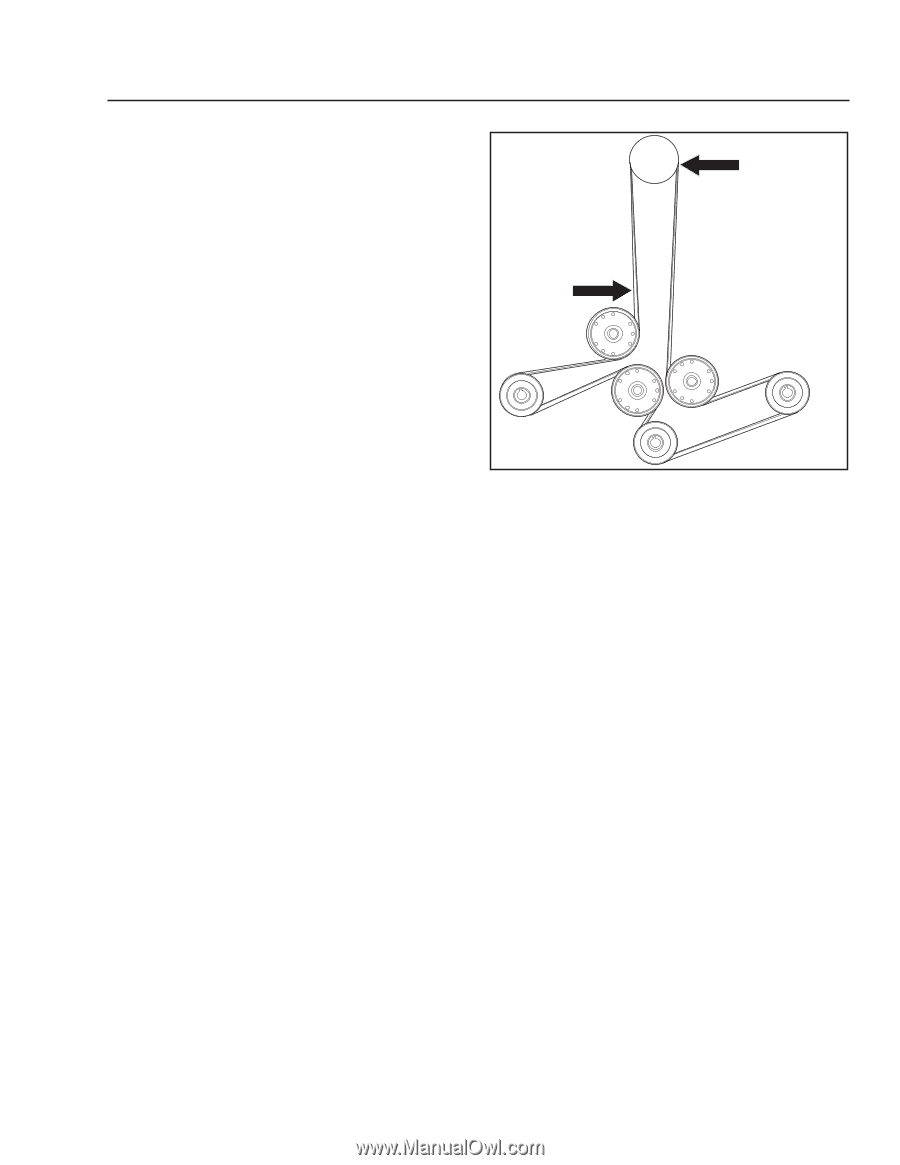
MAINTENANCE Deck Belt Installation NOTE: For ease in installing the deck belt, refer to the routing decal on the top of the deck. 1. Wrap the deck belt around the electric clutch pulley that is located on the engine shaft. 2. Route the belt forward and up onto the deck. 3. Place belt around spring loaded idler pulley. 4. Wrap the belt around the stationary idler pulley and around the mandrel housings. 5. Push inward on the idler arm and carefully route belt over stationary idler pulley. Once belt is properly routed, slowly release idler arm to tension belt. 6. Double check belt routing to make sure it matches the decal affixed to the deck, and the belt does not have any twist. Correct as needed. 7. Replace belt shields on both mandrel housings and secure with fasteners. 1 2 Pump Belt Replacing EZT (E-Series Zeroturn Transaxle) belt Park the mower on a level surface. Engage the parking brake. EZT Belt Removal NOTE: To maintain efficient cooling and not damage the EZTs, be careful of the fan blades when servicing the belt. • Remove the deck belt (see Deck Belt Removal in this section of the manual). • Create slack in the belt by removing the spring on the pump idler arm. • The belt should now be able to be removed from the engine pulley and EZT pulleys. EZT Belt Installation • Wrap the EZT belt around the EZT pulleys • Route the belt around the inside of the idler pulley. • Wrap the belt around the engine pulley. • Reattach the spring on the pump idler arm. • Install clutch onto engine shaft (pulley side down), making sure key is installed. Align the clutch anti-rotation tab into slot on clutch. Secure clutch, install wire. • Reinstall the deck belt onto the electric clutch (see Deck Belt Removal in this section of the manual). 1. Clutch pulley 2. Deck belt Belt routing, 54" deck belt 8011-764 39
-
 1
1 -
2
-
3
-
4
-
5
-
6
-
7
-
8
-
9
-
10
-
11
-
12
-
13
-
14
-
15
-
16
-
17
-
18
-
19
-
20
-
21
-
22
-
23
-
24
-
25
-
26
-
27
-
28
-
29
-
30
-
31
-
32
-
33
-
 34
34 -
 35
35 -
 36
36 -
 37
37 -
 38
38 -
 39
39 -
 40
40 -
 41
41 -
 42
42 -
 43
43 -
 44
44 -
45
-
46
-
47
-
48
-
49
-
50
-
51
-
52
-
53
-
54
-
55
-
56
-
57
-
58
-
59
-
60
 |
 |