Poulan PLB26 Owner Manual - Page 5
Maintenance - choke lever
 |
View all Poulan PLB26 manuals
Add to My Manuals
Save this manual to your list of manuals |
Page 5 highlights
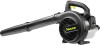
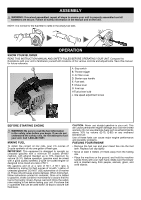
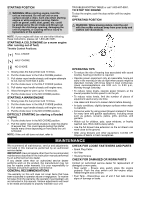
STARTING POSITION aa WARNING: When starting engine, hold the unit as instructed. Do not set unit on any surface except a clean, hard area when starting engine or while engine is running. Debris such as gravel, sand, dust, grass, etc. could be picked up by the air intake and thrown out through the discharge opening, damaging the unit or property, or causing serious injury to bystanders or the operator. NOTE: If your engine still does not start after following these instructions, please call 1-800-487-5951. STARTING A COLD ENGINE (or a warm engine after running out of fuel) Throttle Control Positions: FULL CHOKE TROUBLESHOOTING TABLE or call 1-800-487-5951. TO STOP THE ENGINE To stop the engine, push the stop switch until the engine stops. OPERATING POSITION aa WARNING: While blowing debris, hold the unit with the muffler exhaust away from your body and clothes (see illustration). HALF CHOKE NO CHOKE 1. Slowly press the fuel primer bulb 10 times. 2. Put the choke lever in the FULL CHOKE position. 3. Pull starter rope handle sharply until engine attempts to run, but no more than 3 pulls. 4. Put the choke lever in the HALF CHOKE position. 5. Pull starter rope handle sharply until engine runs. 6. Allow the engine to warm up for 10 seconds. 7. Put the choke lever in the NO CHOKE position. STARTING A WARM ENGINE 1. Slowly press the fuel primer bulb 10 times. 2. Put the choke lever in the HALF CHOKE position. 3. Pull starter rope handle sharply until engine runs. 4. Put the choke lever in the NO CHOKE position. DIFFICULT STARTING (or starting a flooded engine) 1. Put the choke lever in the NO CHOKE position. 2. Pull the starter rope handle sharply to clear the engine of excess fuel. This could require pulling the starter handle many times depending on how badly the unit is flooded. NOTE: If the unit still does not start, refer to OPERATING TIPS • To reduce the risk of hearing loss associated with sound level(s), hearing protection is required. • Operate power equipment only at reasonable hours-not early in the morning or late at night when people might be disturbed. Comply with times listed in local ordinances. Usual recommendations are 9:00 a.m. to 5:00 p.m., Monday though Saturday. • To reduce noise levels, operate power blowers at the lowest possible throttle speed to do the job. • To reduce noise levels, limit the number of pieces of equipment used at any one time. • Use rakes and brooms to loosen debris before blowing. • In dusty conditions, slightly dampen surfaces when water is available. • Conserve water by using power blowers instead of hoses for many lawn and garden applications, including areas such as gutters, screens, patios, grills, porches, and gardens. • Watch out for children, pets, open windows, or freshly washed cars. Blow debris away safely. • Use the full blower tube extension so the air stream can work close to the ground. • After using blowers and other equipment, CLEAN UP! Dispose of debris in trash receptacles. MAINTENANCE We recommend all maintenance, service and adjustments not listed in this manual be performed by an authorized service dealer. IMPORTANT: Have all repairs other than the recommended maintenance described in the instruction manual performed by an authorized service dealer. If any dealer other than an authorized service dealer performs work on the product, the manufacturer may not pay for repairs under warranty. It is your responsibility to maintain and perform general maintenance. GENERAL RECOMMENDATIONS The warranty on this unit does not cover items that have been subjected to operator abuse or negligence. To receive full value from the warranty, the operator must maintain unit as instructed in this manual. Various adjustments will need to be made periodically to properly maintain your unit. CHECK FOR LOOSE FASTENERS AND PARTS • Spark Plug Cable • Air Filter • Housing Screws CHECK FOR DAMAGED OR WORN PARTS Contact an authorized service dealer for replacement of damaged or worn parts. • Stop switch - Ensure stop switch stops the engine properly. Push the stop switch until the engine stops. Restart engine and continue. • Fuel Tank - Discontinue use of unit if fuel tank shows signs of damage or leaks.
-
 1
1 -
 2
2 -
 3
3 -
 4
4 -
 5
5 -
 6
6 -
 7
7 -
 8
8 -
 9
9 -
 10
10 -
 11
11 -
12
-
13
-
14
-
15
-
16
-
17
-
18
-
19
-
20
-
21
-
22
-
23
-
24
 |
 |