Poulan PR120N20S Owner Manual - Page 6
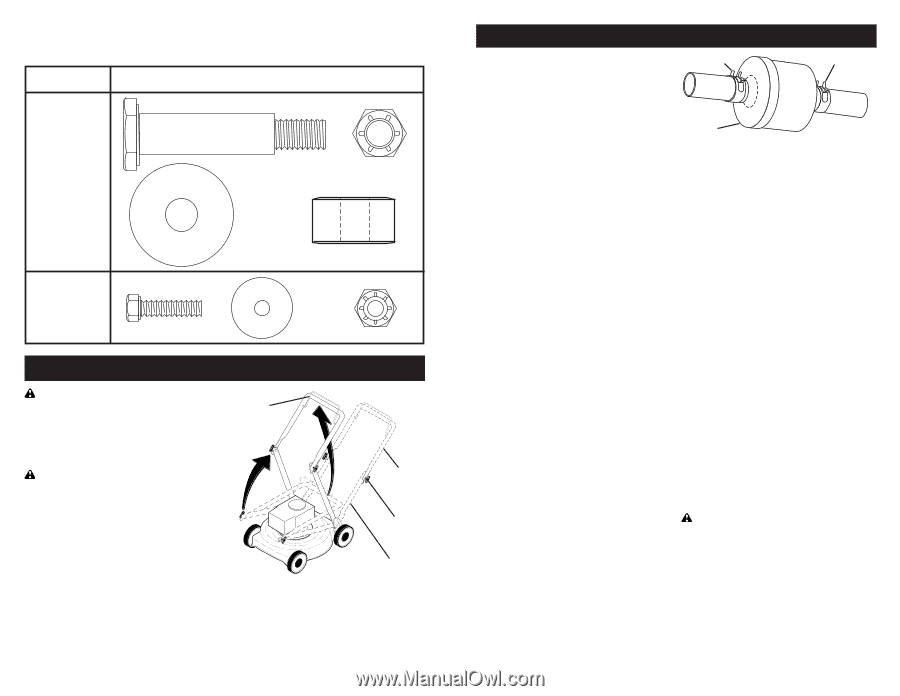
Parts Bag Contents
 |
View all Poulan PR120N20S manuals
Add to My Manuals
Save this manual to your list of manuals |
Page 6 highlights
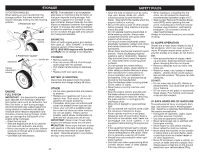
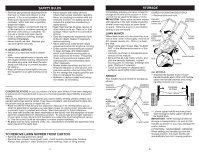
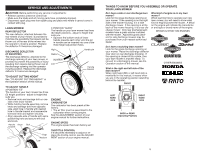
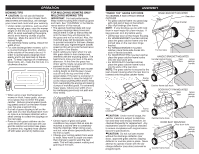
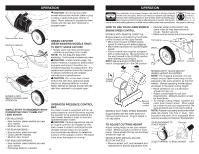
NOTE: Depending upon the features on the lawn mower model you purchased, all the parts shown may not be included with your mower. For ease of assembly, aside of your work area, lay out all hardware in the groups shown. ASSEMBLY LOCATION PARTS BAG CONTENTS (SHOWN ACTUAL SIZE) For models with bolt-on wheels only: WHEELS TO MOWER HOUSING (4) Shoulder Bolts 3/8-16 x 2-1/2 (4) Locknuts 3/8-16 (2) Washers 1-1/4" Dia. (4) Spacers GUARD TO MOWER HOUSING (2) Bolts 1/4-20 x 3/4 (2) Washers 3/4" Dia. (2) Locknuts 1/4-20 ASSEMBLY CAUTION: Do not operate this lawn Operator mower without the discharge deflector or presence an entire approved grass catcher in place. control bar These guards are for your protection and are LIFT required by the American National Standards UP Institute and Consumer Products Safety Commission. CAUTION: Disconnect spark plug wire LIFT from spark plug and place wire where it UP cannot come in contact with plug. MOWING POSITION Upper handle TOOLS REQUIRED FOR ASSEMBLY 1/2" Wrench Domed housing models only. HOW TO SET UP YOUR MOWER UNFOLD HANDLE IMPORTANT: Unfold handle carefully so as not to pinch or damage control cables. 2 POSITION / "ADJUSTABLE" HANDLES • Raise handles until lower handle section locks into place in operating position. Handle knob Lower handle 3 POSITION "EZ" HANDLES • Raise lower handle section to operating position and align hole in handle with one of three height positioning holes. • Insert handle bolt through handle and bracket and secure with knob. • Repeat for opposite side of handle. 6 MAINTENANCE TO CHANGE ENGINE OIL (SEE ENGINE MANUAL) • Be sure lawn mower is on level surface. • Oil will drain more freely when warm. • Catch oil in a suitable container. • For engines without dipstick, remove bottom oil drain plug. • For engines with oil fill cap/dipstick, remove bottom drain plug or remove engine oil cap and turn lawn mower on its side. NOTE: Before tipping lawn mower to drain oil, empty fuel tank by running engine until fuel tank is empty. • After oil has drained completely, replace oil drain plug and tighten securely. • Refill engine with oil. Pour slowly. Do not overfill. • Fill to top of slot inside of filler hole or to "FULL" line on dipstick on models so equipped. Keep oil at proper level. AIR FILTER Your engine will not run properly and may be damaged by using a dirty air filter. Clean the element after every 25 hours of operation or every season. Replace the air filter every 100 hours of operation or every season, whichever occurs first. Service air cleaner more often under dusty conditions. See the maintenance section of your engine manual. MUFFLER Inspect and replace corroded muffler as it could create a fire hazard and/or damage. IN-LINE FUEL FILTER (KOHLER or B&S PRO / ENDURANCE ENGINES ONLY) The fuel filter should be replaced once each season. If fuel filter becomes clogged, obstructing fuel flow to carburetor, replacement is required. 1. With engine cool, remove filter and plug fuel line sections. 2. Place new fuel filter in position in fuel line with arrow pointing towards carburetor. 3. Be sure there are no fuel line leaks and clamps are properly positioned. 4. Immediately wipe up any spilled gasoline. Clamp Clamp Fuel Filter SPARK PLUG Replace spark plug at the beginning of each mowing season or after every 100 hours of operation, whichever occurs first. Set spark plug gap according to engine manual specifications. CLEANING IMPORTANT: For best performance, keep mower housing free of grass build-up and trash. Clean the underside of your mower after each use. • Clean the underside of your lawn mower by scraping to remove buildup of grass and trash. • Clean engine often to keep trash from accumulating. A clogged engine runs hotter and shortens engine life. • Keep finished surfaces and wheels free of all gasoline, oil, etc. • With the exception of the water washout port (if equipped), we do not recommend using a garden hose to clean the outside of your lawn mower unless the electrical system, muffler, air filter and carburetor are covered to keep water out. Water in engine can result in shortened engine life. GRASS CATCHER (IF SO EQUIPPED) Grass catcher may be hosed with water but must be dry when used. CAUTION: Under normal usage, the catcher material is subject to deterioration and wear and should therefore be checked to ensure compliance with original manufacturer specifications. 19
-
 1
1 -
 2
2 -
 3
3 -
 4
4 -
 5
5 -
 6
6 -
 7
7 -
 8
8 -
 9
9 -
 10
10 -
 11
11 -
 12
12
 |
 |