Poulan PR120N20S Owner Manual - Page 8
Assembly, Maintenance
 |
View all Poulan PR120N20S manuals
Add to My Manuals
Save this manual to your list of manuals |
Page 8 highlights
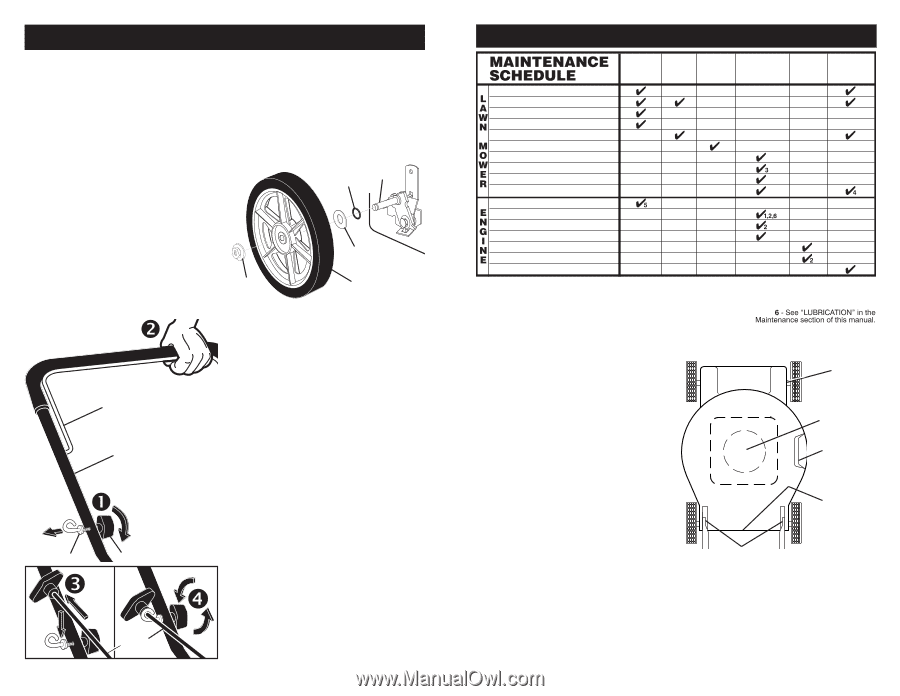
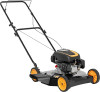
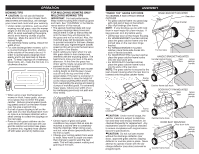
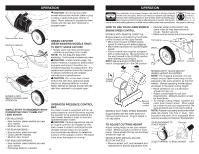
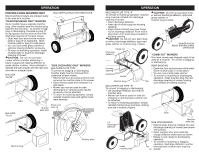
ASSEMBLY ALL HANDLES • Raise upper handle section into place on lower handle, remove protective padding and tighten both handle knobs. • Remove handle padding holding operator presence control bar to upper handle. • Your lawn mower handle can be adjusted for your mowing comfort. Refer to "ADJUST HANDLE" in the Service and Adjustments section of this manual. NOTE: For shipping purposes, the rear wheels on your lawn mower may not be adjusted to the same position as the front wheels. Before operating mower adjust all wheels to the same cutting height. INSTALL REAR WHEELS (HIGH WHEEL MOWERS ONLY) Some high wheel models require washers which will be provided in a parts bag. If provided, install washers on the axle first as shown. • Install one (1) rear wheel on the axle of rear wheel adjuster. • Install 3/8-16 locknut and tighten securely. • Repeat procedure for other rear wheel. Axle O-Ring INSTALL STARTER ROPE (MODELS EQUIPPED WITH T-KNOB) • Loosen T-knob. • Hold control bar against upper handle. • Slowly pull engine starter rope out until rope will slip into loop of rope guide. • Tighten T-knob. Flanged locknut Washer Wheel assembly Control bar Upper handle Rope guide T-Knob Engine starter rope ASSEMBLE GRASS CATCHER (REAR DISCHARGE MOWERS ONLY) IMPORTANT: If your model lawn mower is mulcher ready, the mulcher plate or plug must be removed before using mower as a bagger. To convert mower to bagging or discharging, see the Operation section in this manual. Look at the different grass catcher illustrations that follow. Determine which type of grass catcher you have and follow the appropriate instructions. 8 MAINTENANCE BEFORE EACH USE AFTER EACH USE EVERY 10 HOURS EVERY 25 HOURS OR SEASON EVERY 100 HOURS BEFORE STORAGE Check for Loose Fasteners Clean / Inspect Grass Catcher * Check Tires Check Drive Wheels *** Clean Lawn Mower **** Clean under Drive Cover *** Check Drive Belt / Pulleys *** Check / Sharpen / Replace Blade Lubrication Clean and Recharge Battery ** Check Engine Oil level Change Engine Oil Clean Air Filter Inspect Muffler Replace Spark Plug Replace Air Filter Paper Cartridge Empty fuel system or add Stabilizer * (if so equipped) ** Electric-Start mowers *** Power-Propelled mowers **** Use a scraper to clean under deck 1 - Change more often if operating under a heavy load or in high outdoor temperatures. 2 - Service more often if operating in dirty or dusty conditions. 3 - Replace blades more often when mowing in sandy soil. 4 - Charge 48 hours at end of season. 5 - And after each 5 hours of use. GENERAL RECOMMENDATIONS The warranty on this lawn mower does not cover items that have been subjected to operator abuse or negligence. To receive full value from the warranty, operator must maintain mower as instructed in this manual. Some adjustments will need to be made periodically to properly maintain your unit. All adjustments in the Service and Adjustments section of this manual should be checked at least once each season. • Once a year, replace the spark plug, clean or replace air filter element, and check blade for wear. A new spark plug and clean/new air filter element assures proper air-fuel mixture and helps your engine run better and last longer. • Follow the Maintenance Schedule in this manual. LUBRICATION CHART ➀ Wheel adjuster (on each wheel) ➁ Engine oil ➀ Side dis- charge mower deflector hinge rod ➀ Rear dis- charge mower rear door hinge rod BEFORE EACH USE • Check engine oil level. • Check for loose fasteners. ➀ Handle bracket mounting pins ➀ Spray lubricant ➁ See "ENGINE" in Maintenance section. LUBRICATION Keep unit well lubricated (See "LUBRICATION CHART"). IMPORTANT: Do not oil or grease plastic wheel bearings. Viscous lubricants will attract dust and dirt that will shorten the life of the self-lubricating bearings. If you feel they must be lubricated, use only a dry, powdered graphite type lubricant sparingly. 17
-
 1
1 -
2
-
 3
3 -
 4
4 -
 5
5 -
 6
6 -
 7
7 -
 8
8 -
 9
9 -
 10
10 -
 11
11 -
 12
12
 |
 |