ProForm 485 Instruction Manual - Page 5
Conditioning Guidelines, Warning, Assembly
 |
View all ProForm 485 manuals
Add to My Manuals
Save this manual to your list of manuals |
Page 5 highlights
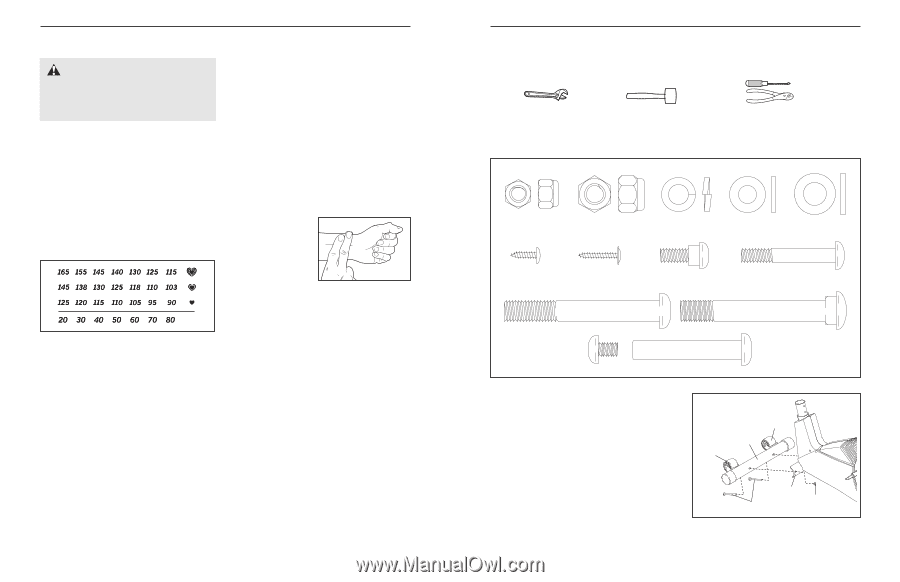
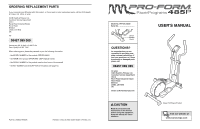
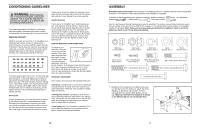
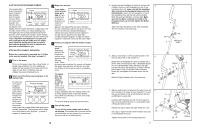
CONDITIONING GUIDELINES WARNING: Before beginning this or any exercise program, consult your physician. This is especially important for persons over the age of 35 or persons with pre-existing health problems. The following guidelines will help you to plan your exercise program. Remember that proper nutrition and adequate rest are essential for successful results. EXERCISE INTENSITY Whether your goal is to burn fat or to strengthen your cardiovascular system, the key to achieving the desired results is to exercise with the proper intensity. The proper intensity level can be found by using your heart rate as a guide. The chart below shows recommended heart rates for fat burning, maximum fat burning, and cardiovascular (aerobic) exercise. To find the proper heart rate for you, first find your age near the bottom of the chart (ages are rounded off to the nearest ten years). Next, find the three numbers above your age. The three numbers are your "training zone." The lowest number is the recommended heart rate for fat burning, the middle number is the recommended heart rate for maximum fat burning, and the highest number is the recommended heart rate for aerobic exercise. Burning Fat To burn fat effectively, you must exercise at a relatively low intensity level for a sustained period of time. During the first few minutes of exercise, your body uses easily accessible carbohydrate calories for energy. Only after the first few minutes of exercise does your body begin to use stored fat calories for energy. If your goal is to burn fat, adjust the intensity of your exercise until your heart rate is near one of the lower two numbers in your training zone as you exercise. Aerobic Exercise If your goal is to strengthen your cardiovascular system, your exercise must be "aerobic." Aerobic exercise is activity that requires large amounts of oxygen for prolonged periods of time. This increases the demand on the heart to pump blood to the muscles, and on the lungs to oxygenate the blood. For aerobic exercise, adjust the intensity of your exercise until your heart rate is near the highest number in your training zone. HOW TO MEASURE YOUR HEART RATE To measure your heart rate, first exercise for at least four minutes. Then, stop exercising and place two fingers on your wrist as shown. Take a six-second heartbeat count, and multiply the result by 10 to find your heart rate. For example, if your six-second heartbeat count is 14, your heart rate is 140 beats per minute. (A six-second count is used because your heart rate will drop rapidly when you stop exercising.) WORKOUT GUIDELINES Each workout should include the following three parts: A warm-up, consisting of 5 to 10 minutes of stretching and light exercise. A proper warm-up increases your body temperature, heart rate, and circulation in preparation for exercise. Training zone exercise, consisting of 20 to 30 minutes of exercising with your heart rate in your training zone. (During the first few weeks of your exercise program, do not keep your heart rate in your training zone for longer than 20 minutes.) A cool-down, with 5 to 10 minutes of stretching. This will increase the flexibility of your muscles and will help to prevent post-exercise problems. 12 ASSEMBLY Assembly requires two people. Place all parts of the elliptical trainer in a cleared area and remove the packing materials. Do not dispose of the packing materials until assembly is completed. In addition to the included hex keys, assembly requires a phillips screwdriver spanners , a rubber mallet , and a pair of pliers , two adjustable . Use the chart below to identify the small parts used in assembly. The number in parenthesis below each part is the key number of the part, from the PART LIST on page 14. The number after the key number is the quantity needed for assembly. Note: Some parts may have been pre-attached for shipping. If a part is not in the parts bag, check to see if it has been pre-attached. M8 Nylon Locknut (38)-6 M10 Nylon Locknut (33)-6 M10 Split Washer (59)-2 M8.5 Washer (35)-2 M10.5 Washer (55)-2 M4 x 12mm Screw (42)-4 M4 x 19mm Flange Screw (36)-6 M8 x 19mm Shoulder Screw (56)-2 M8 x 45mm Button Bolt (50)-4 M10 x 74mm Button Bolt (67)-2 M10 x 75mm Carriage Bolt (34)-4 Pedal Arm Bolt Set (40)-2 1. Identify the Front Stabiliser (10). Whilst another person lifts the front of the Frame (1), attach the Front Stabiliser to the Frame with two M10 x 75mm Carriage Bolts (34) and two M10 Nylon Locknuts (33). Make sure that the Front Stabiliser is turned so the Wheels (22) are not touching the floor. 1 22 22 10 1 33 34 5
-
 1
1 -
 2
2 -
 3
3 -
 4
4 -
 5
5 -
 6
6 -
 7
7 -
 8
8
 |
 |