ProForm 490 Spx Bike English Manual - Page 11
and Loop Fasteners 79. Press a Fastener onto
 |
View all ProForm 490 Spx Bike manuals
Add to My Manuals
Save this manual to your list of manuals |
Page 11 highlights
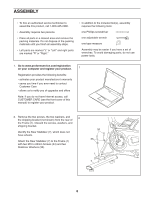
13. The Transmitter (81) requires two AAA batteries (not included); alkaline batteries are 13 recommended. Remove the battery cover from the front of the Transmitter (81), and insert batteries into the battery compartment. Make sure that the batteries are oriented as shown by the diagrams inside the battery compartment. Then, reattach the battery cover. IMPORTANT: From the top of the stabilizer, measure 11 1/2 in. (29 cm) along the Frame (1) as shown. The Transmitter (81) must be attached in this location. Remove the adhesive backing from the Hook and Loop Fasteners (79). Press a Fastener onto the Frame (1) in the indicated location. Orient the Transmitter (81) as shown. Press the other Fastener (79) onto the back of the Transmitter. Attach the Transmitter (81) to the Frame (1) using the Hook and Loop Fasteners (79). 14. Plug the Reed Switch (80) into the Transmitter (81). 14 Insert the other end of the Reed Switch (80) into the Clamp (82). Rotate the Flywheel (36) until the Magnet (84) is aligned with the end of the Reed Switch (80). Move the Reed Switch (80) so that the gap between the Reed Switch and the Magnet (84) is about 1/8 in. (3 mm). 1 79 81 Battery Cover 11.5”" (29 cm) Stabilizer 82 36 84 81 80 15. After the exercise bike is assembled, inspect it to make sure that it is assembled correctly and that it functions properly. Make sure that all parts are properly tightened before you use the exercise bike. Note: Extra parts may be included. Place a mat beneath the exercise bike to protect the floor. 11
-
 1
1 -
2
-
3
-
4
-
5
-
 6
6 -
 7
7 -
 8
8 -
 9
9 -
 10
10 -
 11
11 -
 12
12 -
 13
13 -
 14
14 -
 15
15 -
 16
16 -
17
-
18
-
19
-
20
-
21
-
22
-
23
-
24
 |
 |
