ProForm 545 Ekg Instruction Manual - Page 8
How To Use The Elliptical Trainer
 |
View all ProForm 545 Ekg manuals
Add to My Manuals
Save this manual to your list of manuals |
Page 8 highlights
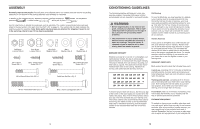
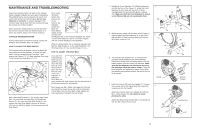
HOW TO USE THE ELLIPTICAL TRAINER HOW TO MOVE THE ELLIPTICAL TRAINER Stand in front of the elliptical trainer, hold the handlebars firmly, and place one foot against one of the wheels. Pull the handlebars until the elliptical trainer can be moved on the front wheels, and carefully move the elliptical trainer to the desired location. Then, place one foot against a wheel and lower the elliptical trainer. Due to the size and weight of the elliptical trainer, use extreme caution whilst moving and lowering it. Handlebar Pulse Sensor Handlebar Pedal Disk Pedal Wheel HOW TO EXERCISE ON THE ELLIPTICAL TRAINER To mount the elliptical trainer, firmly hold the pulse sensor and carefully step onto the pedal that is in the lowest position. Next, step onto the other pedal. Push the pedals until they begin to move with a continuous motion. Note: The pedal disks can turn in either direction. It is recommended that you turn the pedal disks in the direction shown by the arrow at the right; however, for variety, you may turn the pedal disks in the opposite direction. To dismount the elliptical trainer, allow the pedals to come to a complete stop. Note: The elliptical trainer does not have a free wheel; the pedals will continue to move until the flywheel stops. When the pedals are stationary, step off the highest pedal first. Then, step off the lowest pedal. The handlebars are designed to add upper-body exercise to your workouts. As you exercise, push and pull the handlebars to work your arms, shoulders, and back. To exercise only your lower body, hold the pulse sensor as you exercise. 8 HOW TO OPERATE THE CONSOLE Fan Button Display Buttons On/Reset Button Resistance Buttons The easy-to-use console offers a selection of features designed to help you get the most from your workouts. Follow the instructions below to operate the console. 1 Turn on the console. Note: The console requires four 1.5V "D" batteries. See assembly step 3 on page 5 for battery installation instructions. To turn on the console, press the On/Reset button (see the drawing above to identify the On/Reset button). Note: Moving the pedals is another way to turn on the console. 2 Begin pedaling and change the resistance of the pedals as desired. As you pedal, change the resistance of the pedals by pressing the + and - buttons below the large display. There are ten resistance levels- level 10 is the most challenging. Note: After the buttons are pressed, it will take a few seconds for the resistance to reach the selected setting. 3 Follow your progress with the small display and the large display. The small display will show your pedaling pace, Indicator Bar in revolutions per minute (RPM). The indicator bar in the small display will increase or decrease in length as you increase or decrease your pedaling pace. Note: When you use the handgrip pulse sensor, the small display will show your heart rate (see step 4 on page 10). The upper section of the large display will show the distance you have pedaled and the numbers of calories and fat calories you have burned (see FAT BURNING on page 13 for an explanation of fat calories). The display will change from one number to the next every few seconds. 9
-
 1
1 -
2
-
 3
3 -
 4
4 -
 5
5 -
 6
6 -
 7
7 -
 8
8
 |
 |
