ProForm 738 English Manual - Page 4
Assembly
 |
View all ProForm 738 manuals
Add to My Manuals
Save this manual to your list of manuals |
Page 4 highlights
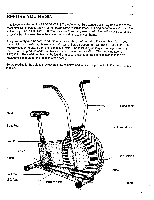
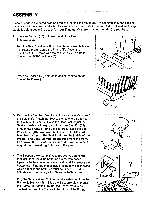
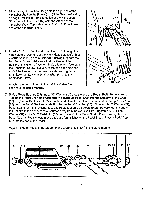
ASSEMBLY Place all parts in a cleared area and remove the packing materials. Do not dispose of the packing materials until the exercise bike is fully assembled and all parts are accounted for. Read each step carefully before beginning assembly. An 8" adjustable wrench (not included) Is required. 1. Press an Endcap (40) onto each end of the Rear Stabilizer (39). 6 Turn the Rear Stabilizer (39) so that the recessed holes in the Stabilizer are toward the Frame (1). Attach the 39 Stabilizer to the Frame with the two 5/16° x 2 1/2" Bolts (49) and two 5/16" Locknuts (6). 40 6 49 40 2. Press an Endcap (40) onto each end of the tube on the front of the Frame (1). 3. Remove the four 1/4" Seat Nuts (41) from the underside of the Seat (48). Attach the Seat to the top of the Seat Post (42) with the four Nuts. Raise the Seat Post, adjust the Seat to the desired height, and insert the Seat Pin (52) through the Frame (1) and the Seat Post. Slide the Seat Post Sleeve (43) down over the Frame. CAUTION: At leastIwo Inches of the Seat Post must be Inside of the Fra'the. The Seat Pin must be inserted from the front, as shown. If the Seat Pin Is inserted from the back, it may slip out, resulting In injury to the user. 4. The Electronic Monitor (46) requires two "AA" batteries (not included). Alkaline batteries are recommended. Open the battery cover as shown and carefully remove the battery clip. Find the marks inside the battery clip showing which direction the batteries must be turned. Insert the batteries into the battery clip. Close the battery cover. Plug the Sensor Wire (21) into the wire extending from the Electronic Monitor (46). Slide the Electronic Monitor onto the Frame (1). Make sure that the Sensor Wire is not 4 pinched between the Electronic Monitor and the Frame. 40 Gc 40 48 41 42 52 43 46 Battery Clip 46 L7 21
-
 1
1 -
 2
2 -
 3
3 -
 4
4 -
 5
5 -
 6
6 -
 7
7 -
 8
8 -
 9
9 -
 10
10 -
11
-
12
 |
 |
