ProForm 738 English Manual - Page 8
Trouble, Shooting, And Maintenance
 |
View all ProForm 738 manuals
Add to My Manuals
Save this manual to your list of manuals |
Page 8 highlights
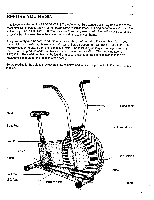
TROUBLE-SHOOTING AND MAINTENANCE ADJUSTING THE CHAIN The exercise bike features a precision chain which must be kept properly adjusted and lubricated. Apply a few drops of light multi-purpose oil to the chain every three months. If the chain is too tight, the bearings may be damaged; if the chain is too loose, the fan may be damaged. If the chain causes excessive noise or slips as you pedal, check the chain in the following manner: 1. Carefully pry the access cover off the right side shield. Reach into the access hole and press down on the chain. There should be no more than 1 Inch, and no less than • 1/4 Inch, of vertical movement In the center of the access cover chain. If the chain is properly adjusted, reattach the ac- cess cover; if the chain needs to be adjusted, see step 2. 2. Pry the access cover off the left side shield. Loosen the fan nuts (4). To tighten the chain, turn the adjustment nuts (8) clockwise; to loosen the chain, turn the adjustment nuts counterclockwise. Be sure the fan is straight, tighten the fan nuts and reattach the access covers. 4 O 8 ELECTRONIC MONITOR If the electronic monitor does not function properly, the batteries should be replaced. Most problems are the result of weak batteries. See assembly step 4 on page 4 for battery installation instructions. If the electronic monitor still does not function properly, the sensor wire should be checked. Slide the electronic monitor off the frame and make sure the sensor wire is plugged fully into the wire extending from the electronic monitor. TIGHTENING THE CRANK ARMS If the brank arms become loose, they should be tightened in order to prevent excessive wear. Loosen the hex nut on the left arm of the crank. Place the end of a standard screwdriver in one of the grooves in the crank nut. Lightly tap the screwdriver with a hammer to turn the crank nut counterclockwise until the crank arms are no longer loose. Do not overtighten the crank nut. When the crank nut is properly tightened, tighten the hex nut. left side shield crank nut hex nut TIGHTENING THE PEDALS if the pedals become loose, tighten the pedal shafts into the arms of the crank. Tighten the 1/2" locknuts onto the ends of the pedal shafts (see assembly step 7 on page 5). 8
-
 1
1 -
2
-
 3
3 -
 4
4 -
 5
5 -
 6
6 -
 7
7 -
 8
8 -
 9
9 -
 10
10 -
 11
11 -
 12
12
 |
 |
