ProForm 738 English Manual - Page 5
overtighten
 |
View all ProForm 738 manuals
Add to My Manuals
Save this manual to your list of manuals |
Page 5 highlights
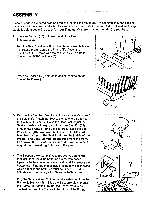
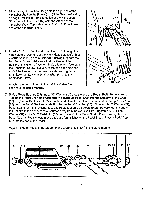
5. Slide the Right Handlebar (36) onto the right end of the handlebar shaft on the Frame (1). (Note: See the drawing on page 3 for the correct orientation of the Handlebars.) Slide the Left Handlebar (37) onto the left end of the handlebar shaft. Tap a Handlebar Pushnut (35) onto each end of the handlebar shaft. 36 37 35 3f f 6. Insert a 5/16" x 1 3/4" Handlebar Screw (13) through the hole near the lower end of the Right Handlebar (36). Slide a 5/16" Washer (5) and a Link Arm Bushing (47) onto the Handlebar Screw. Make sure that the flange of the Bushing is next to the Washer. Slide a Link Arm (26) onto the Handlebar Screw. Make sure that the opening in the end of the Link Arm is downward as shown. Tighten a 5/16" Locknut (6), with a 5/16" Washer (5), onto the Handlebar Screw. Attach the other Link Arm to the Left Handlebar (not shown) in the same manner. 36 5 26 47 6 5 13 7. Slide a Pedal Bushing (25) and a 1/2" Washer (24) onto the end of a Pedal Shaft (16) as shown. Turning the Pedal Shaft clockwise, firmly tighten the Pedal Shaft into the right arm of the Crank (18). Tighten a 1/2" Locknut (23) onto the end of the Pedal Shaft. Fit the end of the right Link Arm (26) onto the Pedal Shaft and slide it onto the Pedal Bushing (25). Slide an 11/16" Washer (27), Pedal Spring (28), 5/8" Washer (29) and Pedal (30) onto the Pedal Shaft. Be sure that the end of the Pedal with the deepest hole is turned away from the exercise bike. Tighten a 5/16" Pedal Washer (31) and a 5/16" Pedal Nut (32) onto the end of the Pedal Shaft. Do not overtighten the Pedal Nut; the Pedal should move back and forth slightly on the Pedal Shaft. Press a Pedal Cap (33) into the end of the Pedal. Attach the other Pedal to the left arm of the Crank (not shown) in the same manner. 33 32 31 30 29 28 27 26 16 25 24 18 23 (j.11 3) 5
-
 1
1 -
 2
2 -
 3
3 -
 4
4 -
 5
5 -
 6
6 -
 7
7 -
 8
8 -
 9
9 -
 10
10 -
 11
11 -
12
 |
 |
