ProForm 800 English Manual - Page 10
Using the Weight Bench
 |
View all ProForm 800 manuals
Add to My Manuals
Save this manual to your list of manuals |
Page 10 highlights
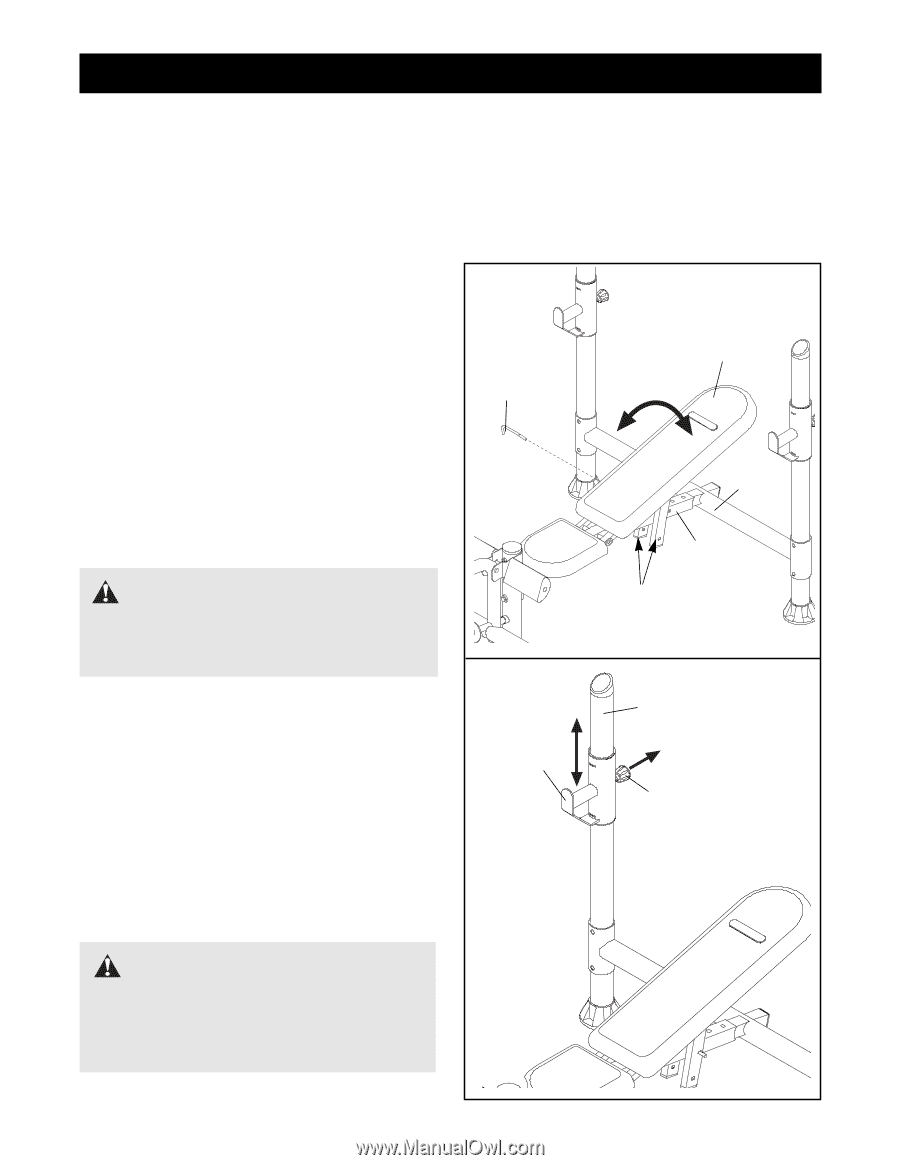
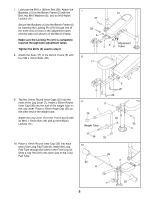
Using the Weight Bench The weight bench is designed to be used with your own weight set (not included). The steps below explain how the weight bench can be adjusted. See EXERCISE GUIDELINES on page 11 for important exercise information and refer to the accompanying exercise poster to see the correct form for several exercises. Refer also to the exercise information accompanying your weight set (not included) for additional exercises. Inspect and tighten all parts each time you use the weight bench. Replace any worn parts immediately. The weight bench can be cleaned with a damp cloth and a mild, non-abrasive detergent. Do not use solvents. ADJUSTING THE BACKREST The Backrest (12) can be used in a decline position, a flat position, or two incline positions. To use the Backrest in the decline position, remove the Locking Pin (27) and lay the Backrest on the Crossbar (2). To use the Backrest (12) in the flat position, lift the 27 Backrest and insert the Locking Pin (27) through the top set of holes in the adjustment tubes and the Bench Frame (5). To use the Backrest (12) in an incline position, lift the Backrest and insert the Locking Pin (27) through one of the bottom two sets of holes in the adjustment tubes and the Bench Frame (5). 12 2 5 WARNING: When using the Backrest (12) in an inclined position, make sure that the Locking Pin (27) is inserted com- pletely through both adjustment tubes. Adjustment Tubes ADJUSTING THE WEIGHT RESTS To adjust the Weight Rests (19), unscrew the Large Adjustment Knob (21) counterclockwise, and pull it out of the Weight Rest, allowing the Weight Rest to slide up or down the Upright (1) to the desired position. Reinsert the Large Adjustment Knob, so that it locks it into a hole in the Upright and screw it clockwise until tight. 1 19 21 WARNING: Always set both Weight Rests (19) at the same height. Make sure that the Large Adjustment Knobs (21) are inserted completely and tightened into the Uprights (1). 10
-
 1
1 -
2
-
3
-
4
-
 5
5 -
 6
6 -
 7
7 -
 8
8 -
 9
9 -
 10
10 -
 11
11 -
 12
12 -
 13
13 -
 14
14 -
 15
15 -
16
-
17
-
18
-
19
 |
 |