ProForm C70 Owners Manual - Page 3
ProForm C70 Manual
 |
View all ProForm C70 manuals
Add to My Manuals
Save this manual to your list of manuals |
Page 3 highlights
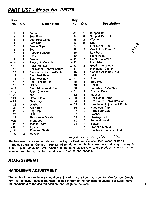
1. Set the bike in a clear area on the floor and remove all packing materials. Make sure that all parts are included before disposing of the carton. 2. Carefully position the Frame (1) as shown, and attach the Rear Leg (22) to the Frame with two Allen Bolts (24) and Washers (23). 3. Rest the Frame (1) on the Seat Post Base (14) as shown and attach the Front Leg (28) to the Frame with two Allen Bolts (24) and Washers (23). Stand the bike upright on the Legs. 4. Place the Seat (6) on the Seat Post (2). Slip the Rubber Bellows (7) over the two rear bolts on the underside of the Seat and attach the Seat with the three Seat Nuts (4). 5. Slide the Seat Post Guide (3) into the Seat Post Base (14). Insert the Seat Post (2) into the Seat Post Base. Pull the Rubber Bellows (7) down over the Seat Post and Seat Post Base. Be sure that the Seat Locking Pin (16) protrudes through the hole in the Bellows. Press the bottom edge of the Bellows into the Body (8). 6. Screw the Seat Adjustment Knob (18) onto the Seat Locking Pin (16). Pull the Knob out, lower the Seat Post to the desired height, and engage the Locking Pin in one of the holes in the Seat Post. 7. Attach the Handlebar Clamp (44) to the Frame (1) with two Bolts (57) and Washers (58). 8. Insert the Carriage Bolt (59) through the Handlebar Clamp (44) and Frame (1). Place the Spacer (61) on the Bolt and attach the Handlebar Adjustment Knob (55). 9. Secure the Resistance Control (13) on to the Fascia (9) with the three Screws (12). Plug the Monitor Wire (29) into the jack on the back of the Electronic Console (10). Set the Fascia (9) in the Frame (1) and secure it with the two Fascia Clips (5). 10. Attach the Crank Arm Covers (38) to the Right and Left Crank Arms (19, 37). Thread the Pedal marked "Left" (39) counterclockwise into the Left Crank Arm (37). Thread the pedal marked "Right" (40) clockwise into the Right Crank Arm (19). Tighten firmly. 2 22 2 34 1 0 00 , 3 23 24 28---- -/ 1 4 4 14 7 • 2 I i 1 6 5,6 2 14 8 7 3 lc) \\ N. \%' 'o--- '- 7,8 55
-
 1
1 -
 2
2 -
 3
3 -
 4
4 -
 5
5 -
 6
6 -
 7
7 -
 8
8
 |
 |
