ProForm Crosswalk Fit 415 Treadmill English Manual - Page 12
Locate the Latch Pin Assembly 68. Remove
 |
View all ProForm Crosswalk Fit 415 Treadmill manuals
Add to My Manuals
Save this manual to your list of manuals |
Page 12 highlights
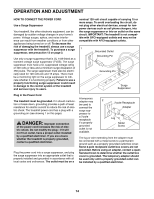
11. Orient the Latch Housing (67) so that the large hole is on the indicated side. Attach the Latch Housing to the Left Upright (66) with two #10 x 3/4" Screws (8); start both Screws, and then tighten them. Locate the Latch Pin Assembly (68). Remove the knob from the pin. Make sure that the collar and the spring are on the pin. (Note: If there are two collars, place one on each side of the spring.) Next, insert the pin into the Latch Housing (67). Then, tighten the knob onto the pin. 11 68 67 Knob 8 Large Hole Spring Collar Pin 66 12. Attach the Left and Right Tray Brackets (83, 84) to the Uprights (66, 76) with four #8 x 3/4" 12 Screws (4). 83 4 66 84 4 76 12
-
 1
1 -
2
-
3
-
4
-
5
-
6
-
 7
7 -
 8
8 -
 9
9 -
 10
10 -
 11
11 -
 12
12 -
 13
13 -
 14
14 -
 15
15 -
 16
16 -
 17
17 -
18
-
19
-
20
-
21
-
22
-
23
-
24
-
25
-
26
-
27
-
28
-
29
-
30
-
31
-
32
 |
 |

12
11
11.
Orient the Latch Housing (67) so that the
large hole is on the indicated side.
Attach the
Latch Housing to the Left Upright (66) with two
#10 x 3/4" Screws (8);
start both Screws, and
then tighten them.
Locate the Latch Pin Assembly (68). Remove the
knob from the pin. Make sure that the collar and
the spring are on the pin. (Note: If there are two
collars, place one on each side of the spring.)
Next, insert the pin into the Latch Housing (67).
Then, tighten the knob onto the pin.
67
8
66
Knob
Spring
Large Hole
Pin
Collar
68
12
12. Attach the Left and Right Tray Brackets (83,
84) to the Uprights (66, 76) with four #8 x 3/4"
Screws (4).
84
4
4
66
83
76