ProForm Endurance 420e Instruction Manual - Page 8
Tip: Avoid pinching the Main Wire 48. Avoid
 |
View all ProForm Endurance 420e manuals
Add to My Manuals
Save this manual to your list of manuals |
Page 8 highlights
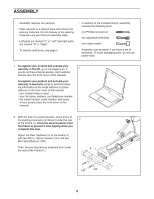
5. Orient the Upright (4) as shown. Have a second person hold the Upright near the Frame (1). 5 Next, locate the wire tie (A) in the lower end of the Upright (4). Tie the wire tie to the Main Wire (48) as shown in the inset drawing. Then, pull the upper end of the wire tie until the Main Wire is routed through the Upright. Tip: To prevent the Main Wire (48) from falling into the Upright (4), secure the Main Wire with the wire tie (A). A A 48 4 A 1 48 6. Tip: Avoid pinching the Main Wire (48). Avoid damaging the indicated plastic tabs (B). Set the Upright (4) on the Frame (1). Attach the Upright (4) with four M10 x 25mm Screws (92) and four M10 Split Washers (105); start all the Screws, and then tighten them. 6 48 Avoid pinching the Main Wire (48) and avoid damaging the tabs (B) 4 92 105 92 105 1 B 8
-
 1
1 -
2
-
 3
3 -
 4
4 -
 5
5 -
 6
6 -
 7
7 -
 8
8 -
 9
9 -
 10
10 -
 11
11 -
 12
12 -
 13
13 -
14
-
15
-
16
-
17
-
18
-
19
-
20
-
21
-
22
-
23
-
24
-
25
-
26
-
27
-
28
-
29
-
30
-
31
-
32
 |
 |
