ProForm Xp Thinline 480 Elliptical Canadian English Manual - Page 9
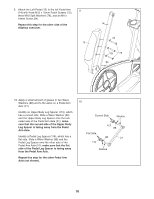
Upper Body Leg onto the Pivot Axle 16. Attach
 |
View all ProForm Xp Thinline 480 Elliptical manuals
Add to My Manuals
Save this manual to your list of manuals |
Page 9 highlights
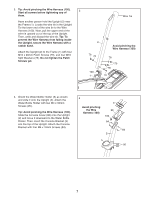
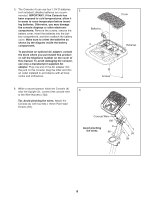
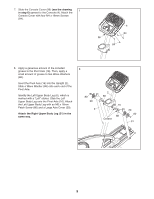
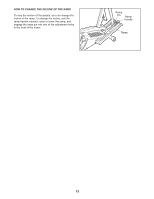
7. Slide the Console Cover (96) (see the drawing in step 6) upward to the Console (4). Attach the 7 Console Cover with four M4 x 16mm Screws (84). 4 84 96 84 8. Apply a generous amount of the included grease to the Pivot Axle (16). Then, apply a small amount of grease to two Wave Washers (88). Insert the Pivot Axle (16) into the Upright (2). Slide a Wave Washer (88) onto each end of the Pivot Axle. Identify the Left Upper Body Leg (6), which is marked with a "Left" sticker. Slide the Left Upper Body Leg onto the Pivot Axle (16). Attach the Left Upper Body Leg with an M6 x 16mm Patch Screw (80) and a Large Axle Cover (20). Attach the Right Upper Body Leg (31) in the same way. 8 80 20 6 2 88 16 88 Grease 20 80 31 9
-
 1
1 -
2
-
3
-
 4
4 -
 5
5 -
 6
6 -
 7
7 -
 8
8 -
 9
9 -
 10
10 -
 11
11 -
 12
12 -
 13
13 -
 14
14 -
15
-
16
-
17
-
18
-
19
-
20
-
21
-
22
-
23
-
24
-
25
-
26
-
27
-
28
 |
 |

9
8
7
7.
Slide the Console Cover (96)
(see the drawing
in step 6)
upward to the Console (4). Attach the
Console Cover with four M4 x 16mm Screws
(84).
96
84
84
4
8.
Apply a generous amount of the included
grease to the Pivot Axle (16). Then, apply a
small amount of grease to two Wave Washers
(88).
Insert the Pivot Axle (16) into the Upright (2).
Slide a Wave Washer (88) onto each end of the
Pivot Axle.
Identify the Left Upper Body Leg (6), which is
marked with a “Left” sticker. Slide the Left
Upper Body Leg onto the Pivot Axle (16). Attach
the Left Upper Body Leg with an M6 x 16mm
Patch Screw (80) and a Large Axle Cover (20).
Attach the Right Upper Body Leg (31) in the
same way.
80
20
6
88
16
88
31
20
80
2
Grease