Pyle GDV123GR User Manual - Page 3
Waterproof Case
 |
View all Pyle GDV123GR manuals
Add to My Manuals
Save this manual to your list of manuals |
Page 3 highlights
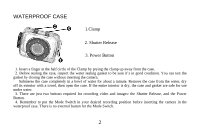
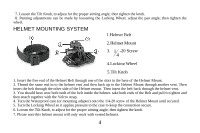
WATERPROOF CASE 1.Clamp 2. Shutter Release 3. Power Button 1. Insert a finger at the half circle of the Clamp by prying the clamp up away from the case. 2. Before sealing the case, inspect the water sealing gasket to be sure it's in good condition. You can test the gasket by closing the case without inserting the camera. Submerse the case completely in a bowl of water for about a minute. Remove the case from the water, dry off its exterior with a towel, then open the case. If the entire interior is dry, the case and gasket are safe for use under water. 3. There are just two buttons required for recording video and images: the Shutter Release, and the Power Button. 4. Remember to put the Mode Switch in your desired recording position before inserting the camera in the waterproof case. There is no external button for the Mode Switch. 2
-
 1
1 -
 2
2 -
 3
3 -
 4
4 -
 5
5 -
 6
6 -
 7
7 -
 8
8 -
 9
9 -
10
-
11
-
12
-
13
-
14
-
15
-
16
-
17
-
18
-
19
-
20
-
21
-
22
-
23
-
24
 |
 |
