Pyle GDV123GR User Manual - Page 5
Helmet Mounting System
 |
View all Pyle GDV123GR manuals
Add to My Manuals
Save this manual to your list of manuals |
Page 5 highlights
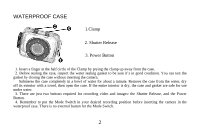
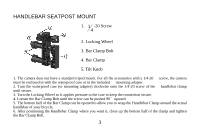
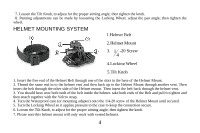
7. Loosen the Tilt Knob, to adjust for the proper aiming angle; then tighten the knob. 8. Panning adjustments can be made by loosening the Locking Wheel, adjust the pan angle; then tighten the wheel. HELMET MOUNTING SYSTEM 1.Helmet Belt 2.Helmet Mount 3. 1 -20 Screw 4 4.Locking Wheel 5.Tilt Knob 1. Insert the free end of the Helmet Belt through one of the slots in the base of the Helmet Mount. 2. Thread the same end in to the helmet vent and then back up to the Helmet Mount through another vent. Then insert the belt through the other side of the Helmet mount. Then insert the belt back through the helmet vent. 3. You should have now both ends of the belt inside the helmet. take both ends of the Belt and pull to tighten and then attach together with the Velcro strap. 4. Turn the Waterproof case (or mounting adapter) onto the 1/4-20 screw of the Helmet Mount until secured. 5. Turn the Locking Wheel so it applies pressure to the case to keep the connection secure. 6. Loosen the Tilt Knob, to adjust for the proper aiming angle; then tighten the knob. 7. Please note this helmet mount will only work with vented helmets. 4
-
 1
1 -
 2
2 -
 3
3 -
 4
4 -
 5
5 -
 6
6 -
 7
7 -
 8
8 -
 9
9 -
 10
10 -
 11
11 -
12
-
13
-
14
-
15
-
16
-
17
-
18
-
19
-
20
-
21
-
22
-
23
-
24
 |
 |
