Pyle GDV123GR User Manual - Page 4
Handlebar Seatpost Mount
 |
View all Pyle GDV123GR manuals
Add to My Manuals
Save this manual to your list of manuals |
Page 4 highlights
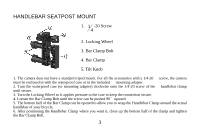
HANDLEBAR SEATPOST MOUNT 1. 1 -20 Screw 4 2. Locking Wheel 3. Bar Clamp Bolt 4. Bar Clamp 5. Tilt Knob 1. The camera dose not have a standard tripod mount. For all the accessories with a 1/4-20 screw, the camera must be enclosed in with the waterproof case or in the included mounting adapter. 2. Turn the waterproof case (or mounting adapter) clockwise onto the 1/4-20 screw of the handlebar clamp until secure. 3. Turn the Locking Wheel so it applies pressure to the case to keep the connection secure. 4. Loosen the Bar Clamp Bolt until the screw can be pushed 90°upward. 5. The bottom half of the Bar Clamp can be opened to allow you to wrap the Handlebar Clamp around the actual handlebar of your bicycle. 6. After positioning the Handlebar Clamp where you want it, close up the bottom half of the clamp and tighten the Bar Clamp Bolt. 3
-
 1
1 -
 2
2 -
 3
3 -
 4
4 -
 5
5 -
 6
6 -
 7
7 -
 8
8 -
 9
9 -
 10
10 -
11
-
12
-
13
-
14
-
15
-
16
-
17
-
18
-
19
-
20
-
21
-
22
-
23
-
24
 |
 |
