Pyle PAD15MXU Instruction Manual - Page 3
Operating Elements And Connections, Applications
 |
View all Pyle PAD15MXU manuals
Add to My Manuals
Save this manual to your list of manuals |
Page 3 highlights
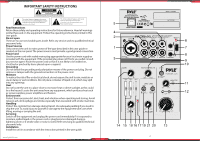
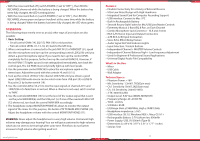
OPERATING ELEMENTS AND CONNECTIONS 1. MIC/LINE IN: This combined jack can be used to connect mono signal such as XLR microphone or 1/4" line level. Note: A. Please choose balanced cable and MIC to connect. Do not use the unbalanced ones. When the unit is powered on, remember not to connect the high level signal to XLR Mic In, which may damage the unit. B. At the XLR jack, a phantom power of +18V is always present. 2. Stereo input LINE IN (RCA jacks) to connect an audio source with line signal level (e.g. CD player) to channel CH2/ 3 . 3. Stereo input 2-TK (RCA jacks) to connect stereo line signal level sources. 4. Stereo outputs MAIN MIX (RCA jacks) to connect the input of an amplifier or a recorder. 5. USB port (type B) to connect a computer or power supply unit with USB connection. When operating the mixer with a computer, it is possible to use this port as an audio output (output of the mixed signal) and as an audio input (feed- in of audio data to be reproduced via channel LINE/USB) 6. Power/ Charge LED ON/ CHARGE Not lighting up: During battery operation of the unit and when the unit switched OFF and connected to a power supply and the battery is fully charged. Red light: When the unit is switched OFF and connected to a power supply and the battery is being charged. Shows red and green (=yellow): When the unit is switched ON and connected to a power supply and the battery is being charged Green light: When the unit is switched ON and connected to a power supply and the battery is fully charged 7. POWER Switch 8. HEADSET Connections (MIC/PHONES) Note: Headset connected to the built-in microphone must be connected MIC IN and PHONES in order to avoid unnecessary noise. The audio input is sent to channel 1. 9. Echo Control to adjust the Echo e ect component for channel CH1 10. 2TK/ET Control Switch: This is the assign control of 2TK input and Bluetooth input. When this control is engaged, the signal of 2TK/ET will be assigned to MONITOR (8). When the controls disengaged, the signal of2TK/BT Will be Assigned to MAIN MIX (4) and USB (5). 3 www.PyleUSA.com 11. Volume Control MONITOR/PHONES for the headphone output MONITOR/ PHONES (8). 12. Overload LEDs CLIP for the stereo output signal adjusted with the control MAIN MIX (l4). 13. MAIN MIX Control to set the level of the output signal sent via the outputs MAIN MIX (4) and the USB port (5). 14. Control GAIN for channel CH1 to set the input amplification. 15. High frequency control HI and low frequency control LO for channel CH1. 16. PAN This is the panorama control or balanced control. This control is us ed for stereo e ect field of the signal. Set this control in middle position, signal level of Channel L & R will be same. When the control is set to top stop, only Channel L receives the signal, Channel R can not. Vice versa l7. PEAK LED This is clip LED indicator of CH1 level. When this LED illuminates, it means that PFL CH1 level is clipped. 18. Control LEVEL for channel CH1. 19. From LINE IN/ USB Play source selector switch.: Pushing the button in, the signal of channel LINE/U SB comes from USB PLAY(computer); When the switch is disengaged, signal will be from RCA jacks of channel 2/ 3. 20. LINE/USB switch assigns signal to Main Mix or Monitor (Phones). 21. Control LEVEL for channel LINE/USB APPLICATIONS This compact 5-channel audio mixer with USB interface is suited for universal applications, e. g. For audio recording on the computer. The mono input channel allows to connect a (phantom-powered) microphone; The stereo input channel allows to connect an audio source with line signal level. In addition, the mixer is provided with connections for a recorder and headphones. The mixed signal is sent to the output via a RCA jacks and the USB port. It is also possible to use the USB port as an input to transfer audio data from the computer to the mixer. When connecting the mixer to a computer, power is supplied via the USB connection. When operating the mixer without a computer, either use a suitable power supply unit with USB connection to operate the mixer. 4
-
 1
1 -
 2
2 -
 3
3 -
 4
4 -
 5
5
 |
 |
