Pyle PAD15MXU Instruction Manual - Page 5
Operation
 |
View all Pyle PAD15MXU manuals
Add to My Manuals
Save this manual to your list of manuals |
Page 5 highlights
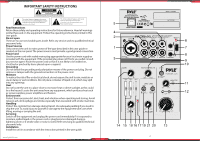
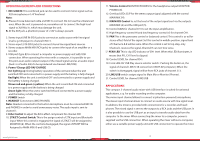
• With the mixer switched o [ switch POWER (7) set to "OFF" ] , the LED ON / RECHARGE shows red while the battery is being charged. When the battery has been fully charged, the LED is extinguished. • With the mixer switched on [ switch POWER (7) set to "ON" ] , the LED ON/ RECHARGE shows green and green (=yellow) at the same time while the battery is being charged. When the battery has been fully charged, the LED show green. OPERATION The following steps merely serve as an aid, other ways of procedure are also possible: 1. Basic Setting • Set all control GAIN (14), EQ (15), PAN (16) to mid-position. • Turn all control LEVEL (1 l, 13, 18, 21) back to the left stop. 2. When a microphone is connected to the jack MIC IN (1) of HEADSET ( 8 ), speak into the microphone and turn up the corresponding control LEVEL(l 8) until you obtain a good microphone signal. If you need to turn up the control LEVEL completely for this purpose, further turn up the control GAIN(14). However, if the led PEAK (17) lights up and is not extinguished immediately, turn back the control gain, The led PEAK must only briefly light up with level peaks. 3. Use the panorama control PAN(16) to place the microphone signal on the stereo base. Adjust the sound with the controls HI and L0 (15). 4. Turn up the control LEVEL(21) for channel LINE/USB until you obtain a good input. LINE [USB audio source can be select come from USB port (5) or LINE IN Rca jacks (2) by button switch (19). 5. Use the controls LEVEL (18, 21) to mix the input signals of channels CH1 and LINE/USB or to fade them in and out. When a channel is not used, set it's control to "MIN". 6. Use the controls MAIN MIX (13) to set the level of the output signal that is sent via the jacks MAIN MIX(4) and the USB port (5). If one of the overload LEDs CLIP (12) shows red, turn back the control MAIN MIX accordingly. 7. The headphone output MONITOR/PHONE (S) allows to monitor the output signal of the mixer. For this purpose, the button 2TK TO MAIN MIX/ PHONE (10). Adjust the headphone volume with the control MONITOR/PHONES (11). WARNING: Never adjust the headphones to a very high volume. Permanent high volumes may damage your hearing! Your ear will get accustomed to high volumes which do not seem to be that high after some time. Therefore, do not further increase to high volume after getting used to it. 7 www.PyleUSA.com Features: • Flexible Connectivity for a Variety of External Devices • Ultra-Low Noise Design with High Headroom • Integrated Sound Card for Computer Recording Support • USB Interface: Connect to Mac / PC • Built-In Rechargeable Battery • Smooth Rotary-Style Faders for Mic/USB/Line/Master Controls • Extremely Musical 2-Band EQ & Pan, on Each Channel • Combo Microphone Jack Connector - XLR and 3.5mm • RCA (L/R) Stereo Input and Output Connectors • 2-TK RCA (L/R) Input Connectors • Voice Echo E ect/Delay Feature • Audio Signal CLIP LED Indicator Lights • Input Selection / Control Buttons • Independent Channel + MASTER Volume Controls • Independent Channel Balance/High + Low Frequency Adjustment • Used for Beginner & Professional Sound Applications • Universal Digital Audio File Compatibility What's in the Box: • Mixer • USB Cable • Wall Adapter Technical Specs: • Phantom Power: +18V • Mic Sensitivity: 1.3mV/1.7KΩ(Gain max) • Ch.1 Sensitivity: 5mV/12KΩ(Gain max) • Ch. 2/3 Sensitivity: 260mV/16KΩ • 2-TK: 300mV/22KΩ • Output Level: 5.8V max (MAIN; MONITOR) • Frequency Range: 20 -21000 Hz • T.H.D.: ≤0.05% • S/N Ratio: 81dB • EQ Range: Bass ±15dB/80Hz, High ±15dB/12kHz • Headphone impedance: ≥16Ω • USB Interface: SB 2.0, Windows 98SE+, Macc OS 9.1+ • Rechargeable Battery: 3.7V Lithium Ion, 600mAh • Power Supply: USB, 5V/500mA (Type-B) • Dimensions (L x W x H): 3.97'' x 5.31'' x 1.77'' - inches • Sold as: Unit 8
-
 1
1 -
 2
2 -
 3
3 -
 4
4 -
 5
5
 |
 |
