Pyle PAD15MXU Instruction Manual - Page 4
Operation Setting, Operation With A Computer, Operation With Power Supply Unit, Charging The Battery
 |
View all Pyle PAD15MXU manuals
Add to My Manuals
Save this manual to your list of manuals |
Page 4 highlights
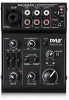
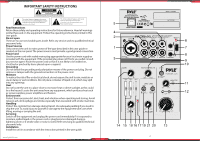
OPERATION SETTING Prior to connection/disconnection and prior to each switching on, the output controls MONITOR lPHONES (11) and MAIN MIX (13) should be turned back to "min". 1. As audio sources, microphones and/or audio sources with line signal level (e.g. e ect units, musical instruments, players) can be connected to the five input channels. Mono Channels CH1 Combined XLR/6.35mm jack are available as inputs (1) • Connect microphones to the balanced XLR jack or HEADSET jacks The XLRjack (CH1) and 3 .Smmjack (HEADSET MIC IN) always supplies a +18V phantom power and it thus suitable for a condenser Microphone operated with this phantom power. Caution! Do not connect a microphone with unbalanced output via XLR plug; it may be damaged by the phantom power. • Connect mono sources with line level to the 6.35jack. • Do not use both CH1 Input (l)-MIC IN and HEADSET (8)-MIC IN. 2. The input LINE IN (2) of the stereo channel LINE/U SB allows to connect an audio source with line signal level (e.g. CD player) via RCA plugs: L= left channel, R= right channel. 3. The input 2TK (3) of the stereo channel allows to connect an audio source with line signal level (e.g. Recorder , MP3 player...e.t.c) 4. The 3.5mm jack MONITOR/PHONES (8) allows to connect stereo headphones (impedance 16 ohm). Thus, you will be able to monitor the output signal or the input signal of the jacks 2TK (3) via headphones. 5. At the stereo MAIN MIX(4), the output signal adjusted with the MAIN MIX. control (13) is present. This output allows to connect an ampli er or a second mixer via a RCA plug. OPERATION WITH A COMPUTER When operating the mixer with a computer, either use the audio software supplied with the operating system or an audio software installed additionally. Various programs for audio reproduction/ recording are available on the internet free of charge. 5 www.PyleUSA.com 1. Start the computer. Connect the USB port (5) to a USB connection on the computer via the USB cable provided. Switch on the mixer with the switch POWER (7) [position ON]. The LED ON/CHARGE (6) lights up according to the battery charge status (chapter 3.3). 2. The computer recognizes the USB interface of the mixer as an external device for audio input and audio output, e.g. as "USB Ear Microphone" . depending on the operating system. The required drivers (standard drivers of the operating system) are available on the computer. Note: If not all drivers required are available on the computer, install them, e.g. via the original CD of the operating system. Restart the computer after installation, if necessary. 3. Open the reproduction/ recording program and make the required settings for audio reproduction via the mixer or audio recording from the mixer (user manual of the program). If it is not possible to record or reproduce any sound, make sure to activate the USB interface for audio input or audio output in the system settings of the operating system of the computer. Hint: If the mixer is connected to a computer and to any units GND via their mains cables (e.g. ampli ers), there may be hum noise due to ground loops. To eliminate this noise, connect the mixer to the corresponding unit via a ground isolator. OPERATION WITH POWER SUPPLY UNIT Via its USB connection, the power supply unit must provide an output voltage of 5V and an output current of 500mA. Connect the power supply unit to the USB port (5) via the USB cable provided, then connect it to a mains socket. Switch on the mixer with the switch POWER (7) [position ON]. The LED ON (6) lights Up. CHARGING THE BATTERY / BATTERY OPERATION To ensure the maximum operating time (approx 4 hours) when the mixer is operated via the integrated rechargeable lithium-ion battery, fully charge the battery prior to operation. Connect the USB port (5) to a computer (chapter 3.1) or to a power supply unit ( chapter 3.2). The LED ON/CHARGE (6) shows the charge status and operating mode: 6
-
 1
1 -
 2
2 -
 3
3 -
 4
4 -
 5
5
 |
 |
