Pyle PHDVR40 PHDVR40 Manual 1 - Page 6
Getting Started
 |
View all Pyle PHDVR40 manuals
Add to My Manuals
Save this manual to your list of manuals |
Page 6 highlights
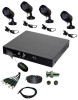
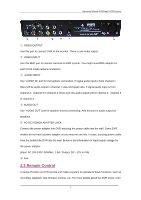
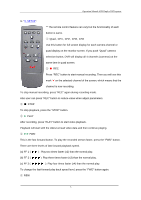
Operation Manual-4CH Duplex DVR system This is the rewind button. To play the recorded stream backward, press the "REW" button. [NOTE]: The fast forward and reverse playback speeds will vary depending on the frame rate and record quality settings, as well as the number of channels recorded PAUSE To pause the video playback, press the "PAUSE" button. Then the video displaying will be stopped. To continue playback, push the "PLAY" button. ⑧ MENU It displays menu option or go back to the previous. ⑨ UP(▲) / DOWN(▼) To change a menu field, use the "UP" or "DOWN" buttons. ⑩ SEL/EDIT Use this button to change values on main menu or sub menu setting. Press this button to increase value. 3. GETTING STARTED Install a hard disk drive into your DVR. Connect DVR to monitor. Connect cameras (up to 4) to DVR. Connect other peripheral devices (mouse, USB Drive) if necessary. Plug the power cord into the power jack on the wall. Connect the power adapter into DVR to turn on the DVR. Start TV Monitoring and Recording. ¨ Make sure that a hard disk drive and camera(s) are properly installed. ¨ The hard disk (IDE HDD) jumper setting must be set to "master " jumper setting. ¨ After installation of hard drive, the hard drive drawer must be locked with key. ¨ If the power is turned off while recording (i.e. a power failure), the DVR will enter "Power Recovery" modes at start up, detect that it has been shut down, and then 6
-
 1
1 -
 2
2 -
 3
3 -
 4
4 -
 5
5 -
 6
6 -
 7
7 -
 8
8 -
 9
9 -
 10
10 -
 11
11 -
 12
12 -
13
-
14
-
15
-
16
-
17
-
18
-
19
-
20
-
21
-
22
-
23
-
24
-
25
-
26
-
27
-
28
-
29
-
30
-
31
 |
 |
