Pyle PLDVRCAM25 User Manual - Page 5
G-SENSOR, Digital Zoom, Tire Pressure Alarm, Impact / Parking Monitor Mode, Charger, System Settings - manual
 |
View all Pyle PLDVRCAM25 manuals
Add to My Manuals
Save this manual to your list of manuals |
Page 5 highlights
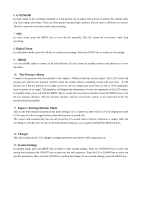
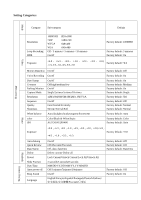
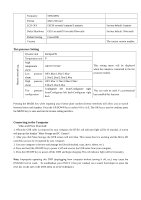
6. G-SENSOR In video mode, if the car brakes suddenly or is hit heavily, the G-sensor will activate to prevent the current video clip from being overwritten. There are three grades settings (high, medium, low) to cater to different car owners. This file cannot be overwritten while loop recording. 7. SOS In video mode, press the MENU key to save the file manually. This file cannot be overwritten while loop recording. 8. Digital Zoom In video/photo mode, press the UP key to zoom in on an image. Press the DOWN key to zoom out of an image. 9. HDMI Use your HDMI cable to connect to an HD television. Put the camera in standby mode to take photos or to view the video. 10. Tire Pressure Alarm Connect a tire pressure detection module to the camera‟s USB port and turn on the camera. The LCD screen will prompt you with the tire pressure interface when the camera detects something wrong with your tires. It will inform you if the tire pressure is too high or too low, the tire temperature is too hot or cold, or if the transmitter has low power or no signal. This interface will display the information of each tire separately on the LCD screen. In standby mode, press and hold the MENU key to access the tire pressure interface. Press the MENU key to exit the tire pressure interface. The tire pressure interface will not work if the camera is not connected to the tire pressure detection module. 11. Impact / Parking Monitor Mode Turn on the Park Monitor function in the menu settings. If it is turned on, there will be a P icon displayed on the LCD screen (it will no longer be there when this function is turned off). The camera will automatically turn on and record for 10 seconds when it detects vibrations or impact (after the recording, it will shut off). To turn on the Park Monitor function, you can press and hold the MODE button. 12. Charger This unit contains an AC Car Charger to charge and power your device while using your car. 13. System Settings In standby mode, press the MENU key in order to enter system settings. Press the UP/DOWN key to select the setting item and press the ON/OFF key to enter into the sub-categories. Press the UP or DOWN key to select the specific parameters; then, press the ON/OFF to confirm the change. To exit system settings, press the MENU key.
-
 1
1 -
 2
2 -
 3
3 -
 4
4 -
 5
5 -
 6
6 -
 7
7 -
 8
8 -
 9
9
 |
 |
