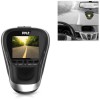
Pyle PLDVRCAM25 User Manual - Page 7
Tire pressure Setting, Connecting to the Computer
 |
View all Pyle PLDVRCAM25 manuals
Add to My Manuals
Save this manual to your list of manuals |
Page 7 highlights
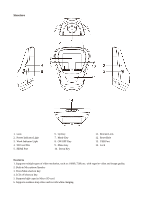
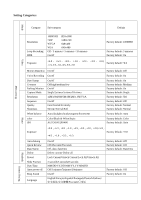
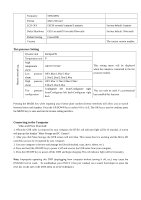
Frequency Format LCD OFF 50Hz/60Hz Micro SD card Off/30 seconds/1 minute/3 minutes Delay Shutdown Off/5 seconds/10 seconds/30seconds Default Setting Version Cancel/OK Factory default: 1minute Factory default: 30seconds The current version number Tire pressure Setting Pressure unit Bar/kpa/PSI Tire pressure setting Temperature unit High temperature alarm Low pressure alarm High pressure alarm Tire pressure configuration F° Off/70°/75°/80° Off/1.8bar/1.9bar/2.0bar/ 2.1bar/2.2bar/2.3bar/2.4bar Off/2.6bar /2.7bar/2.8bar/2.9bar/ 3.0bar/3.1bar/3.2bar Configurate left front/Configurate right front/Configurate left back/Configurate right back This setting menu will be displayed when the camera is connected to the tire pressure module. This can only be used if a professional has installed this function Pressing the MODE key while inputting your license plate number (license interface) will allow you to switch between letters and numbers. Press the UP/DOWN key to select 0-9 or A-Z. The OK key is used to confirm; press the MENU key to save and exit the license setting interface. Connecting to the Computer Video and Photo Download: 1. When the USB cable is connected to your computer, the DVR‟s red indicator light will be lit (steady). A screen will pop up that display "Mass Storage and PC Camera". 2. After you click Mass Storage, the DVR screen will turn blue. This means that it is working and the Micro SD card disk can now be recognized by your computer. 3. Use your computer to browse and manage the files (download, copy, move, delete, etc.) 4. Press and hold the ON/OFF key to power it off and remove the USB cable from your computer. 5. Press the ON/OFF key to power off the DVR and begin charging. The red indicator light will be lit (steady). Note: Improperly operating this DVR (unplugging from computer without turning it off, etc.) may cause the DVR/SD Card to crash. To troubleshoot your DVR if it has just crashed, use a small, hard object to press the reset key on the side of the DVR (Item 12 of the Schematic).
-
 1
1 -
 2
2 -
 3
3 -
 4
4 -
 5
5 -
 6
6 -
 7
7 -
 8
8 -
 9
9
 |
 |
