Pyle PLMRB38B Instruction Manual - Page 2
Installation
 |
View all Pyle PLMRB38B manuals
Add to My Manuals
Save this manual to your list of manuals |
Page 2 highlights
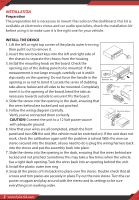
INSTALLATION Preparation The preparation kit is necessary to mount the radio on the dashboard, this kit is available at electronics stores and car audio specialists, check the installation kit before using it to make sure it is the right one for your vehicle. INSTALL THE DEVICE 1. Lift the left or right top corner of the plastic outer trim ring then pull it out to remove it. 2. Insert the two bracket keys into the left and right side of the chassis to separate the chassis from the housing. 3. Install the mounting knob on the board. Check the opening size of the sliding panel to be mounted. If the measurement is not large enough, carefully cut it until it slips easily on the opening. Do not force the handle in the opening so as not to bend it. Locate the series of dubbing tabs above, below and all sides to be mounted. Completely insert it to the opening of the board, bend the tabs as necessary towards outside to ensure it ts the board. 4. Slide the stereo into the opening in the dash, ensuring that the wires behind are tucked and not pinched. 5. Follow the wiring diagram carefully. Verify you've connected them correctly. CAUTION! Connect the unit to a 12 Volt power source with adequate ground. 6. Now that your wires are all completed, attach the front panel and turn ON the unit (the vehicle must be switched on). If the unit does not work, check the calibration again until the problem is solved. With the new car stereo secured into the bracket, all you need to do is plug the wiring harness back into the stereo and put the assembly back into place. 7. Slide the stereo into the opening in the dash, ensuring that the wires behind are tucked and not pinched. Sometimes this may take a few times when the vehicle has a tight dash opening. Tuck the wires back into an opening behind the unit. 8. Install the plastic outer trim ring 9. Snap all the pieces of trim back into place over the stereo. Double check that all screws and trim pieces are securely in place.Try out the new stereo. Turn the car power on again and play around with the stereo and its settings to be sure everything is in working order. 2 www.PyleUSA.com
-
 1
1 -
 2
2 -
 3
3 -
 4
4 -
 5
5 -
 6
6 -
 7
7 -
 8
8 -
9
-
10
-
11
-
12
-
13
-
14
-
15
-
16
 |
 |
