RCA 75330 User Guide - Page 6
General Controls, Display, Clock & Timer
 |
View all RCA 75330 manuals
Add to My Manuals
Save this manual to your list of manuals |
Page 6 highlights
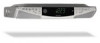
General Controls BAND RADIO ON - Turns on the radio, selects radio bands (AM/FM/TV) MEMO RECALL - Recalls preset radio stations. OFF - Turns off the unit. EN MUTE - Mutes sound. VOLUME + / - - Adjusts volume PLAY/PAUSE - Starts and Pauses disc playback. STOP - Stops disc playback. TRACK TUNE - Tunes down radio frequency, selects the previous TV and weather channel, selects previous CD disc tracks, searches backwards through a track, counts backwards for setting clock and timer. TRACK TUNE - Tunes up radio frequency, selects the next TV and weather channel, selects next CD disc tracks, searches forward through a track, counts forwards for setting clock and timer. CD MODE - Selects among CD playback modes. TIMER - Turns timer on / off. Inserting Batteries into Remote Control The remote control must be inserted with 2 "AAA" batteries (not included) prior use. Follow the steps below to ensure correct installation. 1. Slide the battery compartment lid open by pushing it in the direction shown by the arrow on the back of the remote control. 2. Before inserting the batteries, observe the polarities (that is, + and -) of the batteries, then relate the polarities to the engraved diagram inside the battery compartment. Now insert the batteries. 3. After installation of the batteries, replace and fit the lid to cover the batteries. You should hear a small "CLICK" sound when the lid is locked in place. 7 Display Playback modes: Shuffle, repeat track, repeat disc In CD mode, shows track number; In tuner mode, shows memory location. CH Channel indicator in TV mode Weather Band TV Band Bass AM/PM time indicator indicator Wx TV Volume EN Volume indicator In clock setting mode indicator Countdown timer indicator Radio Time/ countdown time / Radio frequency band radio frequency unit Clock & Timer Setting the Time The time display has a 12-hour format with AM and PM indicator. To set the time: 1. Press SET to enter time setting mode. The red Clock icon will appear on the display. 2. To set clock time, use the TRACK / SEARCH / TUNE / buttons to select the correct time. Press and hold to fast forward or fast reverse clock time. 3. Press SET again to save clock time. The red Clock icon will turn off. Setting the Countdown Timer 1. Press TIMER ON/OFF to enter timer setting mode. The red TIMER icon will flash on the display. 2. To select countdown time, use the TRACK / SEARCH / TUNE / buttons to select the correct time. Press and hold to fast forward or fast reverse countdown time. 3. Press TIMER ON/OFF again to activate the timer. The unit will beep twice to indicate countdown has started. The red TIMER icon will remain lit during countdown. 4. Press TIMER ON/OFF to turn timer off at any time or after it has sounded. Tips: In standby mode, press TRACK / SEARCH / TUNE / to show the seconds counter. Note: The radio or CD player is muted when alarm turns on. 8
-
 1
1 -
 2
2 -
 3
3 -
 4
4 -
 5
5 -
 6
6 -
 7
7 -
 8
8 -
 9
9 -
 10
10
 |
 |
